The Cutting Edge Project Kit is Here!
Hello Spellbinders’ and FSJ fans! Our Cutting Edge Project Kit is here!
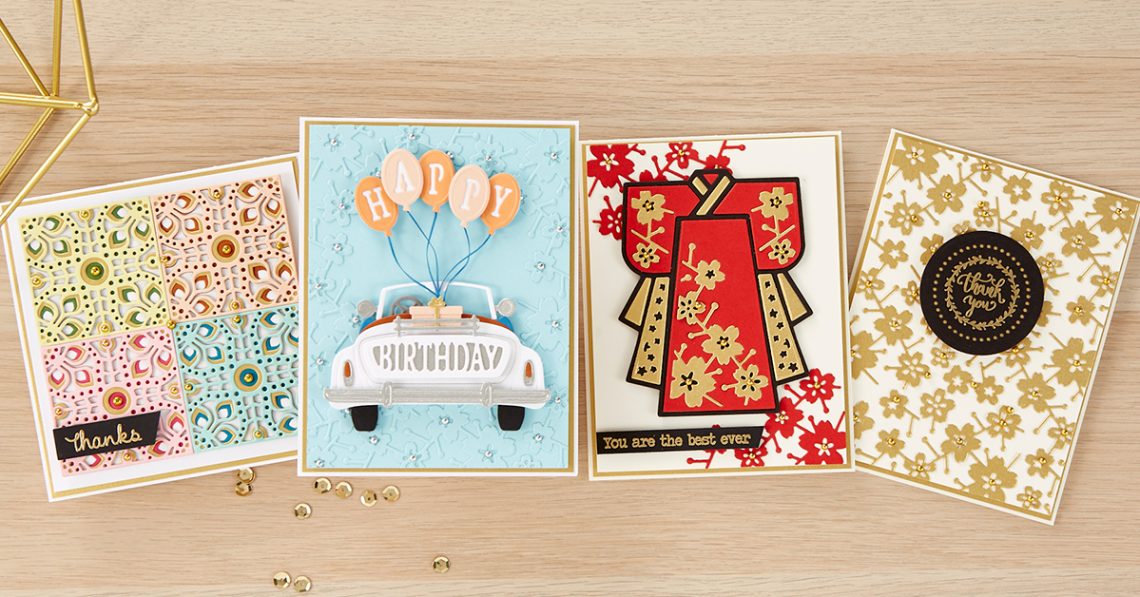
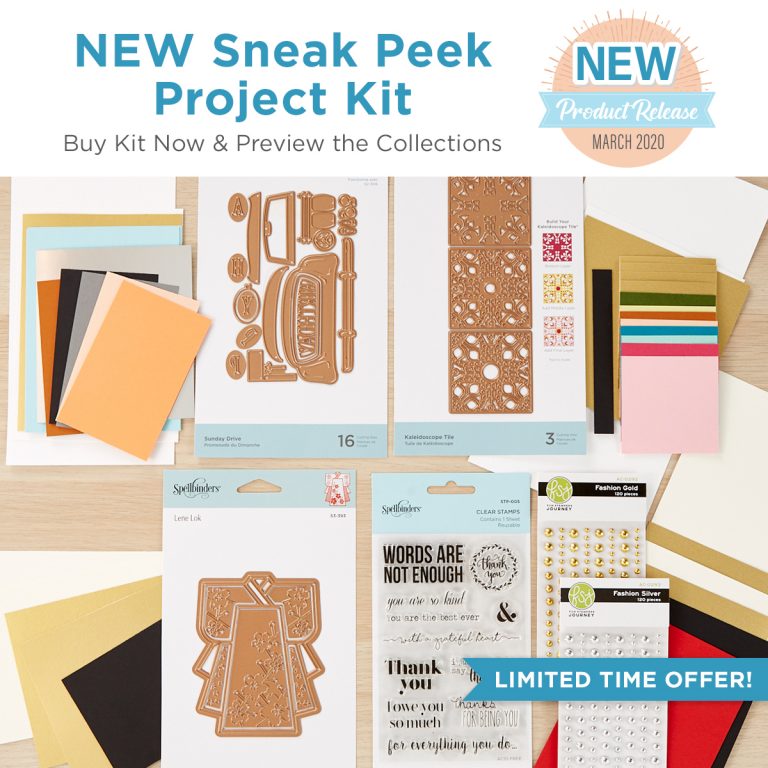
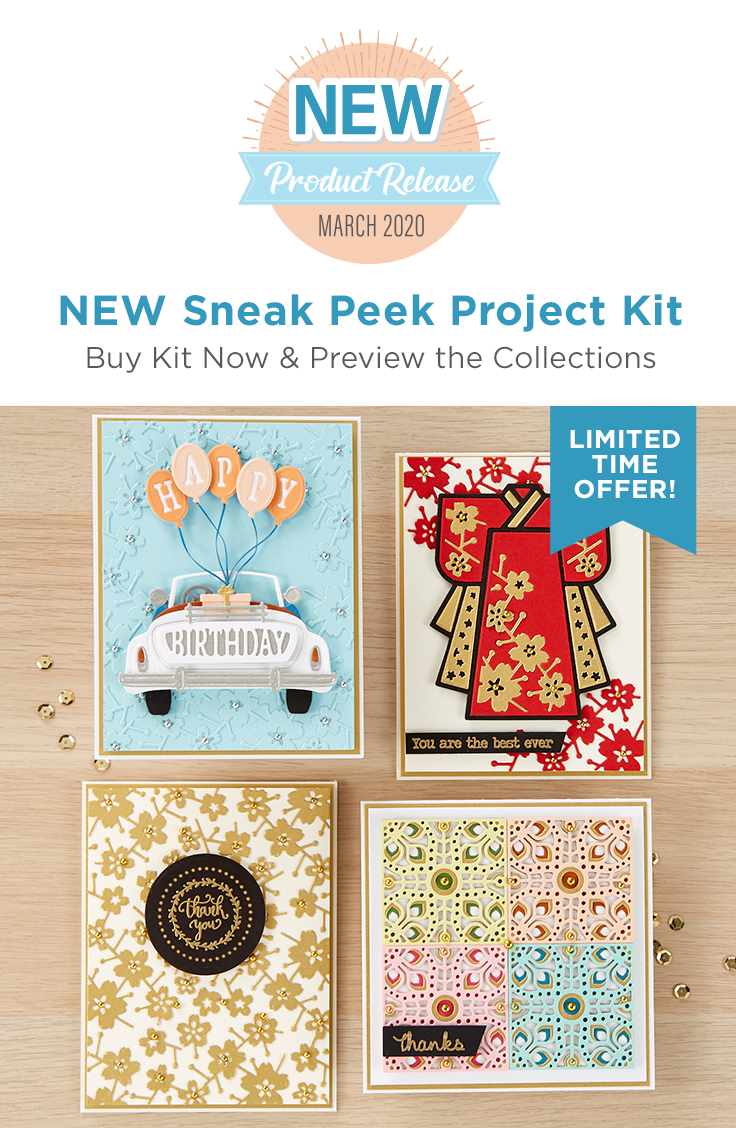
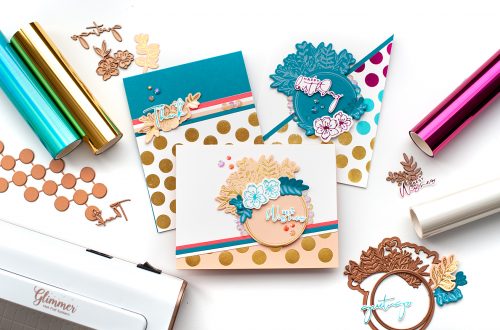
This Cutting Edge Project Kit is the perfect way to get your hands on early products from the upcoming March Collections. This kit comes with an assortment of THREE new die sets, a clear sentiment stamp set, and a card making project kit to make FOUR cards.
Also included are full color instructions and an online Video Tutorial. You will be guided through every step of the way as your create die cut projects.
Included in Project Kit:
- S3-393 Kimono
- S4-1044 Kaleidoscope Tile
- S4-1053 Sunday Drive
- Sentiment Clear Stamp Set (will vary)
- Kit Materials to create FOUR Cards
Happy Birthday Card
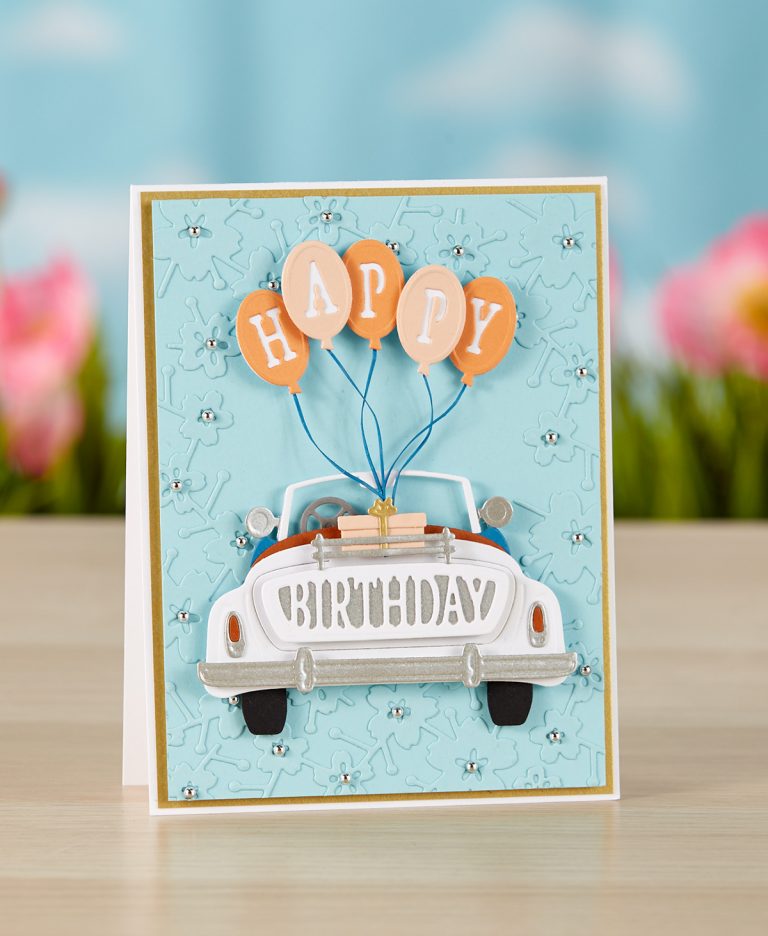
Finished Size: 4 1/4” x 5 1/2”
Instructions:
- Create an A2 top fold card base with Whip Cream cardstock, adhere Brush Gold panel to card front.
- Back Pool Play cardstock panel with adhesive using White Liner sheet; using the large insert from the Kimono set die cut flower sprig from adhesive backed Pool Play cardstock to create a border relief pattern. If needed, use smaller inserts and trim sprigs to create border, trim pieces that extend over panel edge, add panel to card front.
- Die cut car pieces as shown in photo above from Whip Cream, Catalina Splash, Black Licorice, Pumpkin Bread, Brush Silver, River Stone cardstock and assemble.
- Die cut sentiment from Whip Cream and back with Brush Silver, adhere to car.
- Die cut solid balloon bases from Whip Cream cardstock and layer with die cut alphabet balloons from colored card stock (Orange Creamsicle and Peaches & Cream), adhere together.
- Using a paper trimmer, trim thin strips of paper from Catalina Splash to look like string, adhere to back of balloons.
- Die cut car rack and present from Peaches & Cream, Brush Silver and Brush Gold cardstock and assemble.
- Add balloons to card front with foam squares, attach strings to back of car so the present will cover ends of strings.
- Adhere present and car rack to car.
- Embellish using Fashion Silver dots.
Supplies:
DIES: Sunday Drive S4-1053, Kimono S3-393. CARDSTOCK: Black Licorice CS-0003, Journey Brush Silver CS-0135, Journey Brush Gold CS-0134, Whip Cream CS-0040, Pool Play CS-0092, River Stone CS-0094, Catalina Splash CS-0114, Pumpkin Bread CS-0098, Orange Creamsicle CS-0024, Peaches & Cream CS-0144. ACCESSORIES: Fashion Silver AC-0293. TOOLS: Tool ‘n One T-001. BASIC SUPPLIES: White Liner Sheets AD-0113, White Line Tape AD-0001, Easy Glide Permanent Adhesive Runner AD-0081, Journey Foam Squares Small AD-0084, Journey Foam Squares Medium AD-0085 Journey Craft Glue AD-0111, Crease Tool TO-0040.
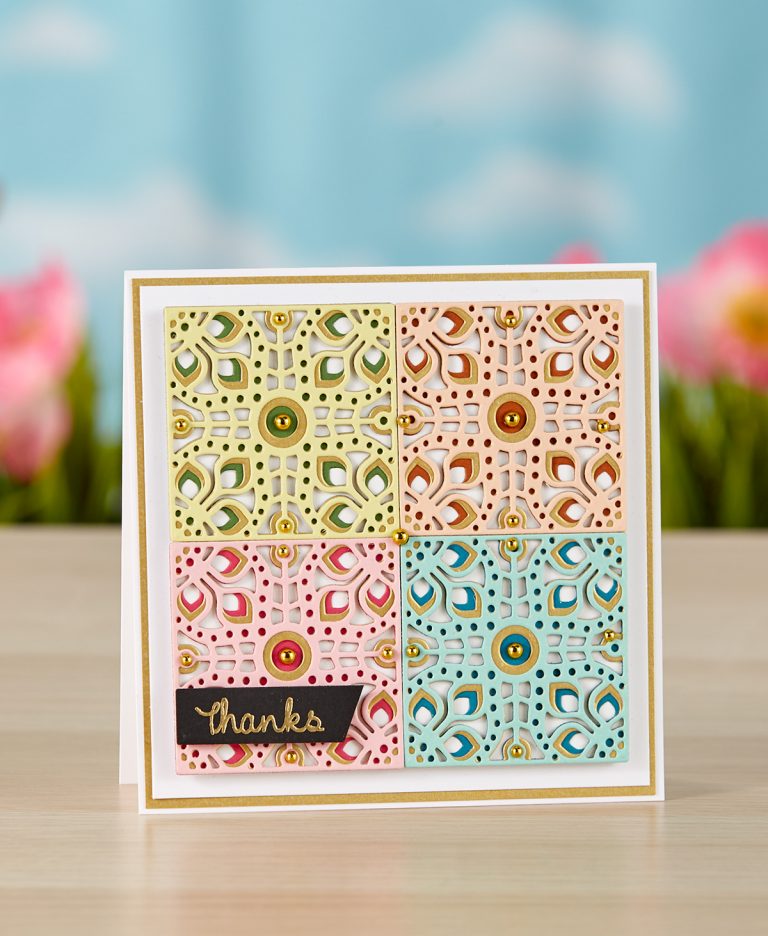
Kaleidoscope Thank You Card
Finished Size: 4 3/4” x 4 3/4”.
Instructions:
- Create a 4 3/4” x 4 3/4” top fold card base with Whip Cream cardstock, adhere Brush Gold cardstock panel and Whip Cream cardstock panel.
- Trim four 2” x 2” squares from Whip Cream cardstock .
- Add White Liner adhesive sheet to Pumpkin Spice cardstock and die cut base layer of tile, back with trimmed Whip Cream cardstock from step 2.
- Add White Liner adhesive sheet to Brush Gold cardstock, die cut second layer and adhere to top of base layer.
- Back Peaches & Cream with White Liner adhesive sheet and die cut, adhere to top of 2nd layer to complete tile; repeat 3 times with remaining colors.
- Adhere completed squares to card front using foam squares.
- Stamp “Thanks FOR BEING YOU” (mask “FOR BEING YOU” with washi tape) with Clear Pigment ink on Black Licorice cardstock (use sentiment stamp of your choice; stamp sets vary) Remove tape, stamp and heat emboss with Journey Gold embossing powder on Black Licorice cardstock, trim sentiment and add to card front with foam squares.
- Embellish with Fashion Gold dots.
Supplies:
DIES: Kaleidoscope Tile S4-1044; STAMP SET: Words Are Not Enough STP-005 (Stamp set may vary); INK & EMBOSSING POWDER: Journey Gold Embossing Powder IP-0101, Clear Pigment Ink IP-0102; CARDSTOCK: Black Licorice CS-0003, Journey Brush Gold CS-0134, Whip Cream CS-0040, Pool Play CS-0092, Sweet Pear CS-0095, Bubble Gum CS-0099, Peaches & Cream CS-0144, Blue Lagoon CS-0004, Kiwi Slice CS-0016, Pumpkin Spice CS-0098, Sweet Berry CS-0034; ACCESSORIES: Fashion Gold AC-0292 TOOLS: Tool ‘n One T-001; BASIC SUPPLIES: White Liner Sheets
AD-0113, White Liner Tape AD-0001, Easy Glide Permanent Adhesive Runner AD-0081, Journey Foam Squares Medium AD-0085, Journey Craft Glue AD-0111, Crease Tool TO-0040, Washi Tape or Clear Tape.
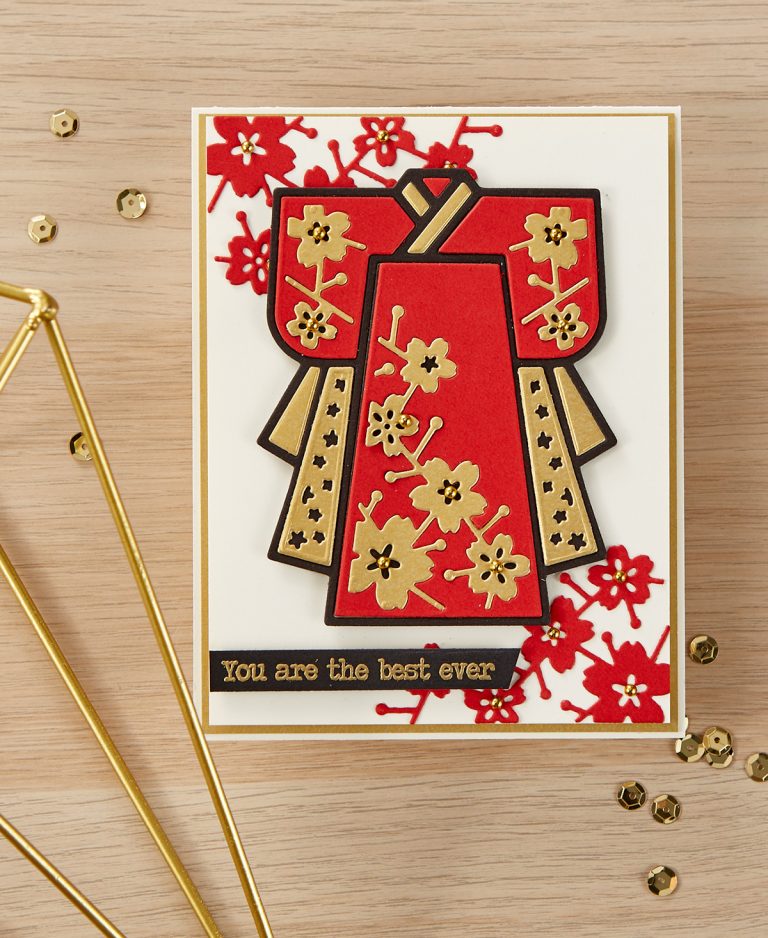
You Are The Best Ever Card
Finished Size: 4 1/4” x 5 1/2”
Instructions:
- Create an A2 top fold card base with Buttercream cardstock, adhere Brush Gold panel to card front.
- Back Cranberry Bliss, Brush Gold and Black Licorice cardstock with White Liner adhesive sheets and die cut using a combination of Kimono frame die and inserts to create a layered Kimono topper.
- Working on top of wax paper or non-stick sheet add strips of white liner tape to back of die cut Kimono frame, trim excess tape that extends beyond edges; assemble Kimono and decorative card panel.
- Using foam squares, adhere decorative panel to card front.
- Peel back some of the white liner backing and add foam squares, adhere Kimono to card front.
- Heat emboss sentiment on Black Licorice cardstock with Clear Pigment ink and Journey Gold embossing powder, trim to size and adhere to card (use sentiment stamp of your choice; stamp set may vary).
- Embellish with Fashion Gold dot.
Supplies:
DIES: Kimono S3-393; STAMP SET: Words Are Not Enough STP-005 (Stamp set may vary); INK & EMBOSSING POWDER: Journey Gold Embossing Powder IP-0101, Clear Pigment Ink IP-0102; CARDSTOCK: Cranberry Bliss CS-0090, Black Licorice CS-0003, Buttercream CS-0006, Journey Brush Gold CS-0134 ACCESSORIES: Fashion Gold AC-0292 TOOLS: Journey Heat Tool TO-0083; BASIC SUPPLIES: White Liner Sheets AD-0113, White Line Tape AD-0001, Easy Glide Permanent Adhesive Runner AD-0081, Journey Foam Squares Medium AD-0085, Journey Craft Glue AD-0111, Crease Tool TO-0040.
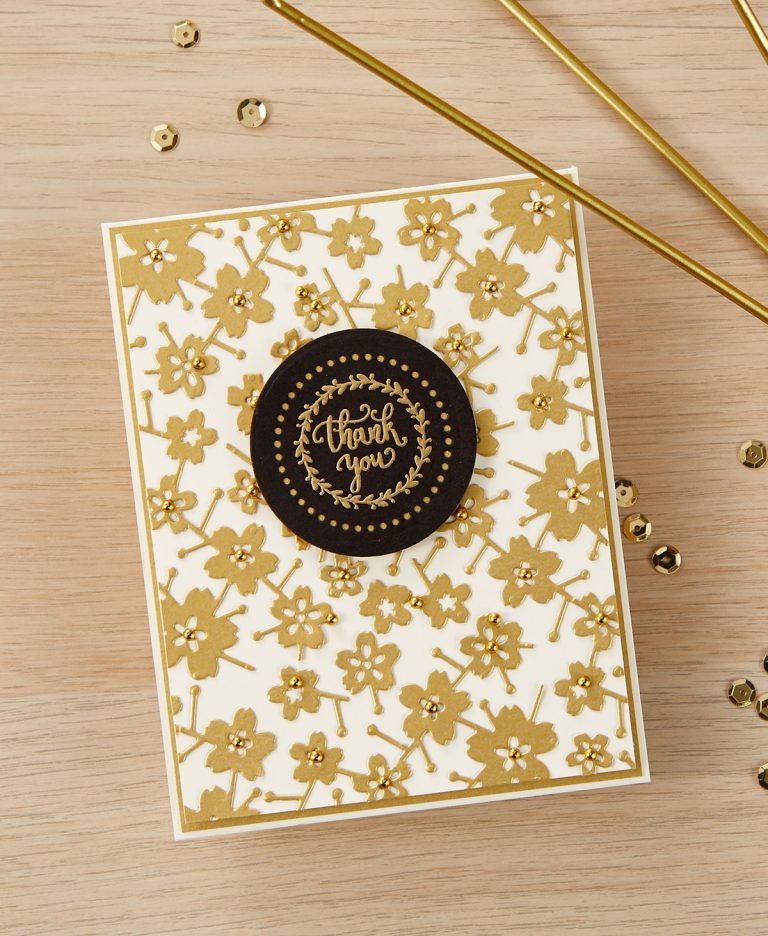
Thank You Card
Finished Size: 4 1/4” x 5 1/2”
Instructions:
- Create an A2 top fold card base with Buttercream cardstock, adhere Brush Gold cardstock panel to card front.
- Add White Liner adhesive sheet to back of Brush Gold cardstock; using the inserts from the Kimono set, die cut flower sprigs from adhesive backed Brush Gold cardstock to create an allover seamless background pattern, trim pieces that extend beyond edge of panel.
- Stamp “Thank You” using Clear Pigment Ink; use Journey Gold embossing powder to heat emboss sentiment on die cut circle of Black Licorice cardstock (use sentiment stamp of your choice; stamp set may vary).
- Adhere to card front with foam squares.
- Embellish flowers with Fashion Gold dots.
Supplies:
DIES: Kimono S3-393, Essential Circles S4-1039; STAMP SETS: Words Are Not Enough STP-005 (Stamp set may vary); INK & EMBOSSING POWDER: Journey Gold Embossing Powder IP-0101, Clear Pigment Ink IP-0102; CARDSTOCK: Journey Brush Gold CS-0134, Buttercream CS-0006, Black Licorice CS-0003; ACCESSORIES: Fashion Gold AC-0292 TOOLS: Journey Heat Tool TO-0083, Tool ‘n One T-001; BASIC SUPPLIES: White Liner Sheets AD-0113, White Liner Tape AD-0001, Easy Glide Permanent Adhesive Runner AD-0081, Journey Foam Squares Medium AD-0085, Journey Craft Glue AD-0111, Crease Tool TO-0040.
The Cutting Edge Project Kit – Video Tutorial
Watch video tutorial using this kit below or on Youtube:

2 Comments
Melissa Leftrick
Love!!!
gilliedog2014
Beautiful!