Delicate Impressions Collection – Inspiration with Yasmin Diaz
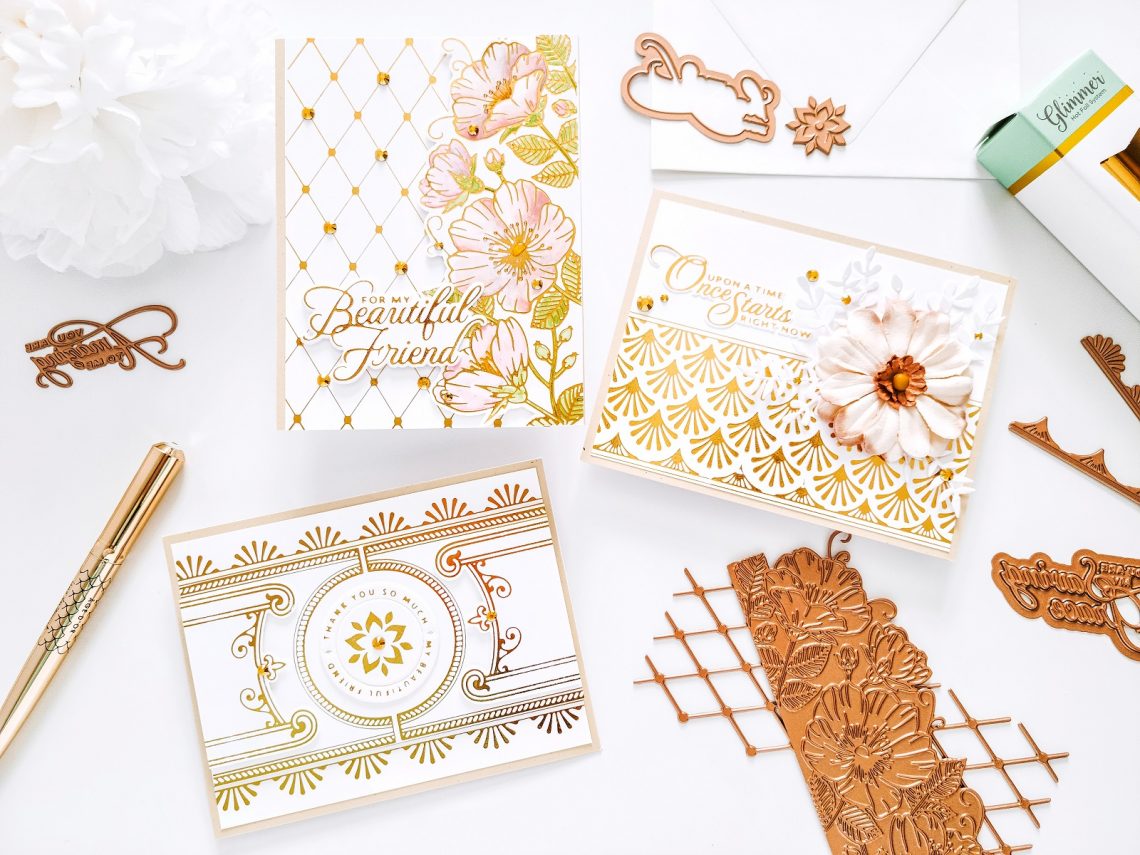
Hello, Spellbinders and FSJ, Friends! Yasmin here sharing with you a delicate trio of Glimmer Foiling cards made showcasing Delicate Impressions Collection by Becca Feeken. So, without further ado, let’s jump right into the step-by-step for how I made them.
Sweet Blooms Border & Diamonetta Background
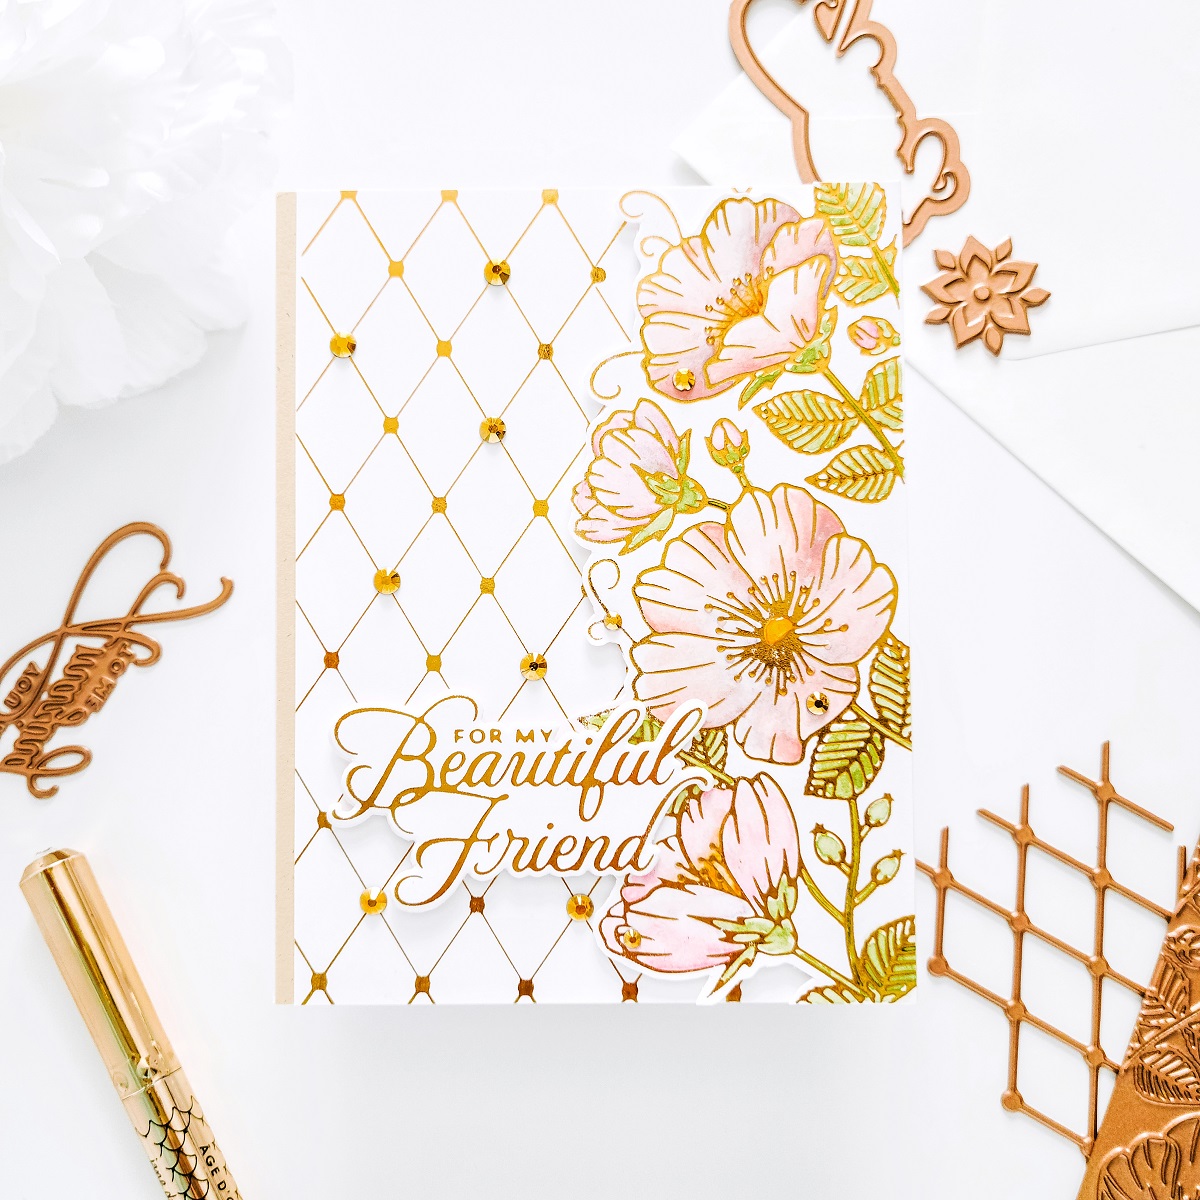
This collection includes a variation of beautiful large and small glimmer plates with which you can achieve fabulous card designs so therefore, I’d like to mention that this are meant to work in conjunction with Glimmer Hot Foil System and Platinum 6 Die Cutting and Embossing Machine. With that said, start by setting up your Glimmer Hot Foil System and Platinum 6 Die Cutting and Embossing Machine on your crafting table then, turn on the glimmer hot foil platform. Thus, while the platform is heating up, go ahead and line up the Diamonetta Background Glimmer Hot Foil Plate over one side of an A2 white card panel. Next, cut a piece larger enough to cover the glimmer plate of Glimmer Hot Foil Roll – Polished Brass using your Quick Trimmer.

Once the platform is ready to foil, go ahead and foil the first half side of the card panel and then, repeat the same step for the second half to achieve a full foiled card panel. Next, line up over the right side of a second A2 white card panel the Sweet Blooms Border Glimmer Hot Foil Plate and get it foil using the same glimmer foil color. Right after when the foiling process is done, do a quick watercolor over the flowers and leaves to add a pop of color.

Moving on, after you’ve had finished watercolor in the flowers and leaves, and they are completely dry, fussy cut them out from the card panel using a small pair of scissors. Then, to assemble the card, trim off an 1/8’’ of an inch from one side of the foiled background and get it adhere with double-sided tape to an A2 Kraft card panel (as shown in the image above) showing off a little strip of Kraft color. Next, mount the fussy cut it sweet blooms border on the right side of the card panel using craft foam tape to add a bit of dimension. Lastly, adhere the layered card panel to an A2 side folding white card base and then finish the card off by gluing down gold jewels to add an extra pop of shine.
Fanfare Landscape Card
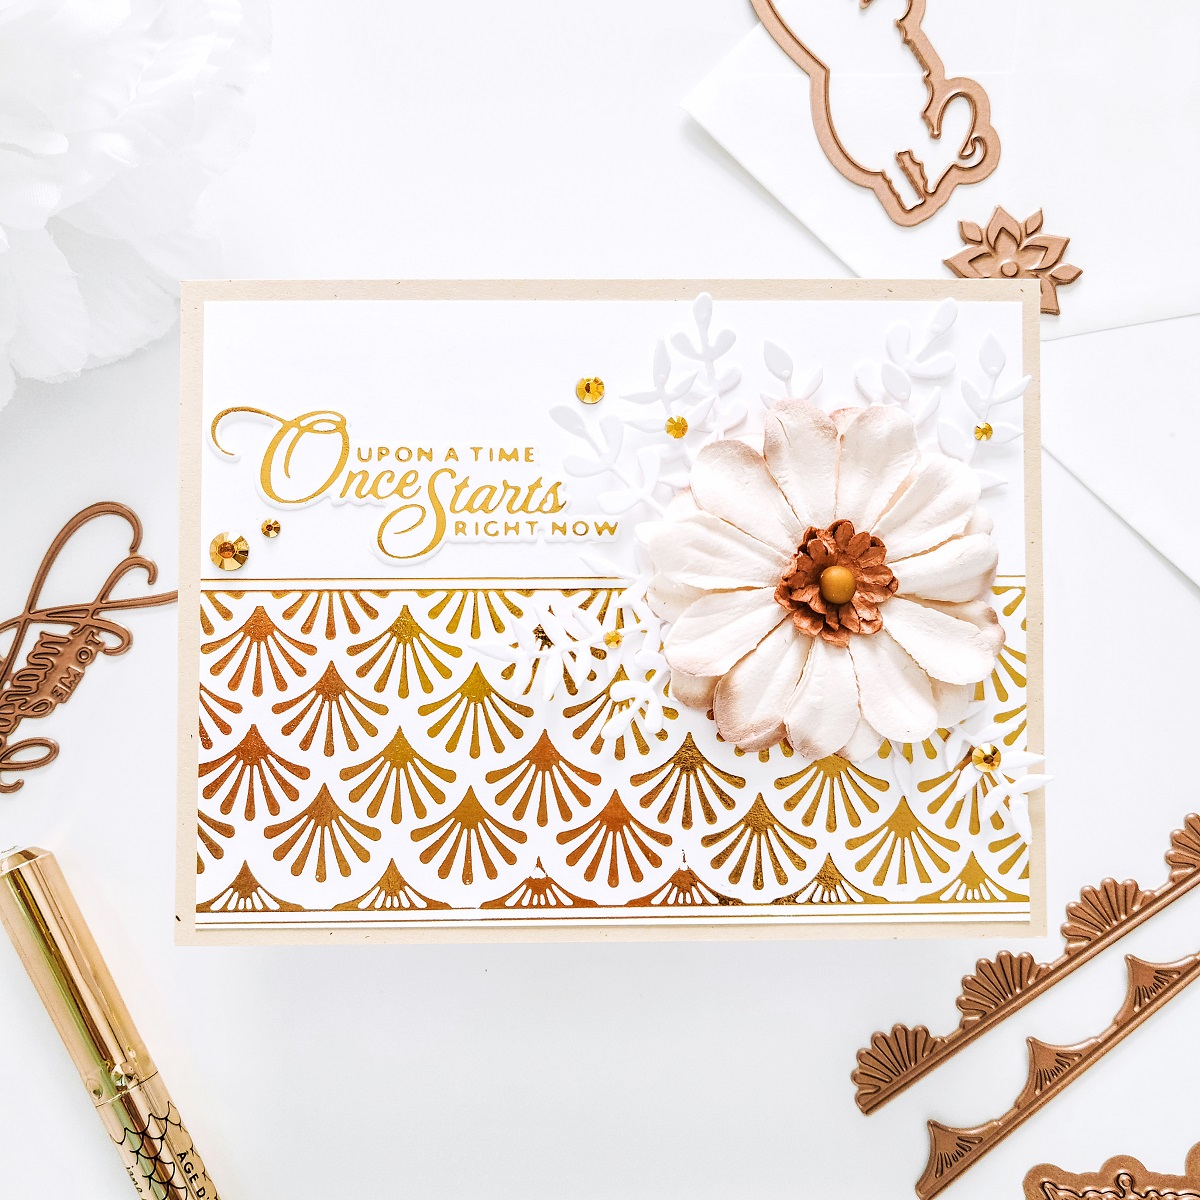
For this landscaping card, start by getting foiled half of an A2 white card panel using a combination of the glimmer plates included in Fanfare Border Glimmer Hot Foil Plate Set. So, start the foiling at the very edge bottom part of the card panel using Half Fan Border. After you’re done getting the edge foiled, continue the foiling by foiling 4 times the Staggered Fans Border then, finish the foiling using the Scalloped Border to complete the card panel foiling design.

Moving, after getting the foiling done, trim the edges off from the card panel and get the backing adhere with double-side tape to an A2 Kraft card panel. Next, embellish the right side of the card panel by gluing down with liquid glue greenery white die-cutting pieces created by using Shapeabilities Botanical House Etched Dies Set and white cardstock.

Lastly, glue down with hot glue a pre-made paper flower and glue down with liquid glue some gold jewels to add an extra pop of shine on the top side of the card panel. Then, finish the card off by getting adhere the backing of it with double-sided tape in a landscaping design to an A2 side folding white card base.
Filigree Crescent Dimensional Band

The last example requires a little extra time as has more detailed foiling however that does not mean that it complicated to achieve so therefore, start by foiling the Crescent Band from Filigree Crescent Band Glimmer Hot Foil Plate Set on a large white card panel then, repeat the same step on the other side leaving 1/16’’ of an inch or you can foil them as closer you if you wish. Next, set the foiled card panel off to the side and get 2 Interior Design images foiled on a piece of white cardstock and once you get them foiled fussy cut them out of the white cardstock using a small pair of scissors.

Next, line up the Circle Frame Die included in the set along with 2 Sentiment Inserts then, place in the center of the circle frame the Flourish. Once you get them all line up pick them up using a small piece of Press’n Seal then remove the circle frame die and get the rest of the pieces foiled over white cardstock. Therefore, right after that you’re done foiling them removed the Press’n Seal and die-cut them out from the cardstock using the circle frame die.
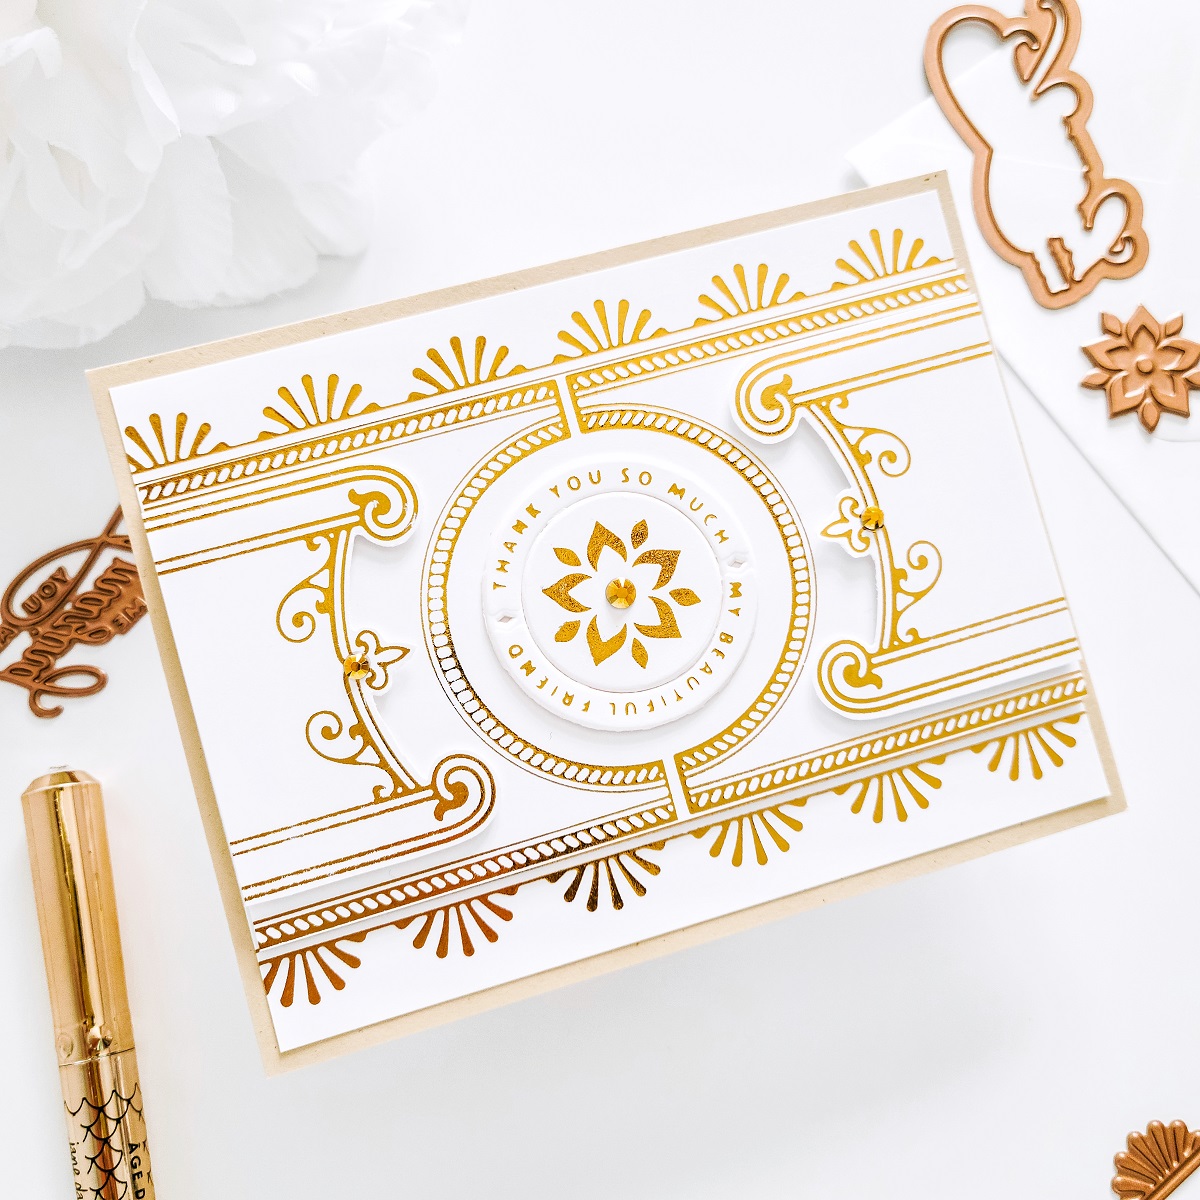
Lastly, trim off edge to edge the full Crescent Foiled Band using the paper trimmer to achieve straight edges and mount with craft foam tape the fussy cut interior foiled pieces (as shown in the image above) Then, mount also with square foam adhesives the foiled circle in the center of the Crescent Band and line it up in the center of an A2 white card panel. At this point the foiled and dimensional band is completed and ready to be adhered to the card panel for a much simpler look but, if you prefer a more detailed design you can take a step further by getting foil the Half Fan Border on each side of the foiled crescent band just like I did for the last example. So, if you decide to do it in the same way as I did it, get each side foiled of a white card panel edge to edge with the crescent band for a continuous design and, once you get them foiled over the card panel continue by mounting the foiled crescent band over the card panel and last but not least, get the card panel adhere with double-sided tape to an A2 Kraft card panel. To finish the card off, adhere the backing of the card panel also with double-sided tape to an A2 side folding white card base and glue down with liquid glue a few gold jewels to add an extra pop of shine.
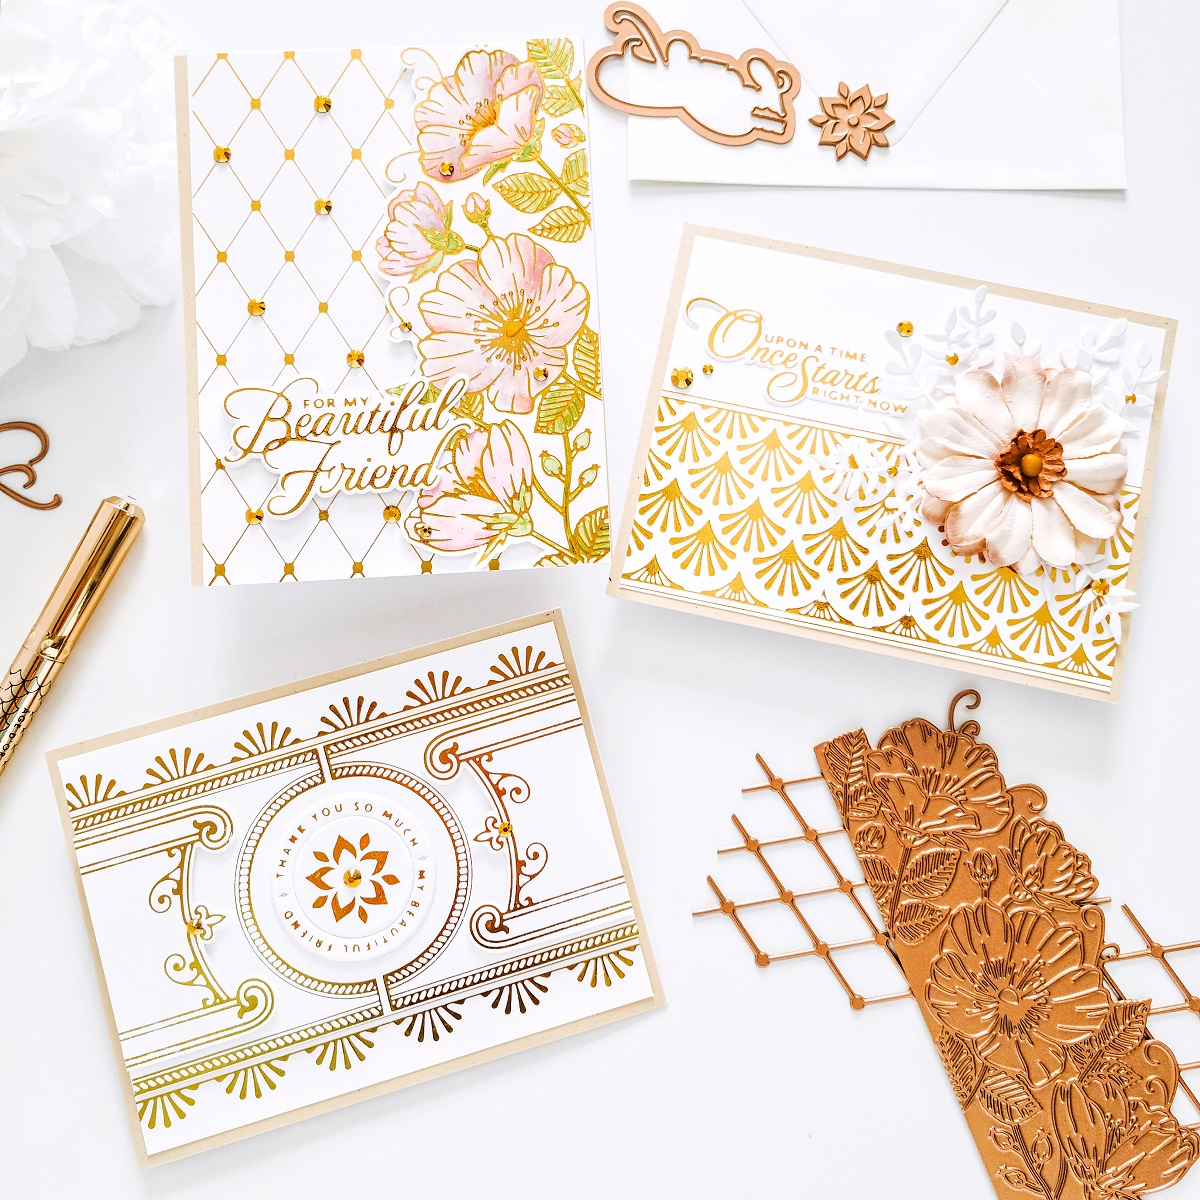
You can appreciate in the image above how each card looks side by side along with their beautiful sentiment which I’ve gotten previously foiled over white cardstock using Heart Melt Sentiments Glimmer Hot Foil Plate & Die Set also from this collection. With that being said, I hope that you’ve enjoyed learning about how-to-make this delicate trio of Glimmer Foiling cards featuring the newest Delicate Impressions Collection by Becca Feeken. If you get inspired be sure to tag us in your social medias using the hashtags #Spellbinders #amazingpapergrace #GlimmerHotFoilSystem and #NeverStopMaking when sharing your creations so, we can see what you are creating with these beautiful glimmer plates.
Thanks for stopping by we hope to see you soon but most of all, we hope you and your family stay healthy and safe.
With love, Yasmin.
Spellbinders Supplies:
Liberty Collection – July and December by Jean

Little Loves Inspiration | Silhouette Cards with Susie