Stained Glass Bouquet Inspiration with Yasmin Diaz
Hello, Spellbinders friends! Yasmin here sharing with you a very elegant trio of cards made showcasing the newest Stained Glass Bouquet Collection by Becca Feeken. So, without further ado, let’s jump right into the step-by-step for how to make them.
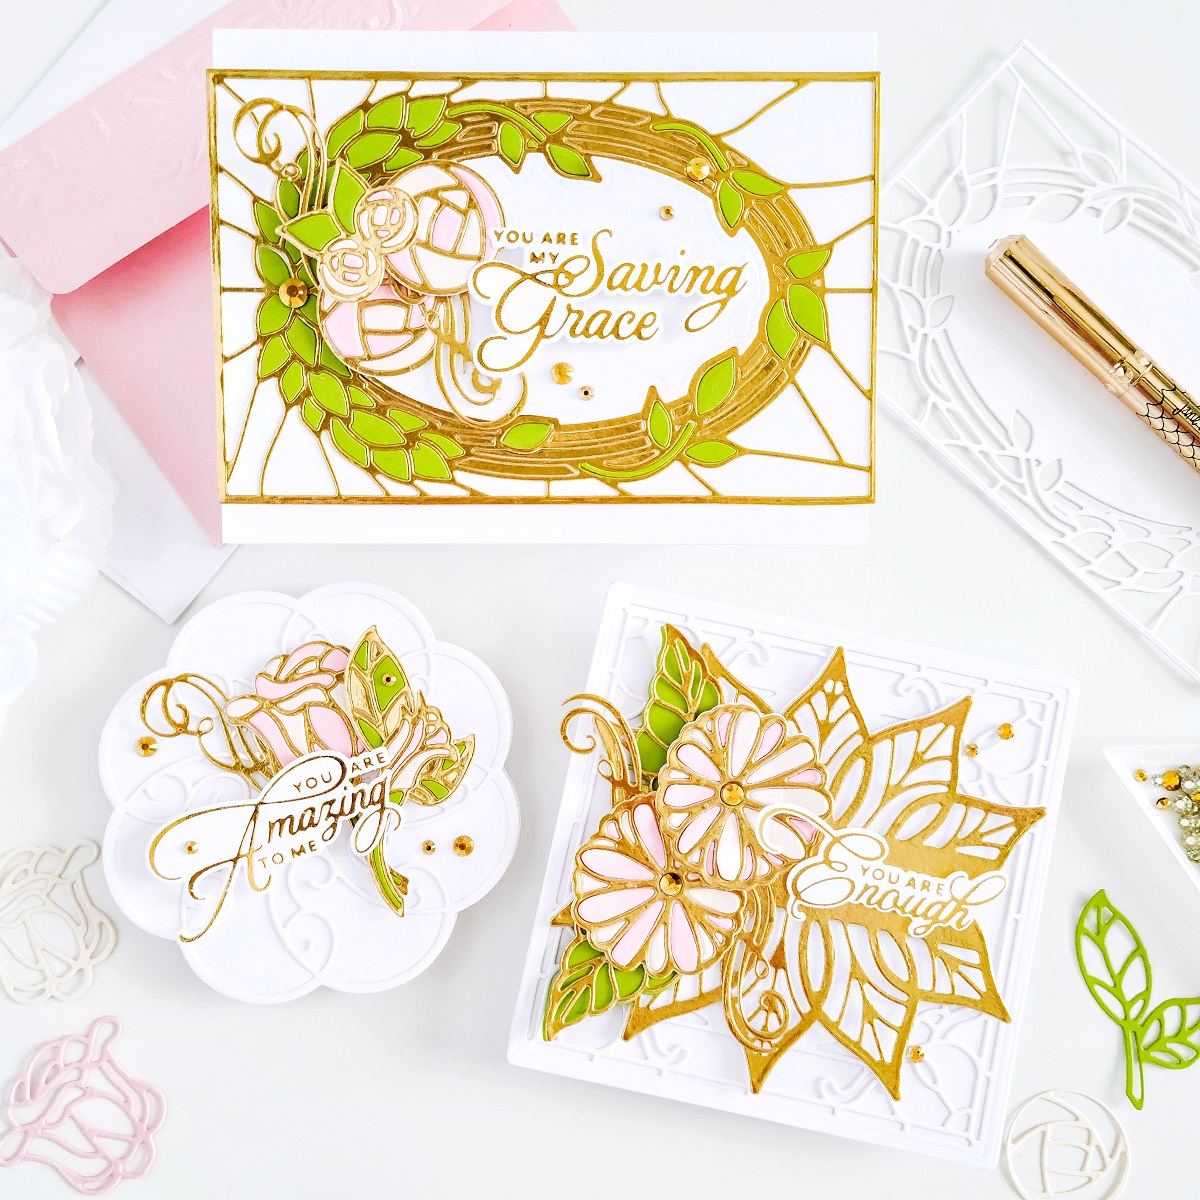
Stained Glass Bouquet Square Card
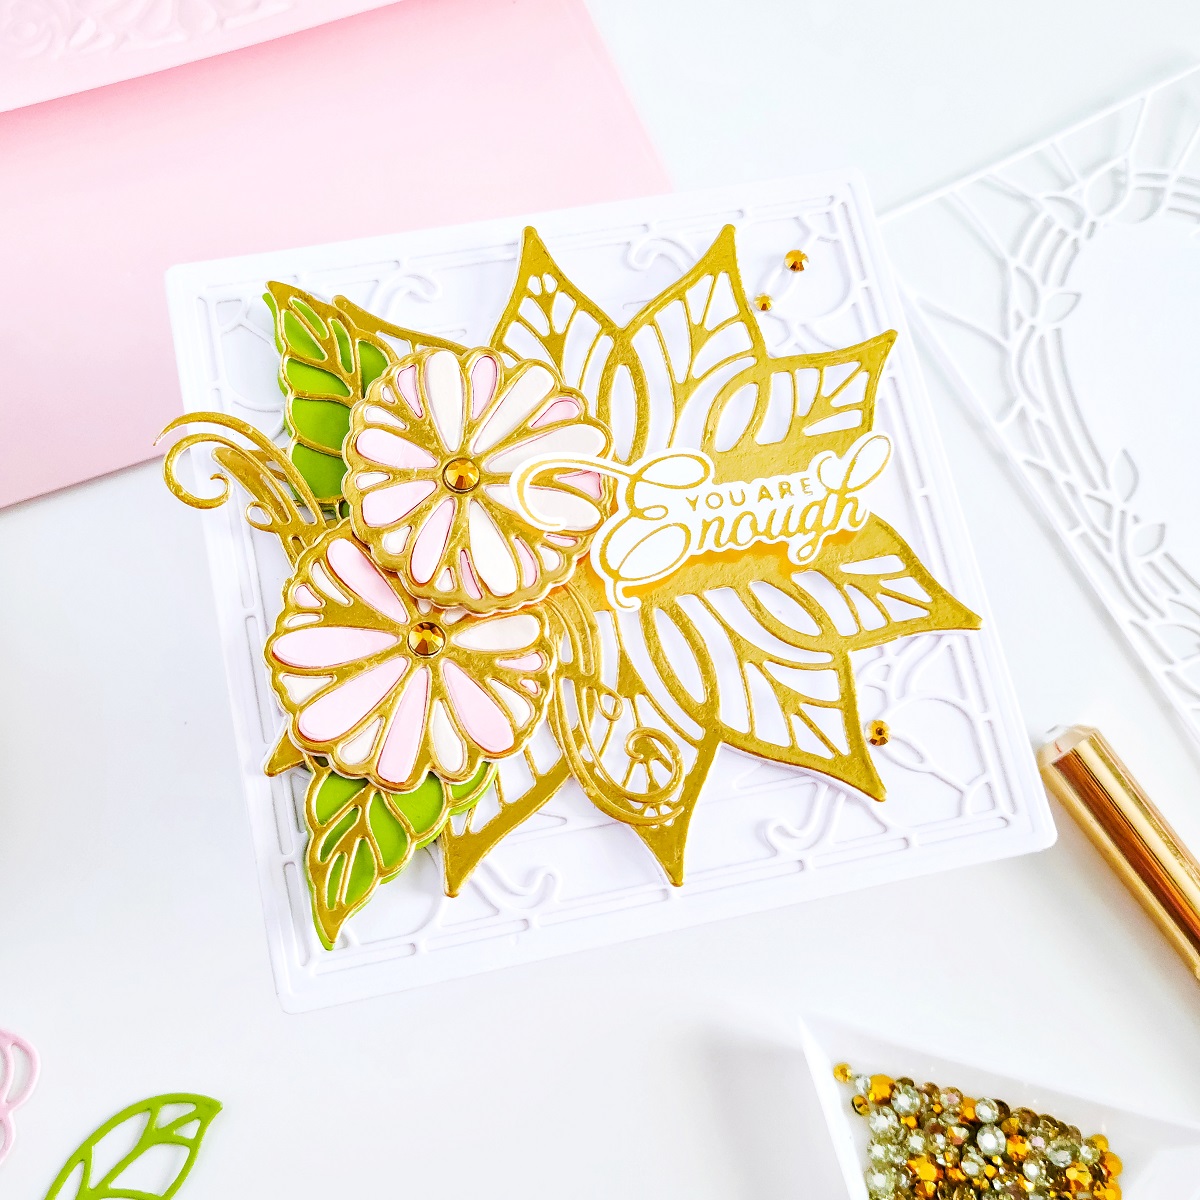
This gorgeous collection includes a full array of amazing die set that will help you to create handmade cards from a delicate, elegant, or why not fun and colorful looks. Therefore, to create this elegant square card, start off by creating a 4-1/4’’ x 4-1/4’’ inches white card base. Next, line up over a large piece of white cardstock the largest die from Tulip Trio Etched Dies and go ahead to run them through your Platinum 6 Die Cutting and Embossing Machine. Right after the first die-cutting square is complete, repeat the same step to die-cut a second square white panel but this time include the detailed inset die to create a detailed die-cutting panel. Once, that step is completed, go ahead to get the detailed die-cutting frame carefully glue down with Bearly Art Mini 2 fl oz Precision Craft Glue + Tip Kit over the solid white card panel and adhere the white card panel over the square card base.

Once, the card base is ready set it off aside and go ahead to line up over a large piece of white cardstock the leaf motif rim die from Be Leave Me Etched Dies and run them through the die-cutting machine. Next, line up over a large piece of gold cardstock the motif leaf insert die and go ahead to run them through the die-cutting machine. Once, that step is complete, stack both leaf motif die-cutting pieces together with a piece of square foam tape to add dimension and then, go ahead to mount it over the card base.

Lastly, to finish the card off, go ahead to line up the Flourish die, Leaf Outline and Flower Outline along with their inserts from the set over a large piece of gold cardstock to create a few die-cutting pieces out of it. Next, line up the Flower Outline and Flower Insert once again to die-cut them out of Barely Peach Cardstock and Pink Sand Cardstock to create the flowers by interchanging the colors when you get to the point to inlay or paper piecing each piece for a contrast. Then, repeat the same step for the leaves, but use Rainforest Cardstock to add a that pop of green. So, as soon as the flowers and leaves are completed, go ahead to create a floral cluster with them and then, get it mounted with square foam adhesives to create dimension. As, a finishing touch, go ahead to mount a foiled sentiment to complement the gold from the card as well as some gold jewels to add an extra touch of sparkle.
NOTE: The sentiment is part of Heart Felt Sentiments Glimmer Hot Foil Plate & Die Set.
Stained Glass Bouquet A2 Landscape Card

For the second example create an A2 standard size card in a landscaping form therefore, go ahead to line up over a large piece of gold cardstock the Leaf Frame Rim and Leaf Frame Insert from Deco Bloom Etched Dies and go ahead and run them through the die-cutting machine. Then, to create the stained-glass effect go ahead to repeat the same step but this time to die-cut it out from Rainforest Cardstock.
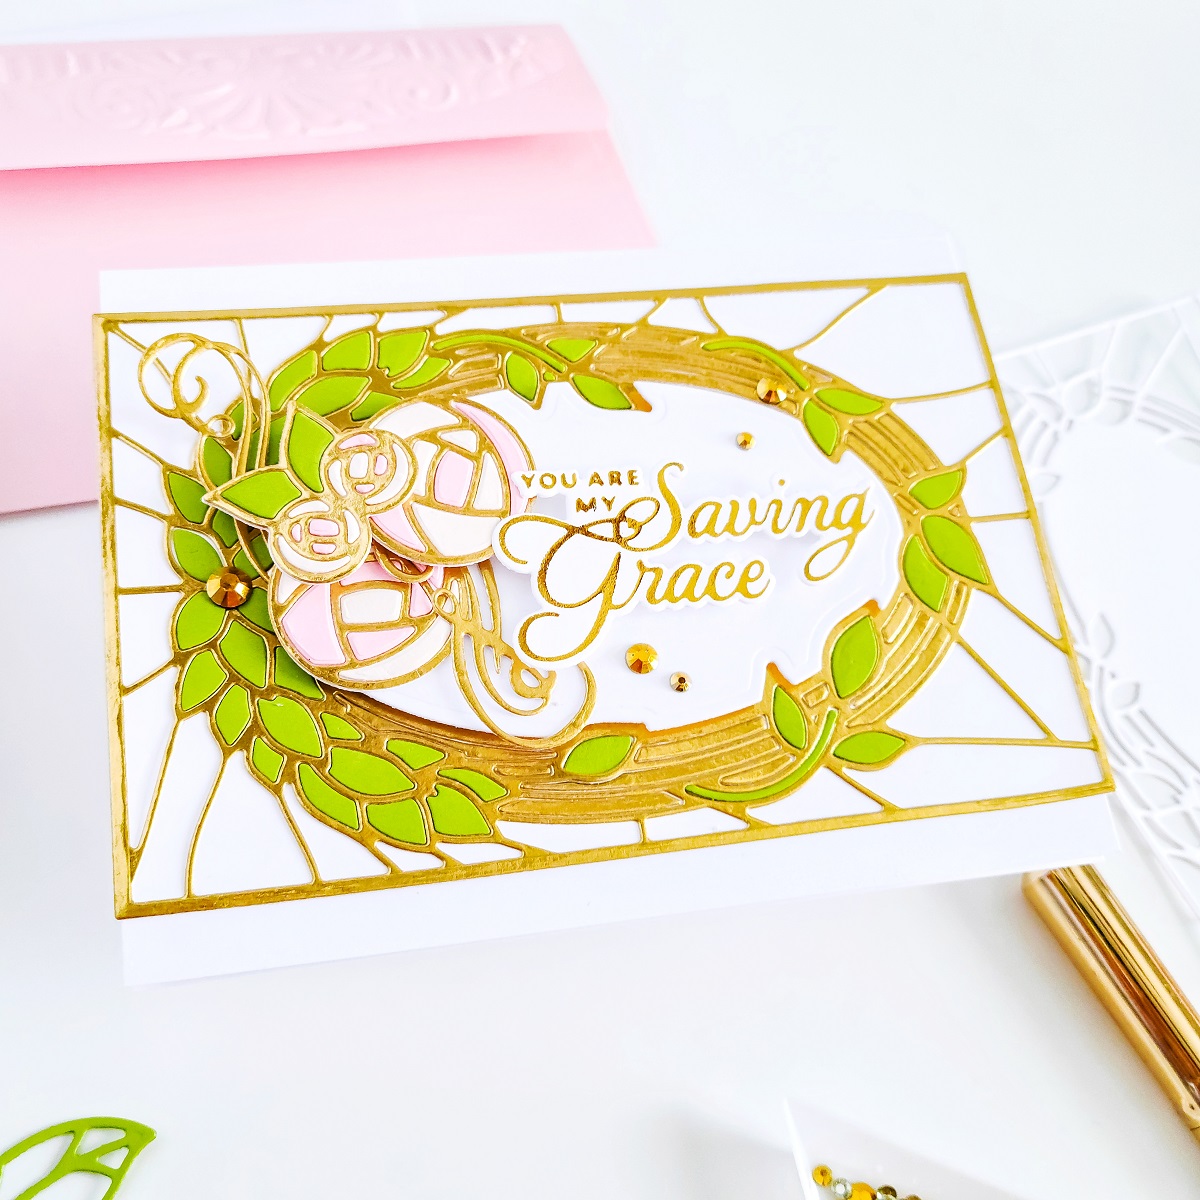
Once, that step is complete, go ahead to carefully glue down with liquid glue the detailed gold frame over an A2 side folding white card base and then, create the stained glass-effect for the oval frame using the green die-cutting leaves. Thus, as soon as that step is done, go ahead to die-cut a few large, medium, and small rose bunches using the same color cardstock combination from the previous example for a cohesive look.
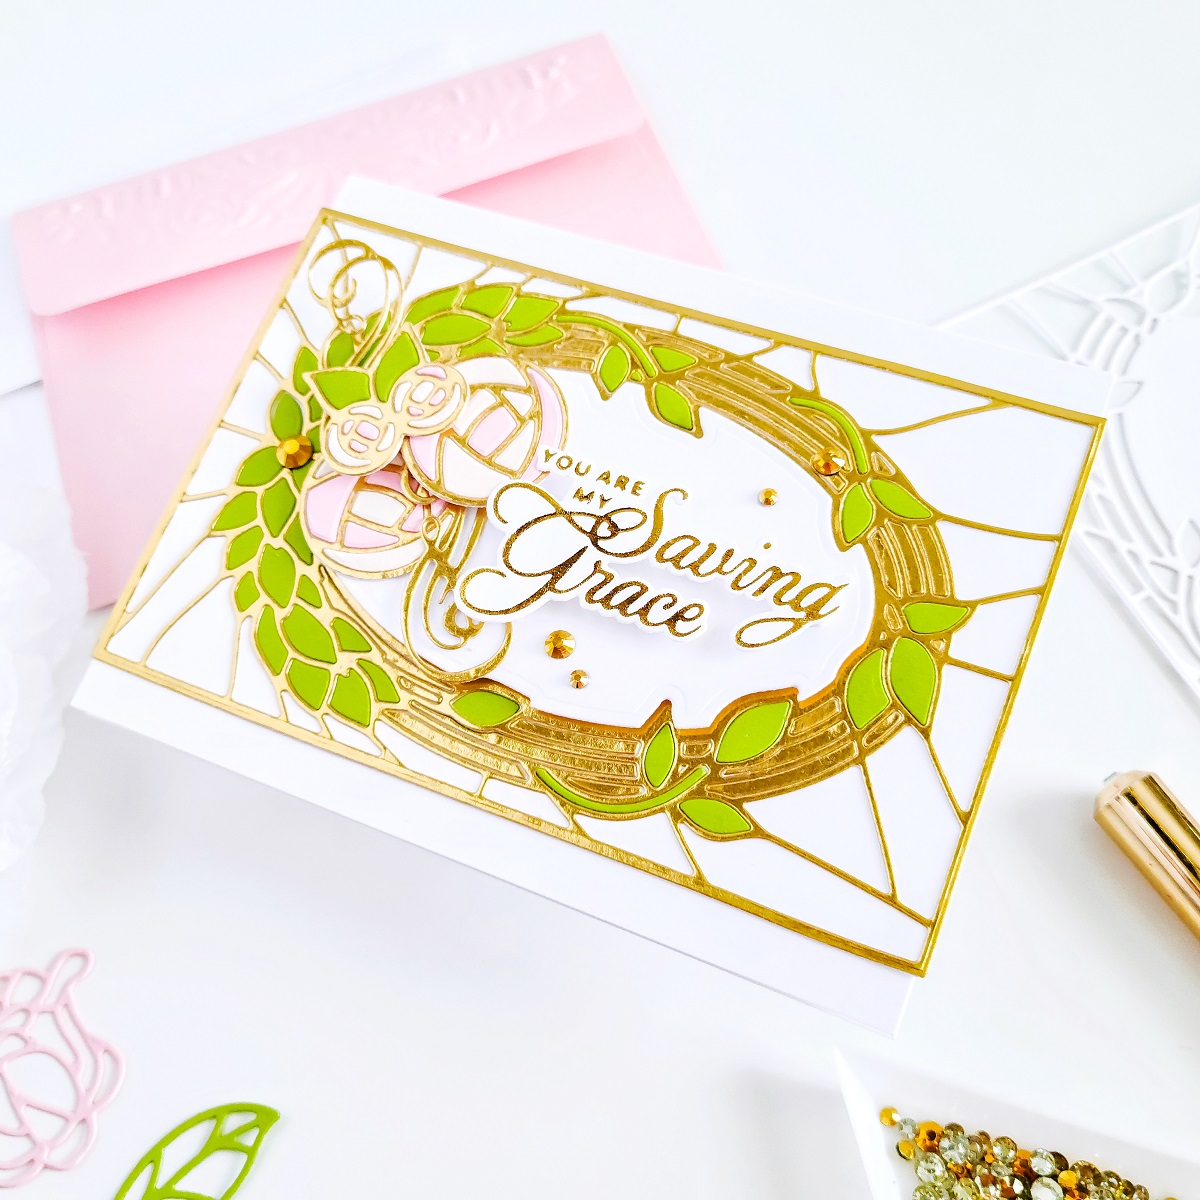
Therefore, as soon as the die-cutting and the stained-glass pattern is completed for the roses, go ahead, and create a floral cluster with them and then, go ahead to get it mounted over the card using a combination of liquid glue and square foam adhesives for a dimensional look. Last but not least, finish the card off by mounting a foiled sentiment along with a few gold jewels to complement the shine from the gold accents.
NOTE: The sentiment is part of Heart Melt Sentiments Glimmer Hot Foil Plate & Die Set.
Stained Glass Bouquet Mini Shaped Card

This gorgeous collection also includes the Sweet Rondure Etched Dies which is perfect to combine with Tulip Trio Etched Dies for a square card or to use by itself to create a mini shaped card therefore, to create this mini shaped card go ahead to line up over a large piece of white cardstock the Rondure Rim die and then go ahead to run them through the die-cutting machine. Repeat the previous step one more time to create 2 solid die-cutting pieces. Once, those steps are completed, go ahead, and score a line to one of the die-cutting pieces at 1/4 of an inch mark, fold and add a piece of double-sided tape to adhere the second die-cutting piece to create the card base.
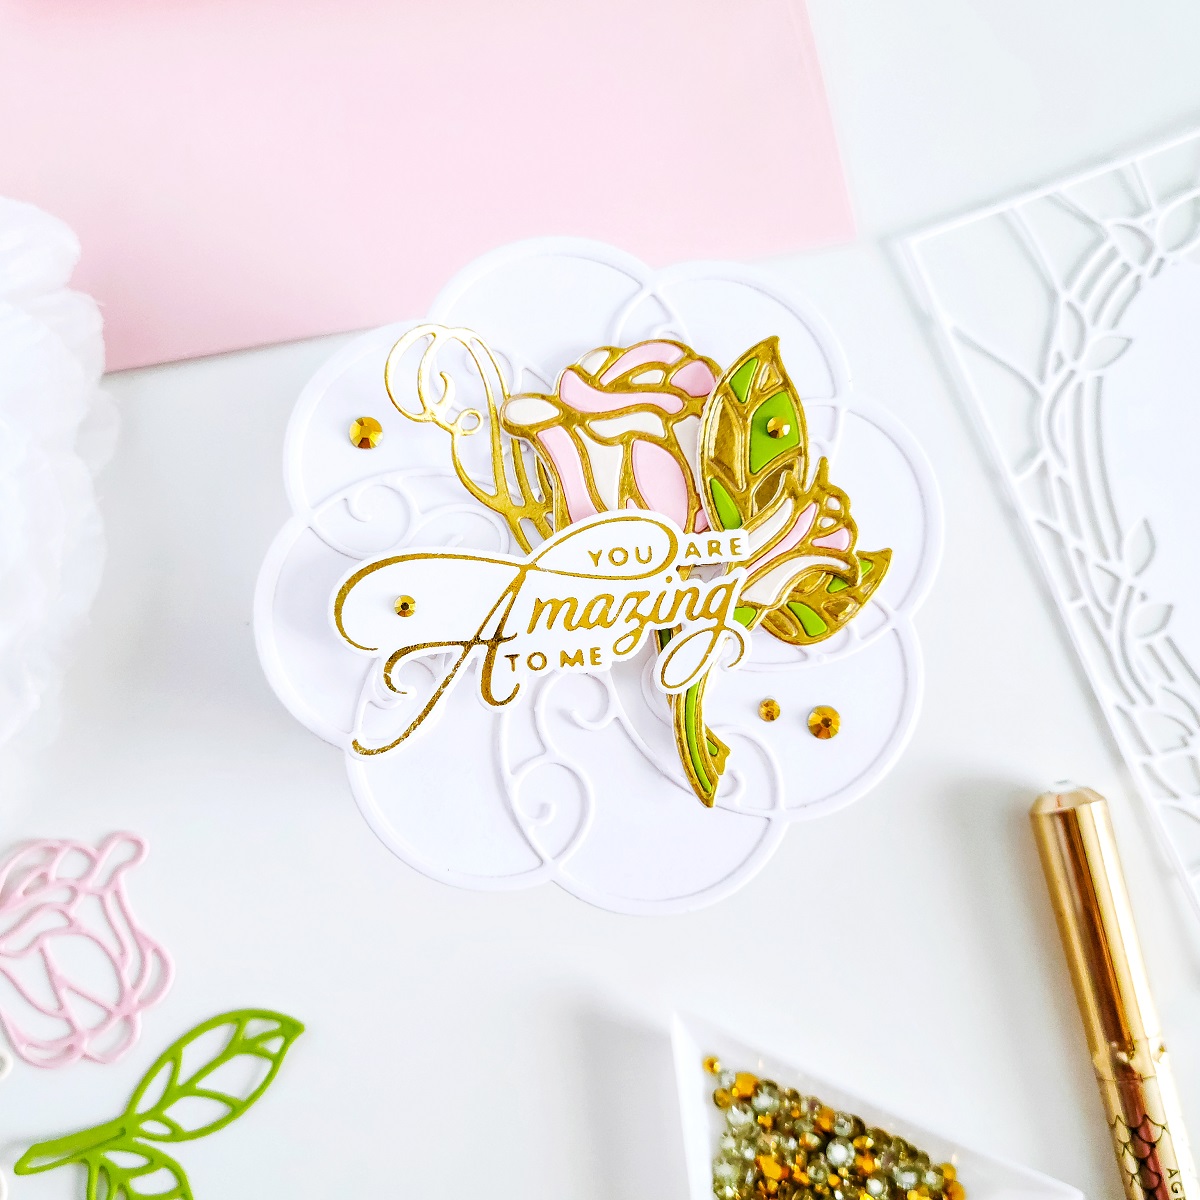
Once the card base is completed, line up over a piece of white cardstock the Rondure Rim along with the Rondure Insert and run them through the die-cutting machine to create a delicate and detailed die-cutting panel. so, as soon as the die-cutting is complete carefully remove the negative die-cutting pieces using your Tool ‘n One and then carefully glue the detailed die-cutting frame over the card base.

Lastly, create some die-cutting roses using the dies including in the set along with the same color cardstock combination using the same stained-glass technique to create a floral cluster. Last but not least, mount the floral cluster over the card along with a foiled sentiment and then, finish the card off by gluing down with liquid glue some gold jewels to complement the gold accents.
By the way, the sentiment is part of Heart Melt Sentiments Glimmer Hot Foil Plate & Die Set as well and for the hot foiling steps is required the use of; Glimmer Hot Foil Roll – Polished Brass along with your Quick Trimmer, Glimmer Hot Foil System and Platinum 6 Die Cutting and Embossing Machine.
With that being said, I hope that you’ve enjoyed learning about how-to-make this elegant trio of cards made showcasing the newest Stained Glass Bouquet Collection by Becca Feeken. If you get inspired, be sure to tag us in your social medias using the hashtags #Spellbinders, #amazingpapergrace and #NeverStopMaking when sharing your creations so, we can see what you are creating with the latest embossing folders.
Thanks for stopping by we hope to see you soon but most of all, we hope you and your family stay healthy and safe.
With love,
Yasmin.
Spellbinders Supplies:

Open House Collection Inspiration with Sheri Holt

Rainbow Floral Cards with Mona Toth