Sweet Cardlets II Inspiration with Yasmin Diaz
Hello, Spellbinders friends! Yasmin here sharing with you a sweet trio of cards made showcasing the newest Sweet Cardlets II Collection by Becca Feeken. So, without further ado, let’s jump right into the step-by-step for how to make them.
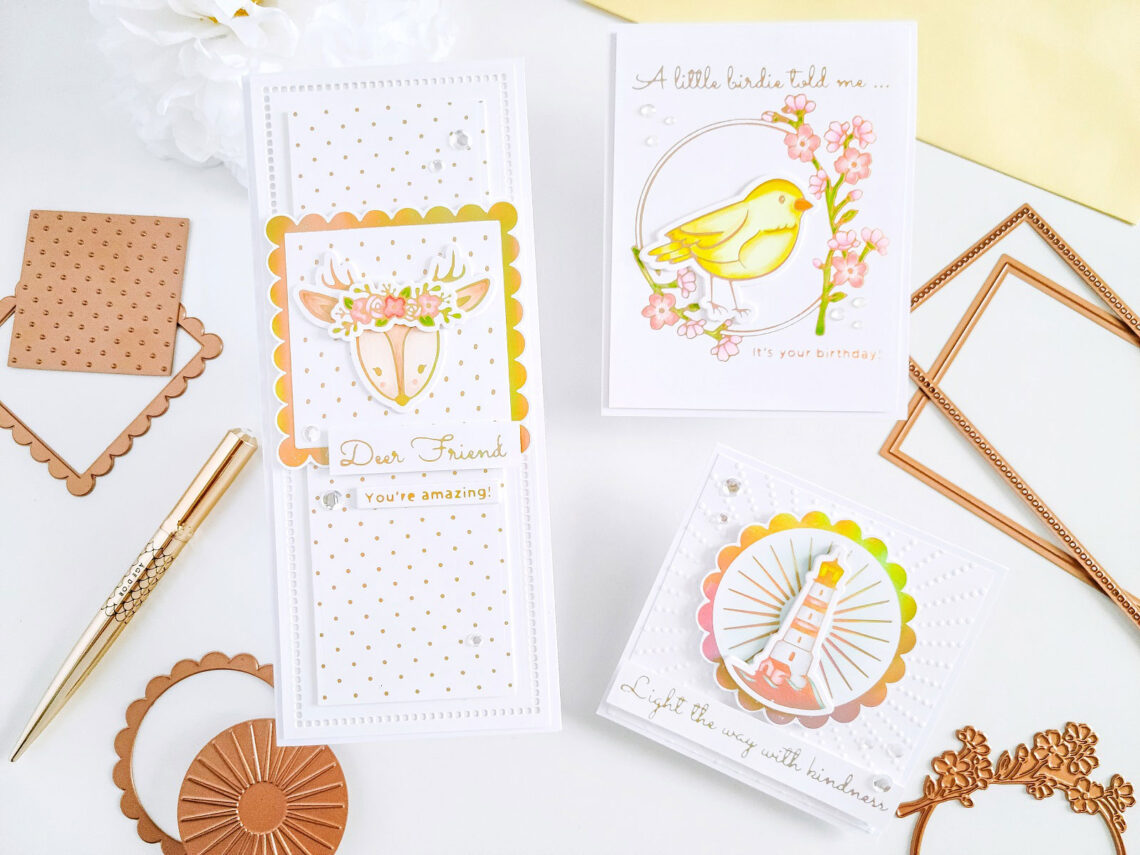
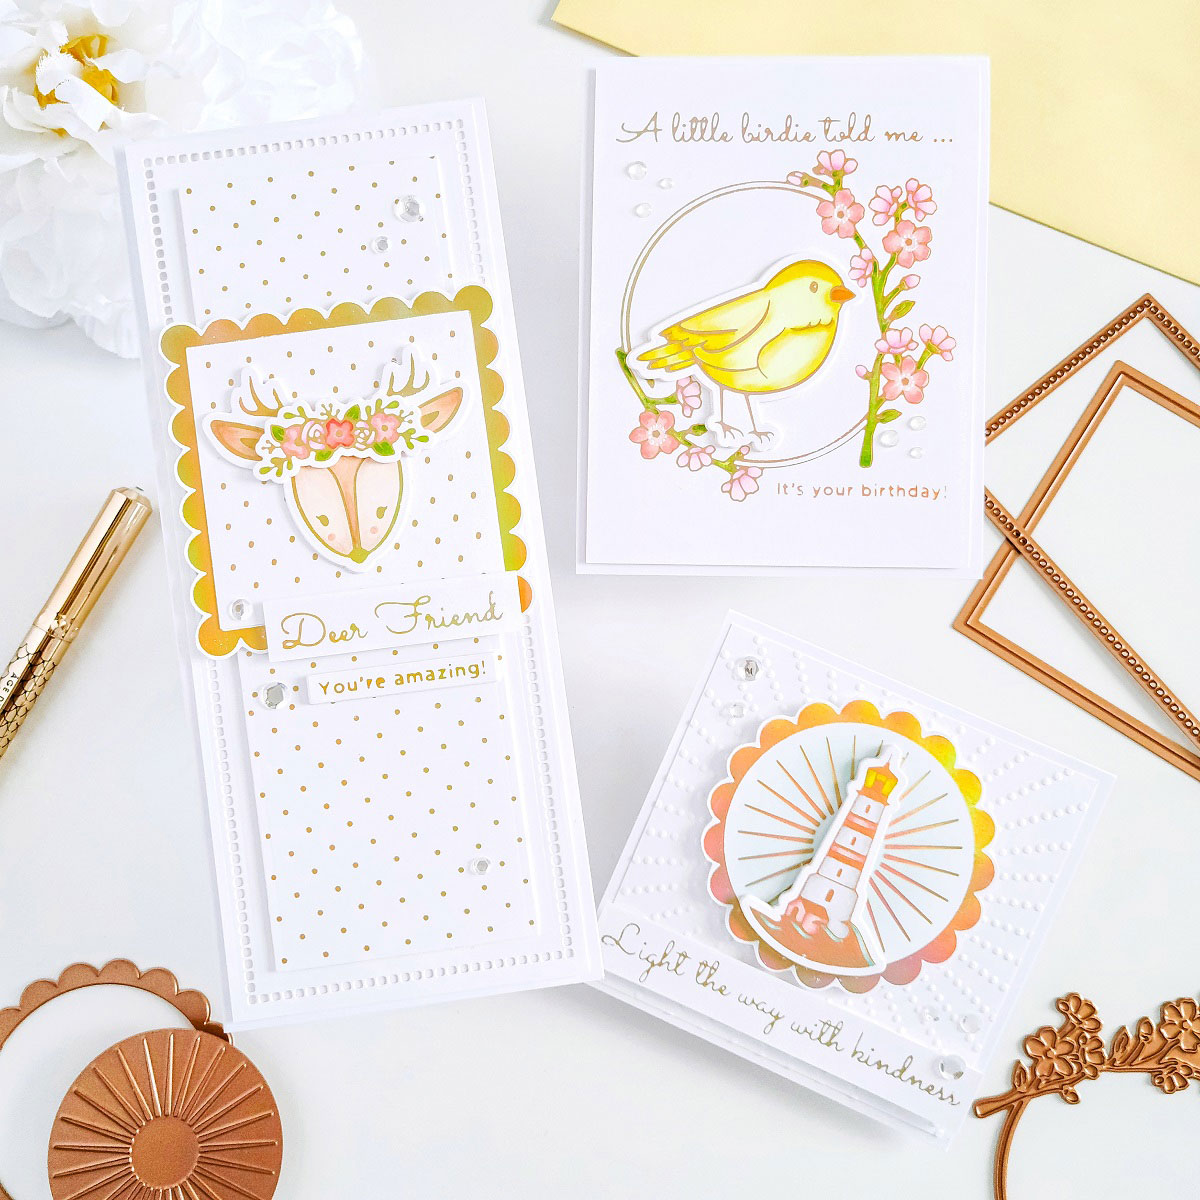
A Little Birdie A2 Size Card
If you’re familiar with Becca Feeken’s collections the Sweet Cardlets II Collection name might sounds familiar to you, as this collection is an extension of the popular Sweet Cardlets Collection with a theme of warmth and kindness. That said, this collection includes thin metal dies and glimmer hot foil plates to help you create any size and any occasion handmade cards. Therefore, to create this A2 size birthday card line up over an A2 size white card panel the floral Frame glimmer plate including in A Little Birdie Glimmer Hot Foil Plate & Die Set and then, go ahead and trim down a piece of Glimmer Hot Foil Roll – Aura using your Quick Trimmer.
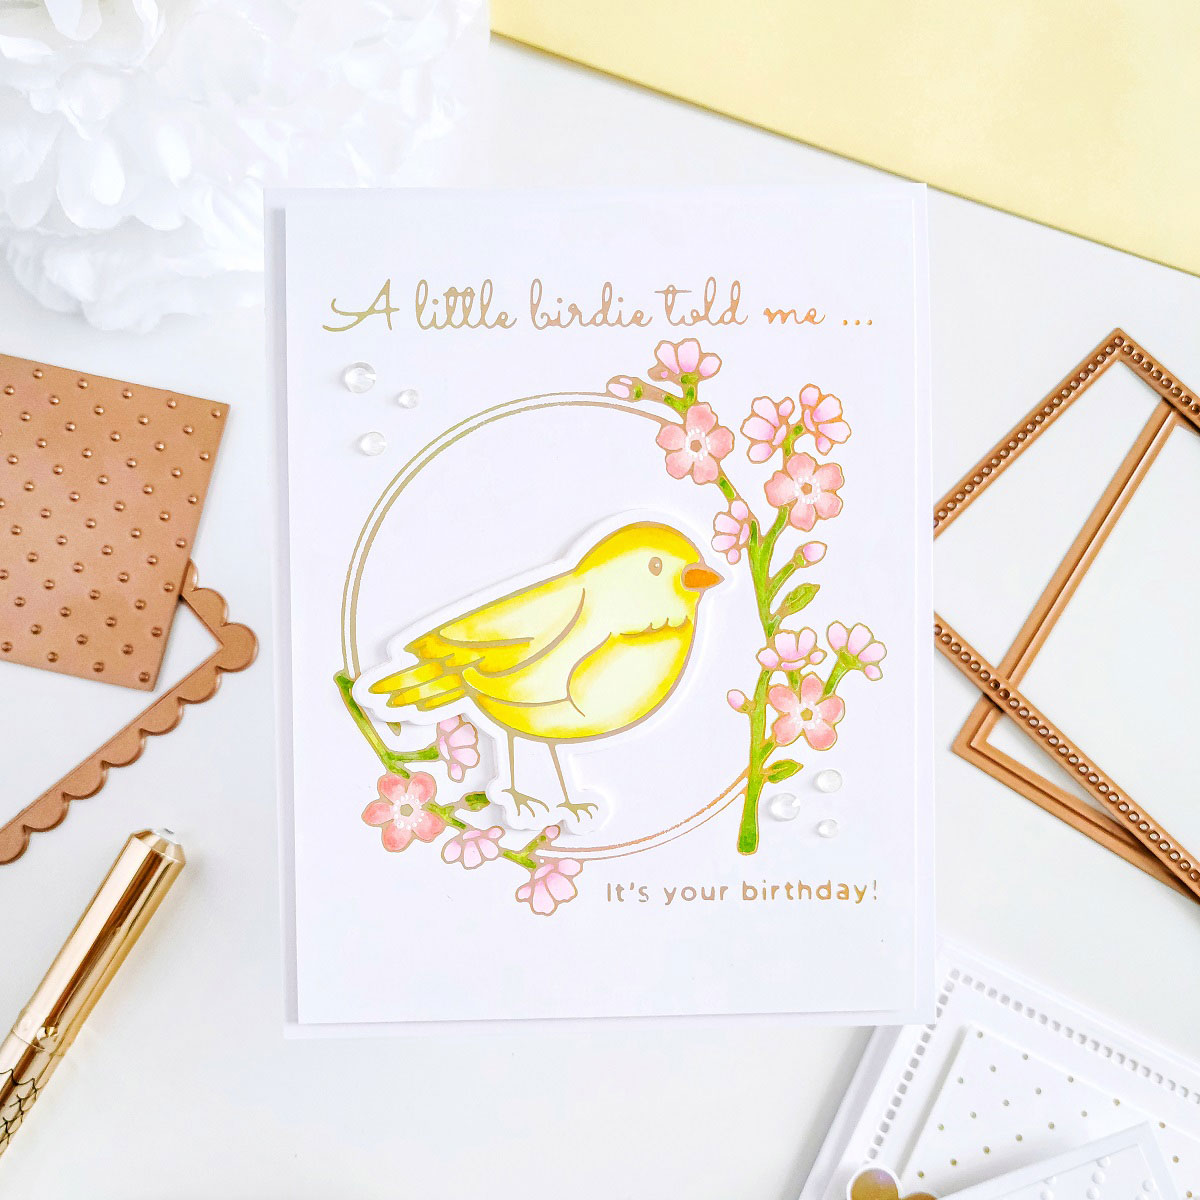
Next, get the foiling done using your Glimmer Hot Foil System and Platinum 6 Die Cutting and Embossing Machine. Once, you’re done foiling the floral frame over the card panel go ahead and line up over a separate piece of white cardstock the bird glimmer plate including in the set, and then go ahead and get it foiled as well.
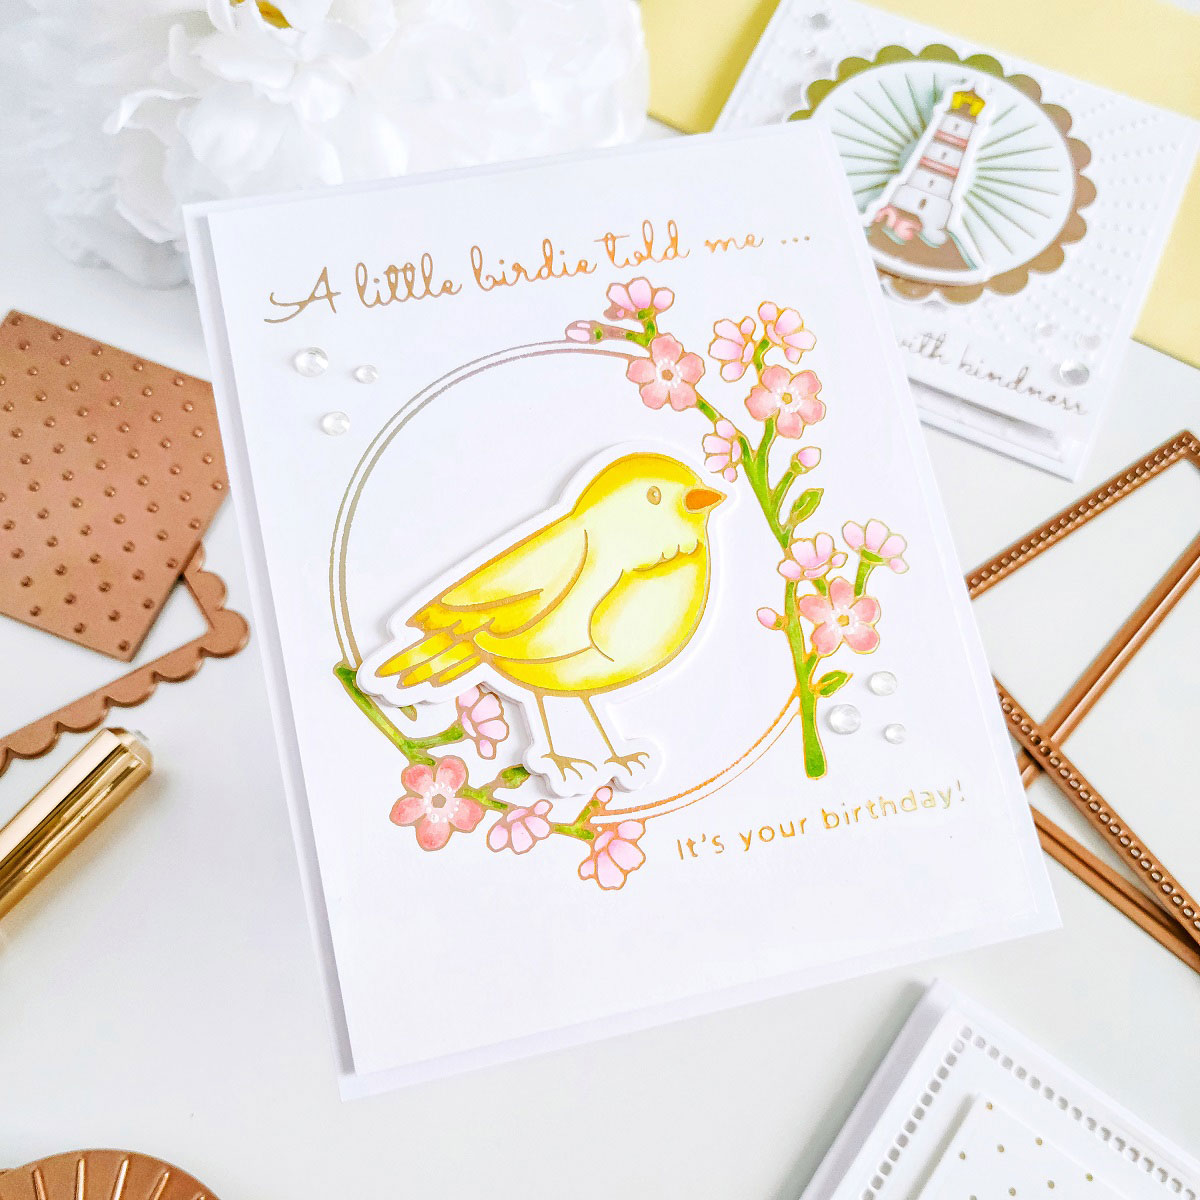
Once, the hot foiling stamping process is completed go ahead and add a pop of color to the floral frame using any color combination and color media of your choice. However, in case you’re wondering, to create the coloring for this card I’m using the following Copic Marker combination; YG21, YG25 and G24 for the greenery and R11, R20and R22 for the flowers. As for the bird, I’m using Y00, Y02, Y06, Y08, Y15 and YR16. Thus, as soon as you’re done with the coloring step, go ahead and trim off the edges of the card panel a bit smaller than the card base, and then go ahead and get the card sentiments foiled directly on the card background (as shown in the image above) or you can do this step separately on strips of white cardstock to add more dimension.
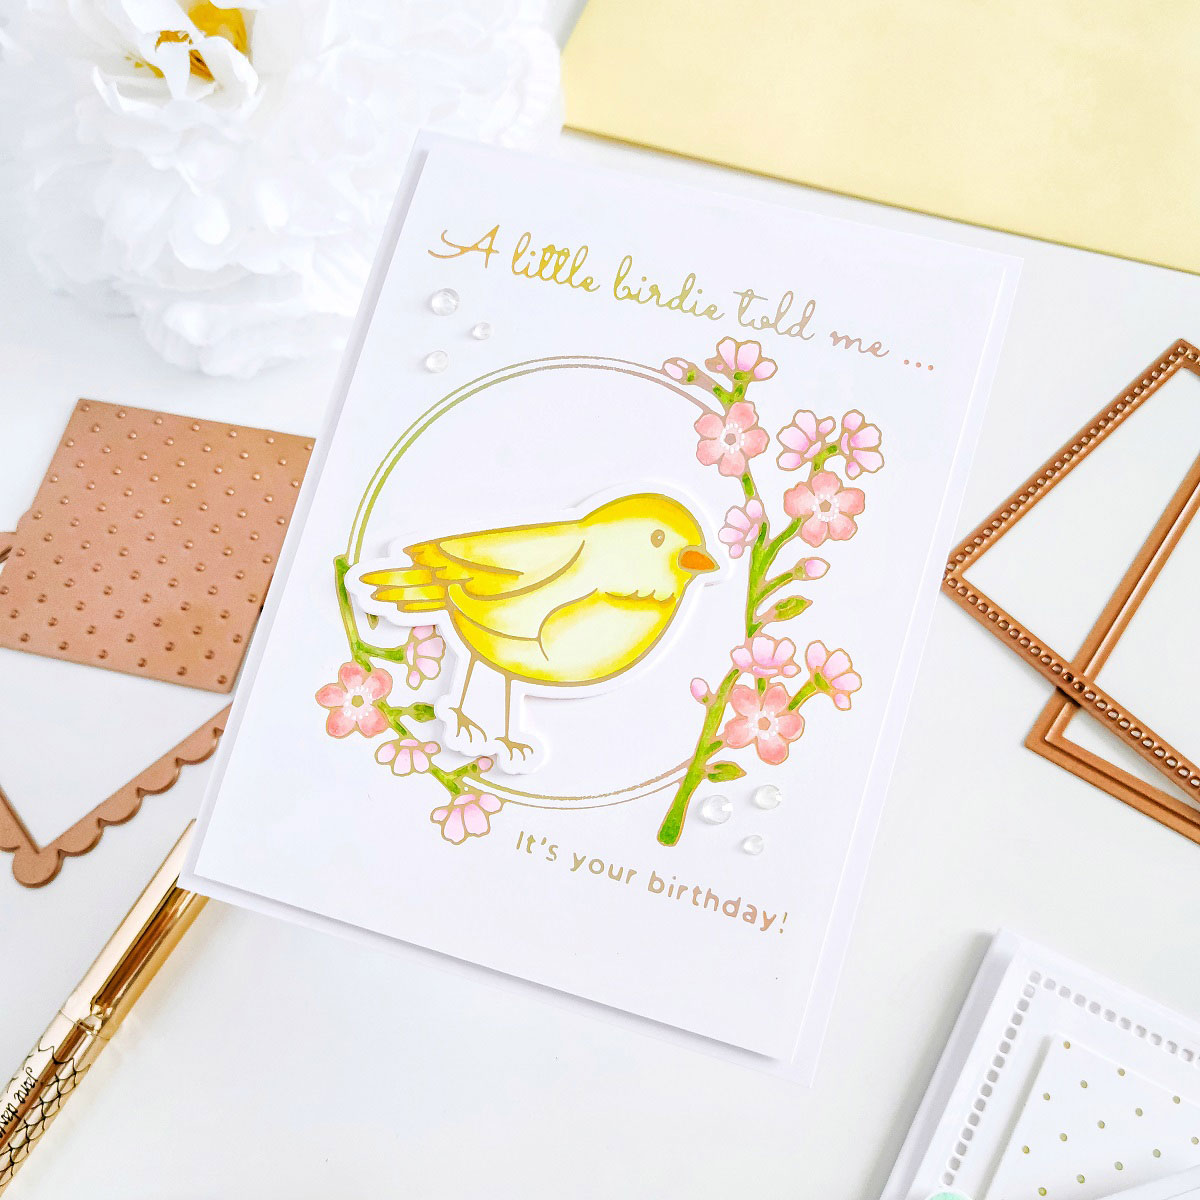
Moving on, after finishing the hot foiling for the card sentiments go ahead and get the backing of the card panel adhere down with craft foam adhesive to an A2 top folding white card base to add a bit of dimension. Lastly, line up the coordinating die over the bird and then go ahead to run them through your Platinum 6 Die Cutting and Embossing Machine to die-cut it out from the cardstock. Last but not least, mount the die-cutting bird to the card using square foam adhesives to add extra dimension and then finish the card off by gluing down some jewels to add an extra touch of shine.
Shine Your Light Square Card
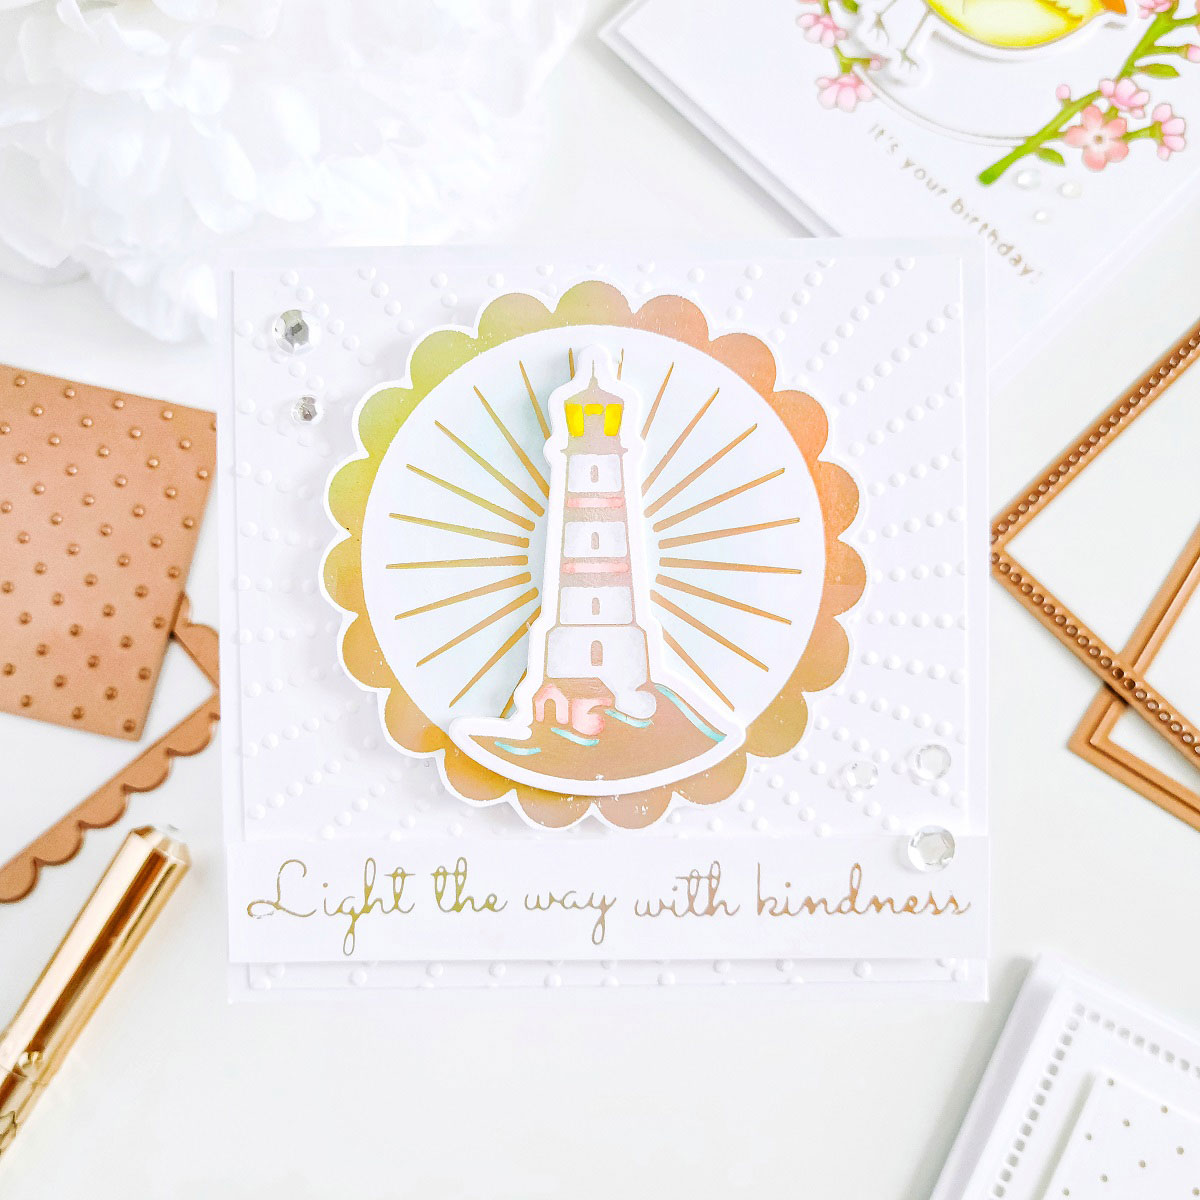
For the second example, go ahead and line up over a large piece of white cardstock the scalloped frame and the insert glimmer plates including in Shine Your Light Glimmer Hot Foil Plate & Die Set and then get them hot foiling with the same glimmer hot foil color as the previous example. Once, you’re done doing that, go ahead and get the lighthouse foiled as well on a separate piece of white cardstock.
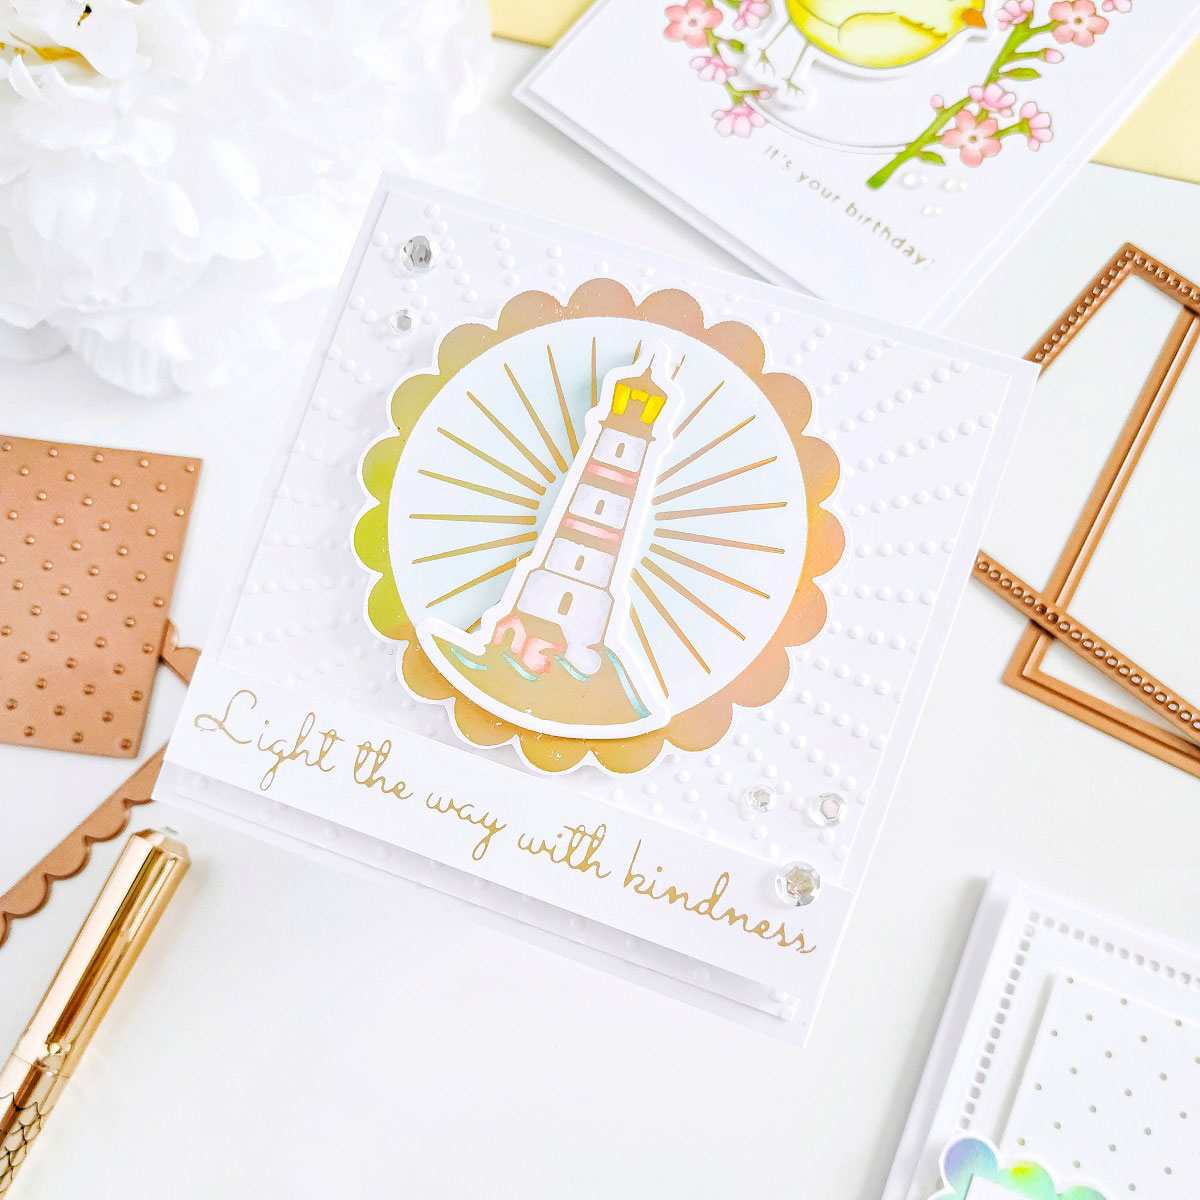
Therefore, as soon as the foiling process is completed go ahead and add a subtle pop of color to the frame using a light touch of light blue ink and then, add a pop of color to the lighthouse as well. Thus, after you’re done adding the pop of color to the foiled images go ahead to start the layering for the card
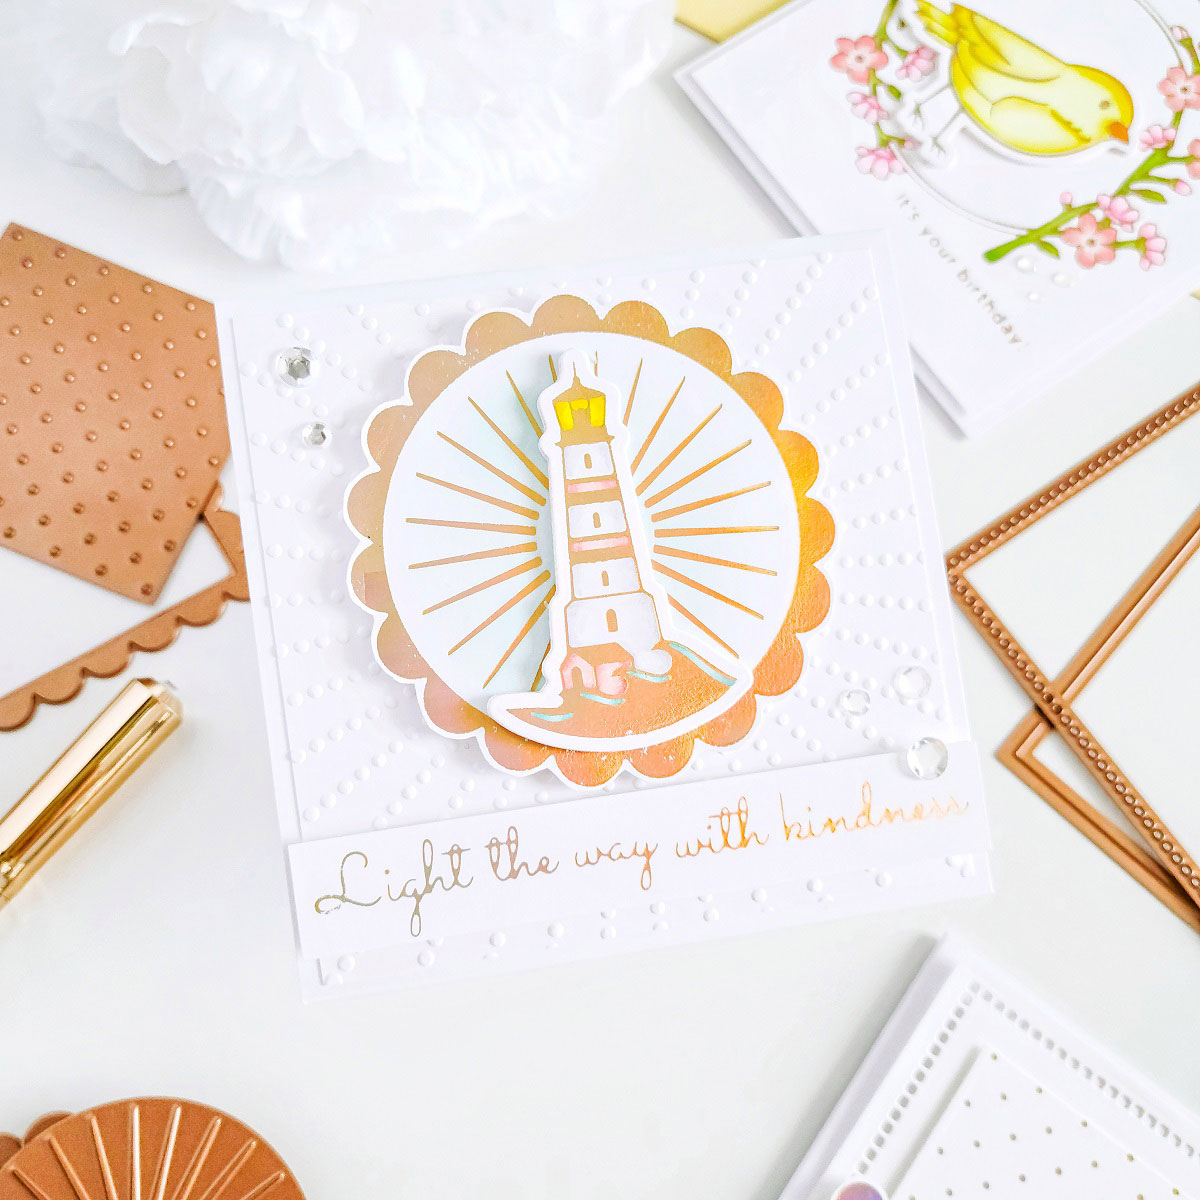
So, for the card layering go ahead and trim off the edges of a textured card panel created by using white cardstock and Sun Rays Embossing Folder. Next, go ahead and get the backing of it adhered with double-sided tape to a square 4-1/4 x 4-1/4 inches white card base. Then, go ahead and fussy cut out the frame using a small pair of scissors and then get the backing of it adhered to the card with square foam adhesives to add dimension. Lastly, mount the lighthouse in the center of the frame and finish the card off by mounting a sentiment created by foiling together on a piece of white cardstock both sentiments including in the set. Finally, as a finishing touch glue down some clear sequins to add a pop of shine.
Hemstitch Slimline Card
This gorgeous collection also includes the Hemstitch Slimline Etched Dies set which is perfect to create any type of slimline cards. That said, to create this slimline card use Cup of Kindness Glimmer Hot Foil Plate & Die Set to create the foiled background and frame. Plus, Deer Friend Glimmer Hot Foil Plate & Die Set to create the deer and one of the card sentiments. Thus, to create the slimline size foiled background, you’ll need to get 3 times the foiling over a large white card panel using the insert glimmer plate including in Cup of Kindness Glimmer Hot Foil Plate & Die Set. Then, you’ll need to get the foiling done over another piece of white cardstock using the frame and the insert glimmer plates including in the set.
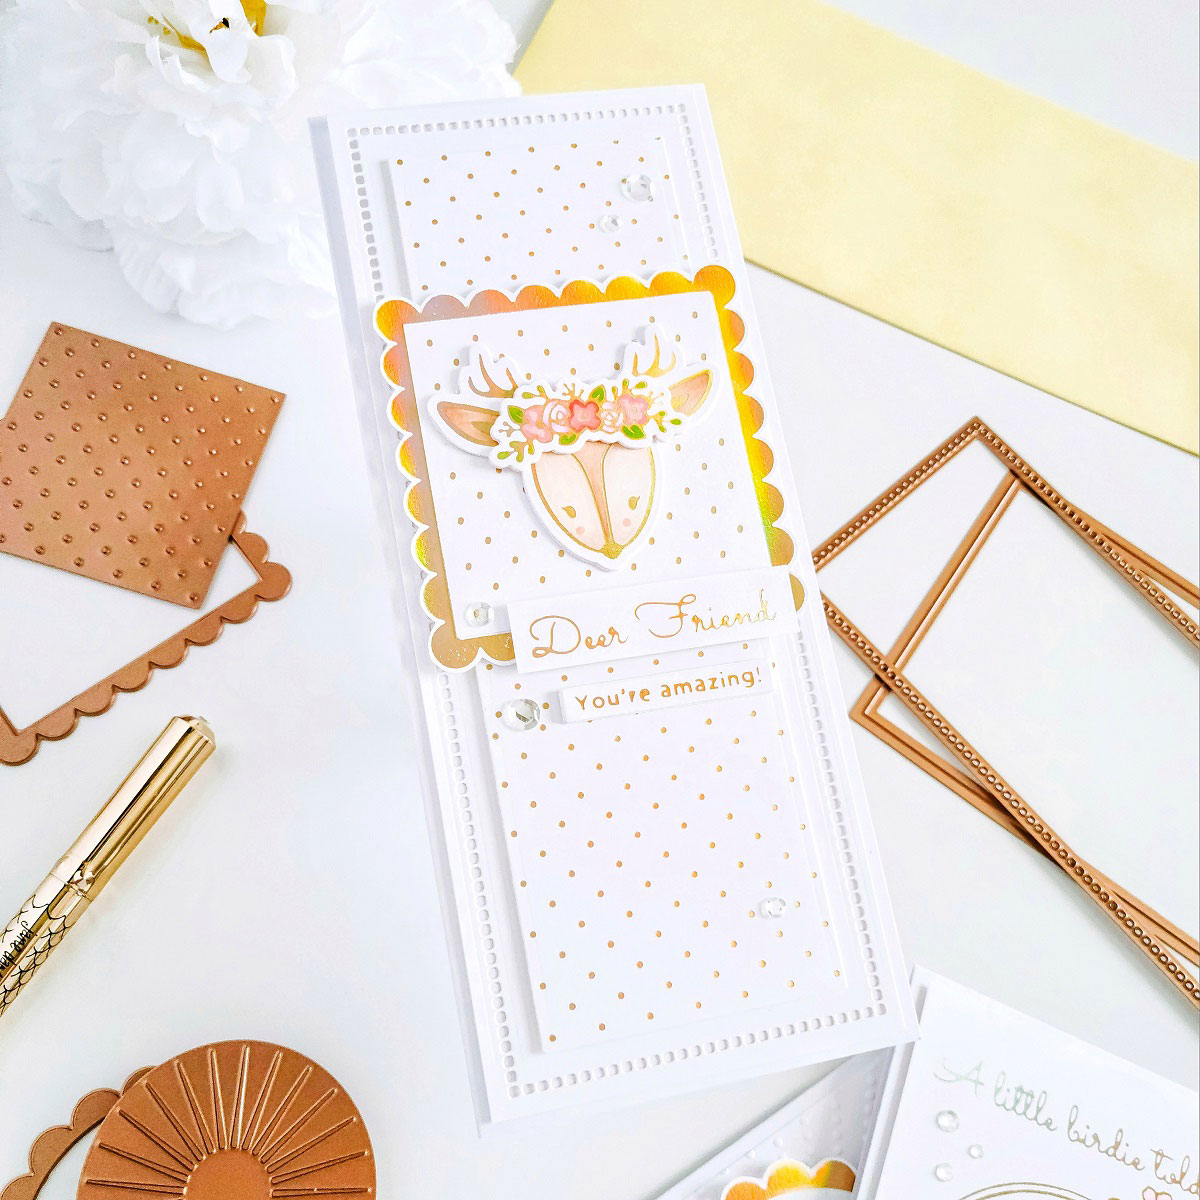
Having that said, after you’re done getting the foiling process done, go ahead and finish the foiling process by getting the deer, flowers band and the card sentiments foiled on a separate piece of white cardstock. So, once the hot foiling process is completed go add a pop of color to the deer and flowers band using the same color combination used in the first example for the flowers plus, E2, E11, E13, E21, E30 and E51 to color in the deer. And, once you’re done doing that, go ahead and start the layering for the card.

Moving on, for the card layering, create a slimline white card base and then, go ahead and line up over a large piece of white cardstock the largest and second-to-last dies including in Hemstitch Slimline Etched Dies set to die-cut the detailed frame out of it. Next, line up the third-to-last die including in the set over the foiled panel and then go ahead and run them through your die-cut machine to die-cut it out of the cardstock. Once, those steps are completed go ahead and adhere the detailed frame to the card base using double-sided tape to the card base and then, go ahead and get the backing on the foiled frame mounted with craft foam adhesive to the card. Lastly, fussy cut out using a small pair of scissors the foiled frame from the cardstock and then, go ahead and mount it over the card using craft foam adhesive as well. Last but not least, go ahead and glue down the deer and its flowers band to its head and finish the card off by mounting the card sentiments. Nevertheless, as a finishing touch, go ahead and glue down some clear sequins as well to complement the shine on all cards.
With that being said, I hope that you’ve enjoyed learning about how-to-make this sweet trio of cards showcasing the newest Sweet Cardlets II Collection by Becca Feeken. If you get inspired, be sure to tag us in your social medias using the hashtags #Spellbinders, #amazingpapergrace and #NeverStopMaking when sharing your creations so, we can see what you are creating with this beautiful collection.
Thanks for stopping by we hope to see you soon but most of all, we hope you and your family stay healthy and safe.
With love,
Yasmin.
Spellbinders Supplies:


One Comment
Donna de Gale-Kalloo
So cute!