
Handmade Cards using Spellbinders Fluted Classics Collection | Guest Post by Hussena Calcuttawala
Hello, crafty friends! This is Hussena from Quill and Punch Works and I’m so honoured to be guest posting today on the Spellbinders blog! I’m sharing a set of four cards using dies from the new Fluted Classics Collection by Becca Feeken. The gorgeous classic nested design shapes can be used to create the perfect border for any background, sentiment, or focal image for a wide variety of projects.
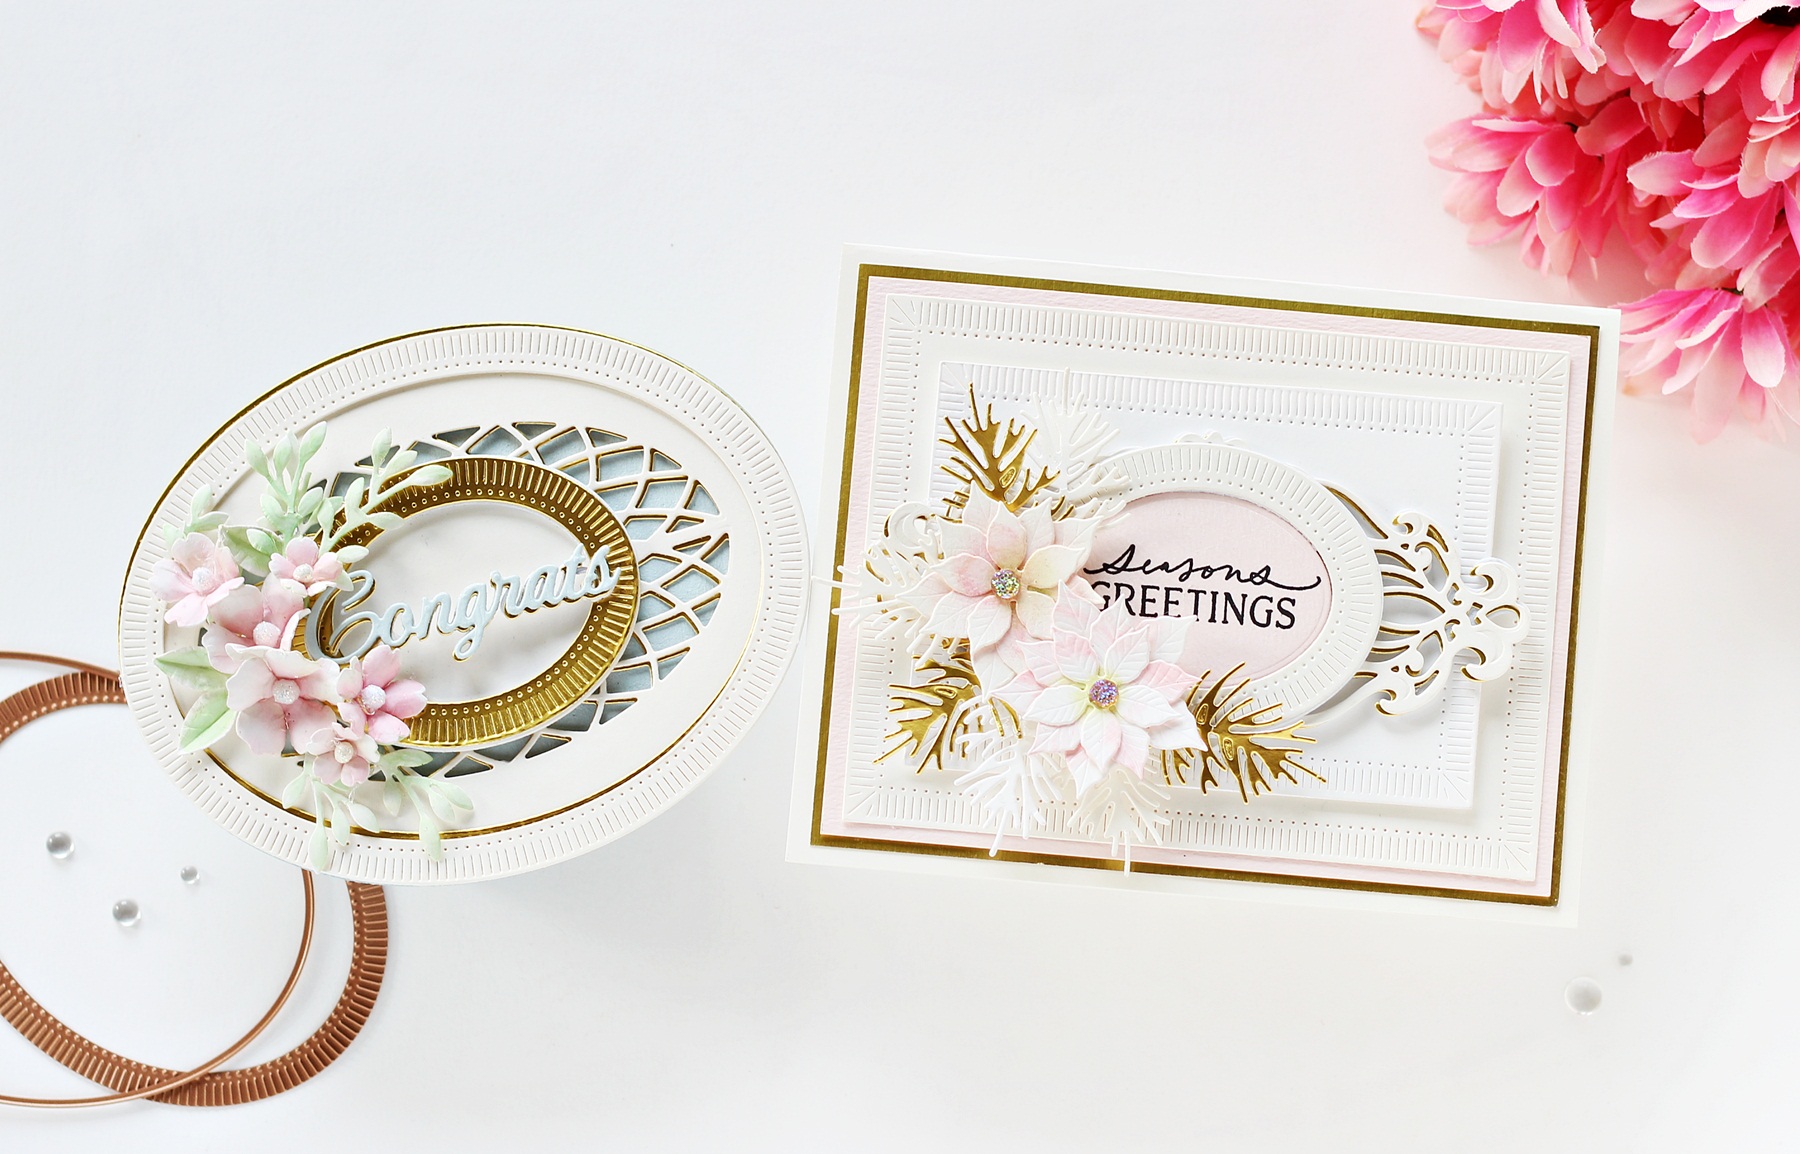

Season’s Greetings Card
My first card features the Fluted Classics Rectangles Etched Dies, Fluted Classics Ovals Etched Dies, and the Pop Up 3D Vignette Poinsettia Sleigh Die Set. The different nesting dies were simply perfect to create this pastel Christmas card.
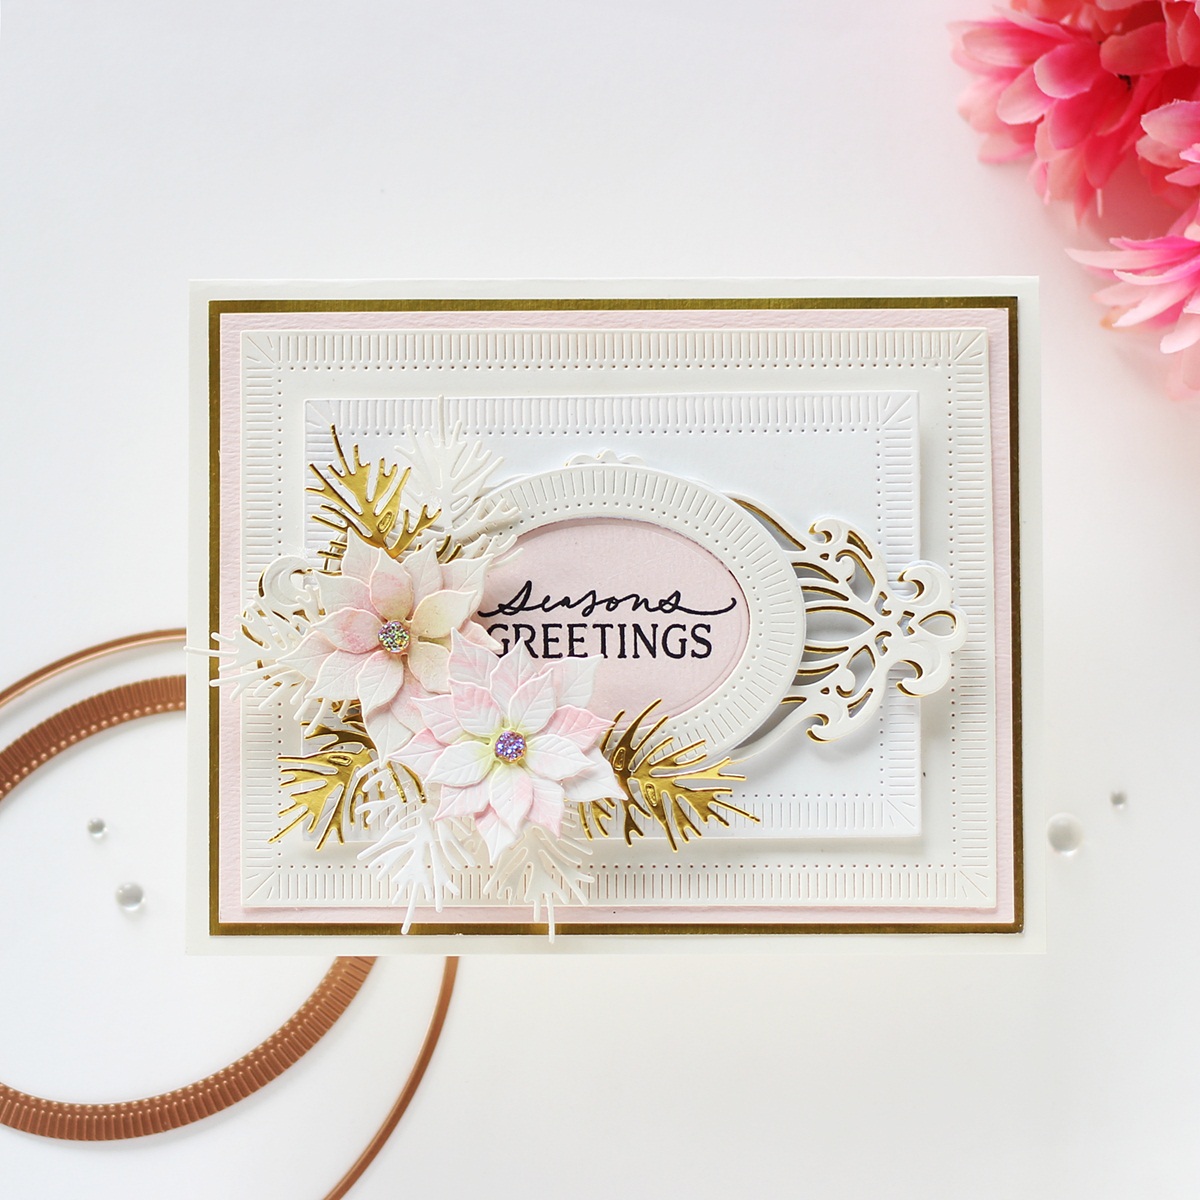
For my card, I first die cut Snowdrift Cardstock using the Large Rectangle Outer Rim and Insert Die together from the Fluted Classics Rectangles Etched Dies. Next, I die cut Alabaster Cardstock using the Medium Rectangle Outer Rim and Insert Dies from the same set. Then, I die cut Alabaster Cardstock using the Medium Oval Outer Rim, Insert, and Inner Rim Dies from the Fluted Classics Ovals Etched Dies. Once that was done, I die cut Pink Sand Cardstock using the Medium Oval Insert Die from the same set and stamped my sentiment on to the piece using Versafine Onyx Black ink.

Next, I die cut Snowdrift Cardstock and Mirror Gold Cardstock using the Design Rim and Insert dies from the Flourished Fleurit Die Set together to add underneath my sentiment piece. I adhered the layers together using liquid glue, allowing a bit of the gold to show as a shadow. This card did involve a bit of die-cutting, but I think it was well worth it in the end!
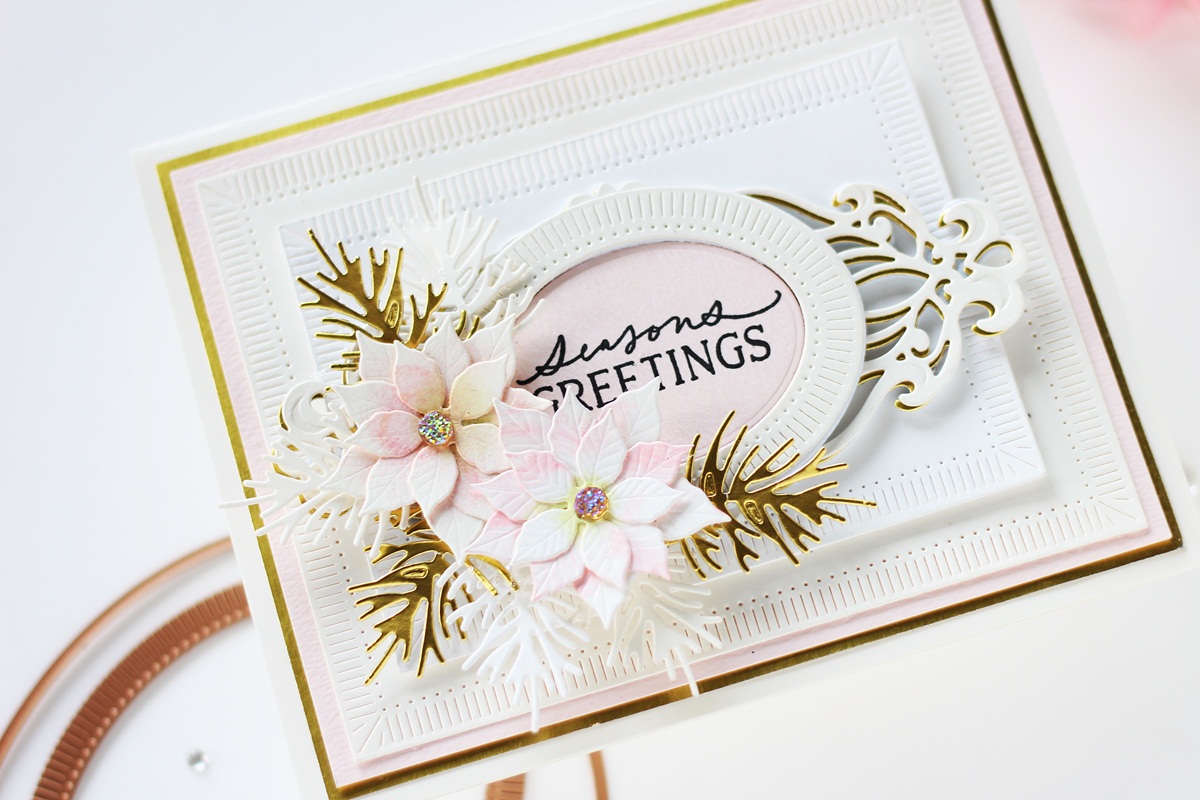
To embellish my card, I die cut Snowdrift Cardstock and Mirror Gold Cardstock using the poinsettia and evergreen leaf dies from the Pop Up 3D Vignette Poinsettia Sleigh Die Set. Next, I inked the centres of the flowers using Twisted Citron Distress ink with a sponge dauber. The petals were coloured very lightly using Picked Raspberry Distress ink and I lightly embossed the flower petals with a Ball Stylus. I then adhered the floral spray together using Liquid Glue and added a small sparkly rhinestone to the center of each flower.
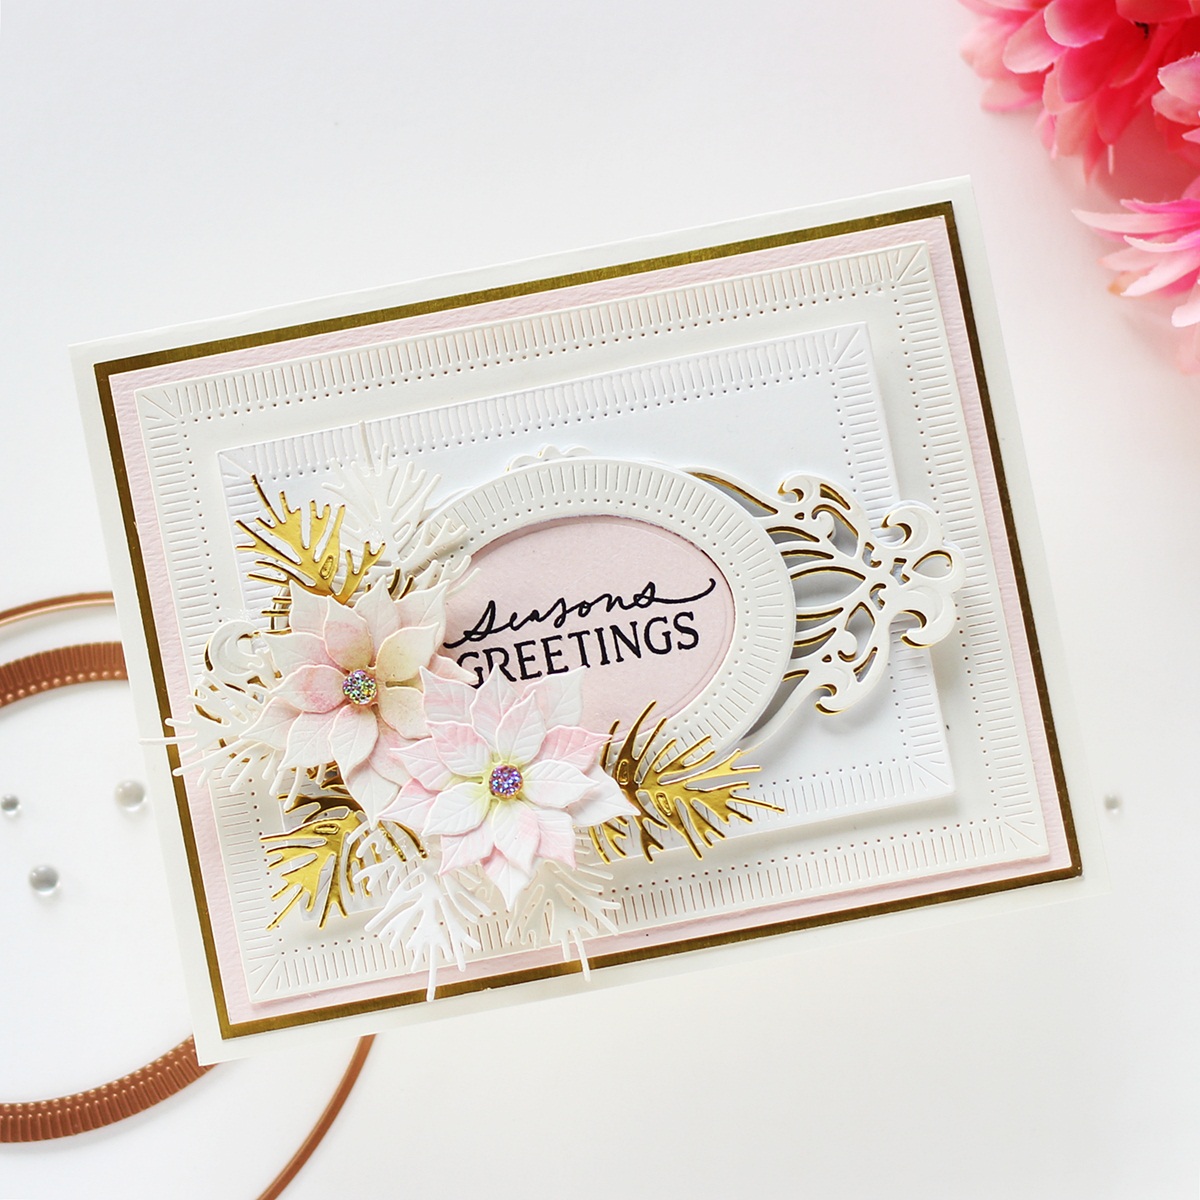
I adhered down all the different die cut elements one on top of the other using foam adhesive and matted the entire panel with layers of Pink Sand and Mirror Gold Cardstock. Then, to finish, I adhered the card front to a top-folding white card base with tape runner.
For You Card
When you have a large focal image on your project, the Fluted Classics Collection is perfect for making elegant frames and background designs to draw attention to them. Here I combined the square and circle shapes to create a layered frame for these floral die-cut pieces.
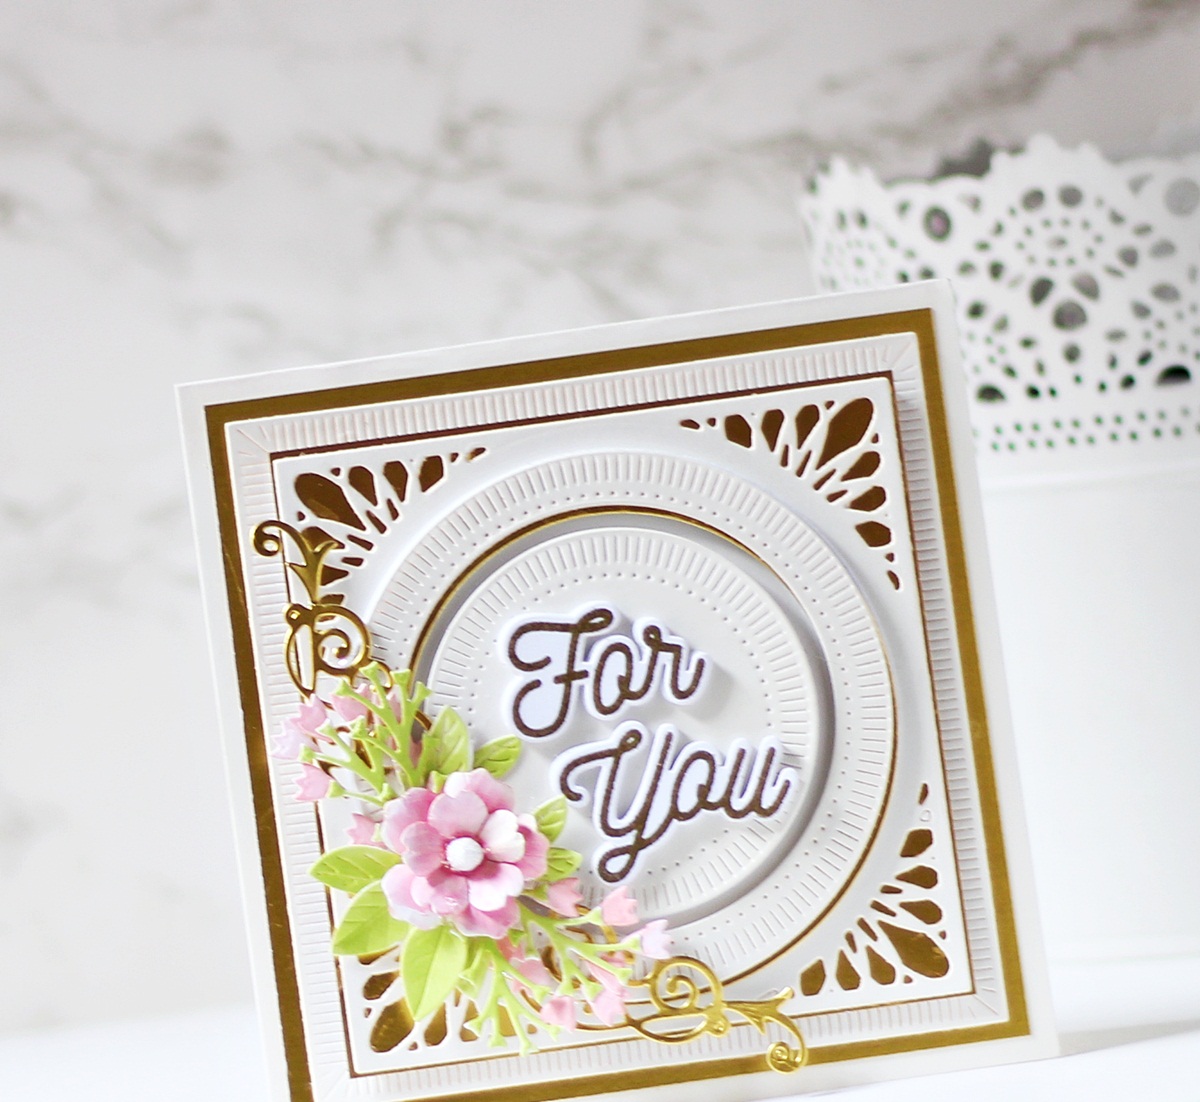
To begin, I die cut Alabaster Cardstock using the Large Square Outer Rim and Insert Dies from the Fluted Classics Square Etched Dies. Next, I die cut Alabaster Cardstock using the Square Frame die from the Elegant Infinity Die Set. In order to highlight the intricate design, I matted the die cut panel with a piece of Mirror Gold Cardstock. Once that was done, I die cut Alabaster Cardstock and Mirror Gold Cardstock using the Large Circle Outer Rim, Insert, and Inner Rim Dies from the Fluted Classics Circle Etched Dies. I adhered the ivory die-cut piece on top of the gold die-cut with liquid glue, offsetting them a bit to form a shadow. Them, I die cut Alabaster Cardstock using the Medium Circle Outer Rim and Inner Rim Dies from the Fluted Classics Ovals Etched Dies. I adhered the pieces down on my panel using foam adhesive for dimension.
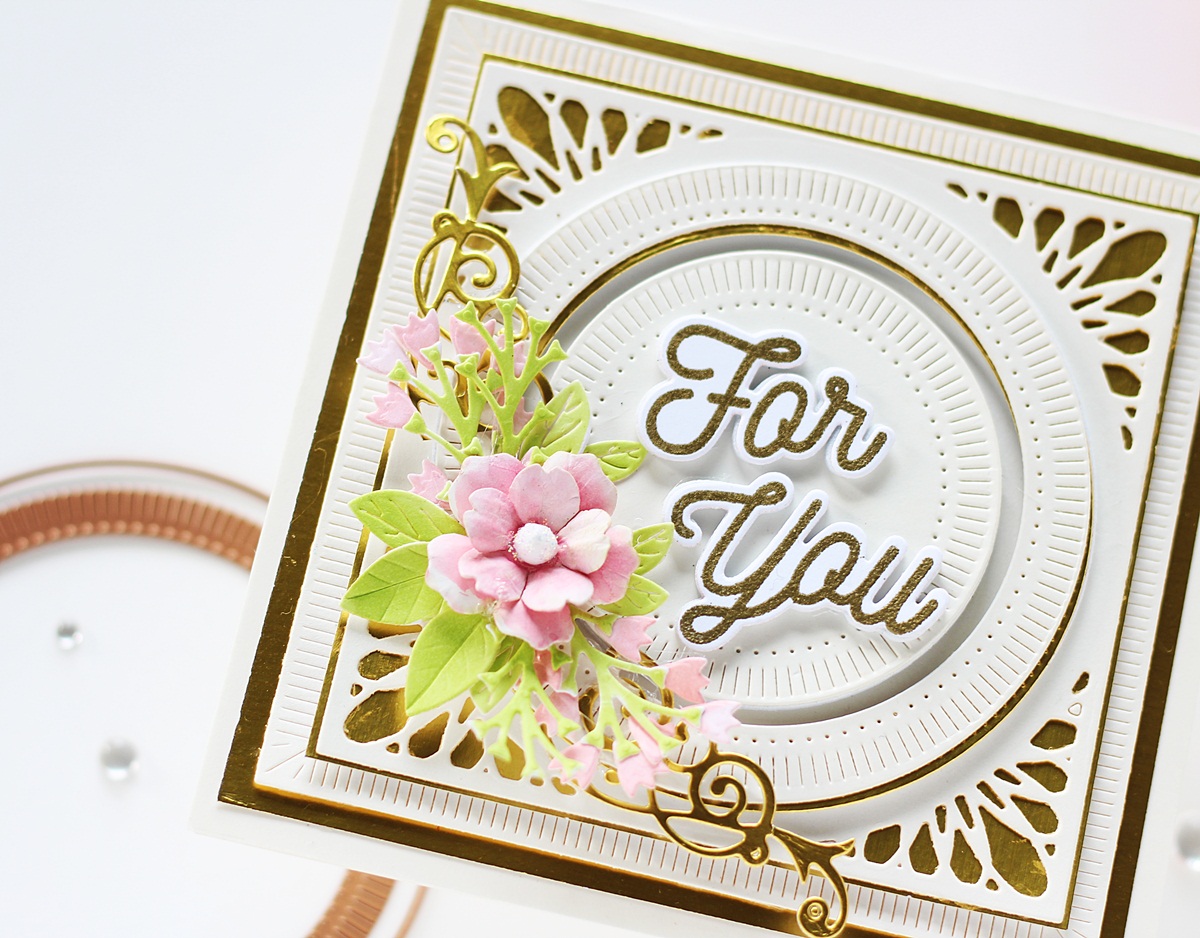
Next, I stamped the sentiment from the Sending You stamp set onto Snowdrift Cardstock using Versamark Embossing ink, added Super Fine Gold Embossing Powder on top of the stamped images, and melted it with a Heat Tool. I cut out the stamped images using the coordinating dies and popped them on to my panel using foam adhesive for dimension.
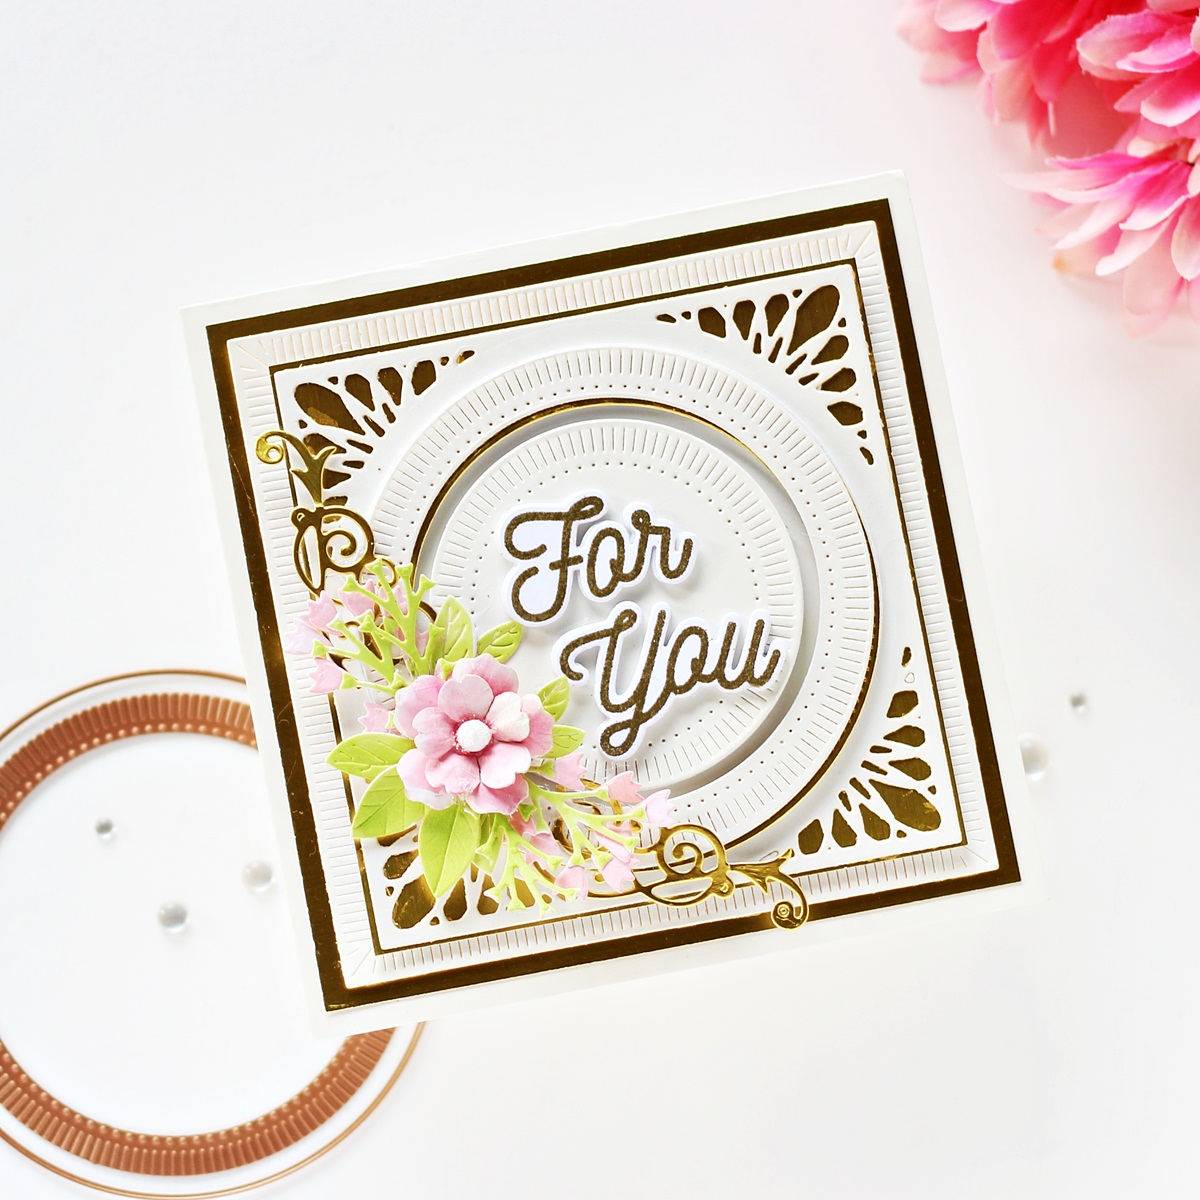
To create my floral spray, I die cut Snowdrift Cardstock using the small blossom and leaf dies from the Floral Potpourri Etched Dies. I coloured the die cut pieces using Mermaid Markers from Jane Davenport, shaped the individual pieces with a Ball Stylus, and added a small sparkly Styrofoam bud to the center of flower. I also die cut Snowdrift Cardstock using the floral accessory dies included in the Flourished Fleurit Die Set and coloured them using Mermaid Markers to add to my foliage. To complete my floral arrangement, I die cut Mirror Gold Cardstock using the decorative flourish die included in the Mini 3D Vignette Floral Mason Jar Die Set.
It was now time to assemble the card together. I adhered down the die cut pieces using a mix of foam adhesive and Liquid Glue. I arranged the flowers and leaves around the sentiment panel and adhered them down with strong Liquid Glue. Then, I matted the card background panel with Mirror Gold Cardstock and adhered it down to a top-folding white square card base with tape runner. To finish, I popped the die cut sentiment pieces on my panel using foam adhesive for dimension.
Hello Card
My next card includes lots of die-cutting and a touch of stamping. I chose a color scheme that would work for most seasons so that I could send this friendship card any time of year.
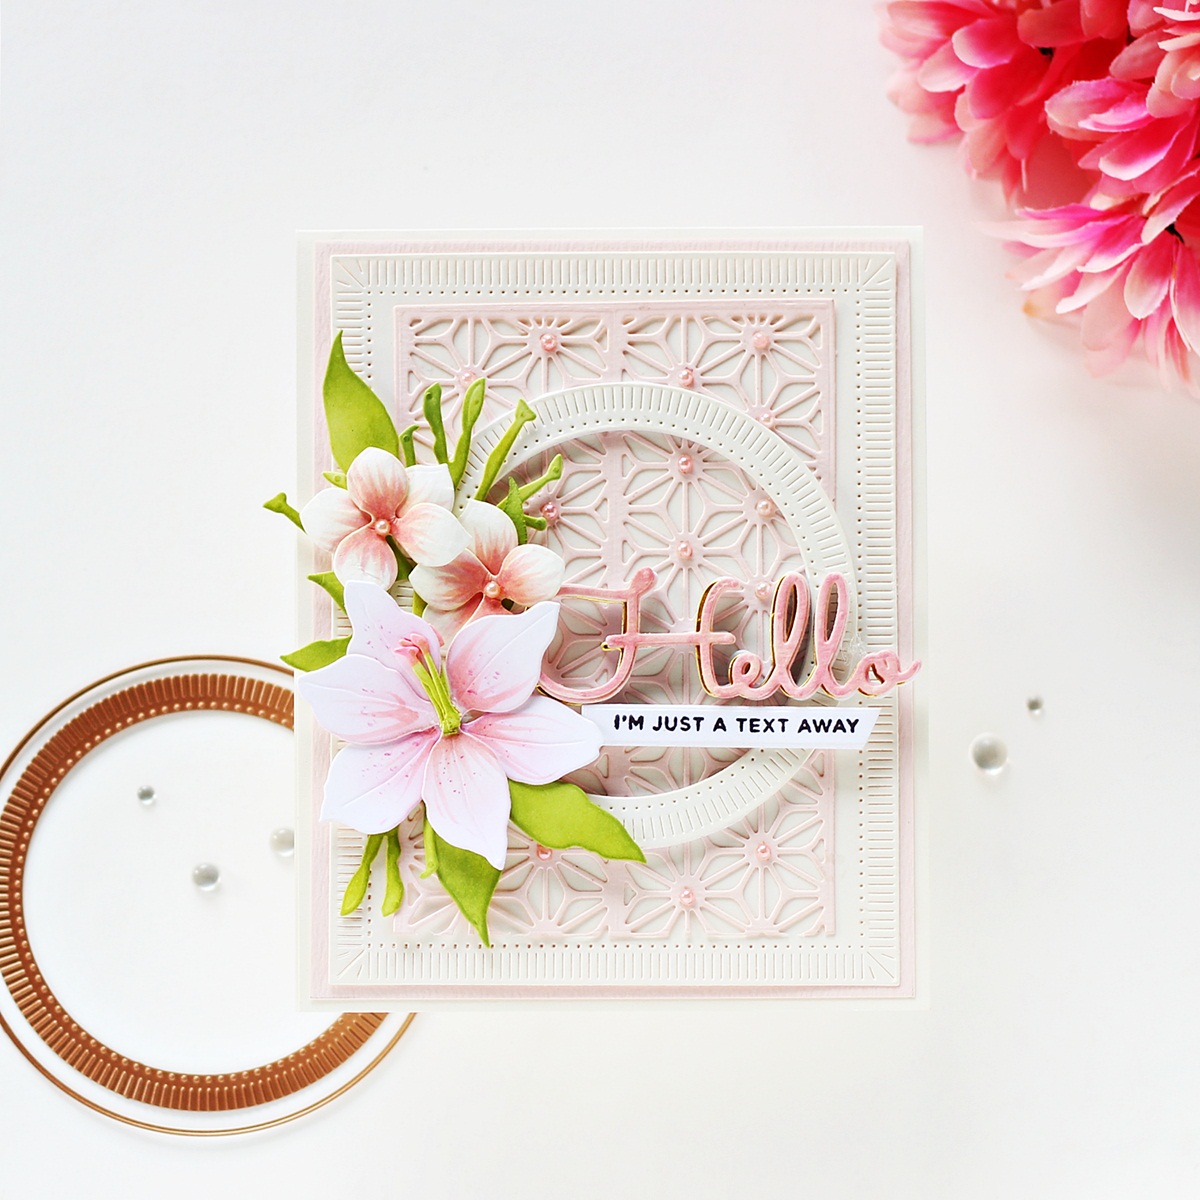
To create my card, I first die cut Alabaster Cardstock using the Large Rectangle Outer Rim and Insert Dies from the Fluted Classics Rectangle Etched Dies. Next, I die cut Pink Sand Cardstock using the Medium Rim and Insert Dies from the Victorian Splendor Slimline Etched Die Set and adhered it down to my card panel using Liquid Glue. Then, I die cut Alabaster Cardstock using the Medium Circle Outer Rim, Insert, and Inner Rim Dies from the Fluted Classics Circles Etched Dies and adhered it down to my background panel using foam adhesive.
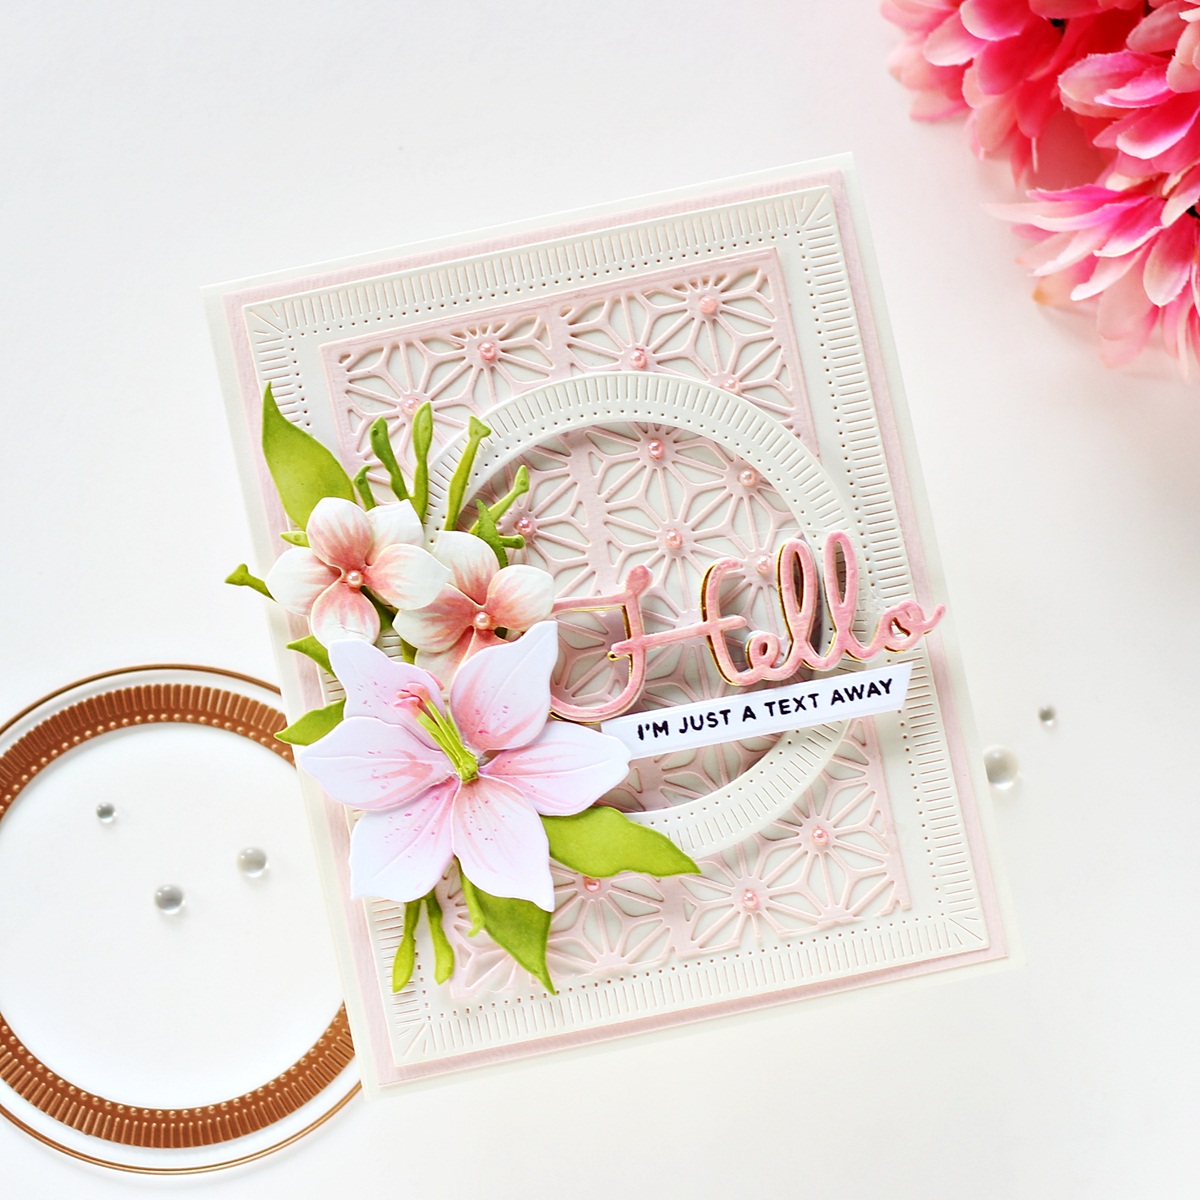
Then, to embellish my card front, I die cut Snowdrift Cardstock using the Oriental Lily and Wellies and Plumeria Etched Dies from Susan’s Garden. I used Copic markers to colour the centres of the flowers and lightly shaped the petals using the Ball Stylus from Susan’s Garden Ultimate Tool Kit. I added a pink pearl to the centre of each flower for interest. Next, I die cut Snowdrift Cardstock using the large leaf, medium leaf, small leaf, and stem die from the Plumeria Etched Dies from Susan’s Garden. I blended Peeled Paint and Twisted Citron Distress inks over the die cut pieces for depth. I went with 2D flowers this time and really like how they have turned out.
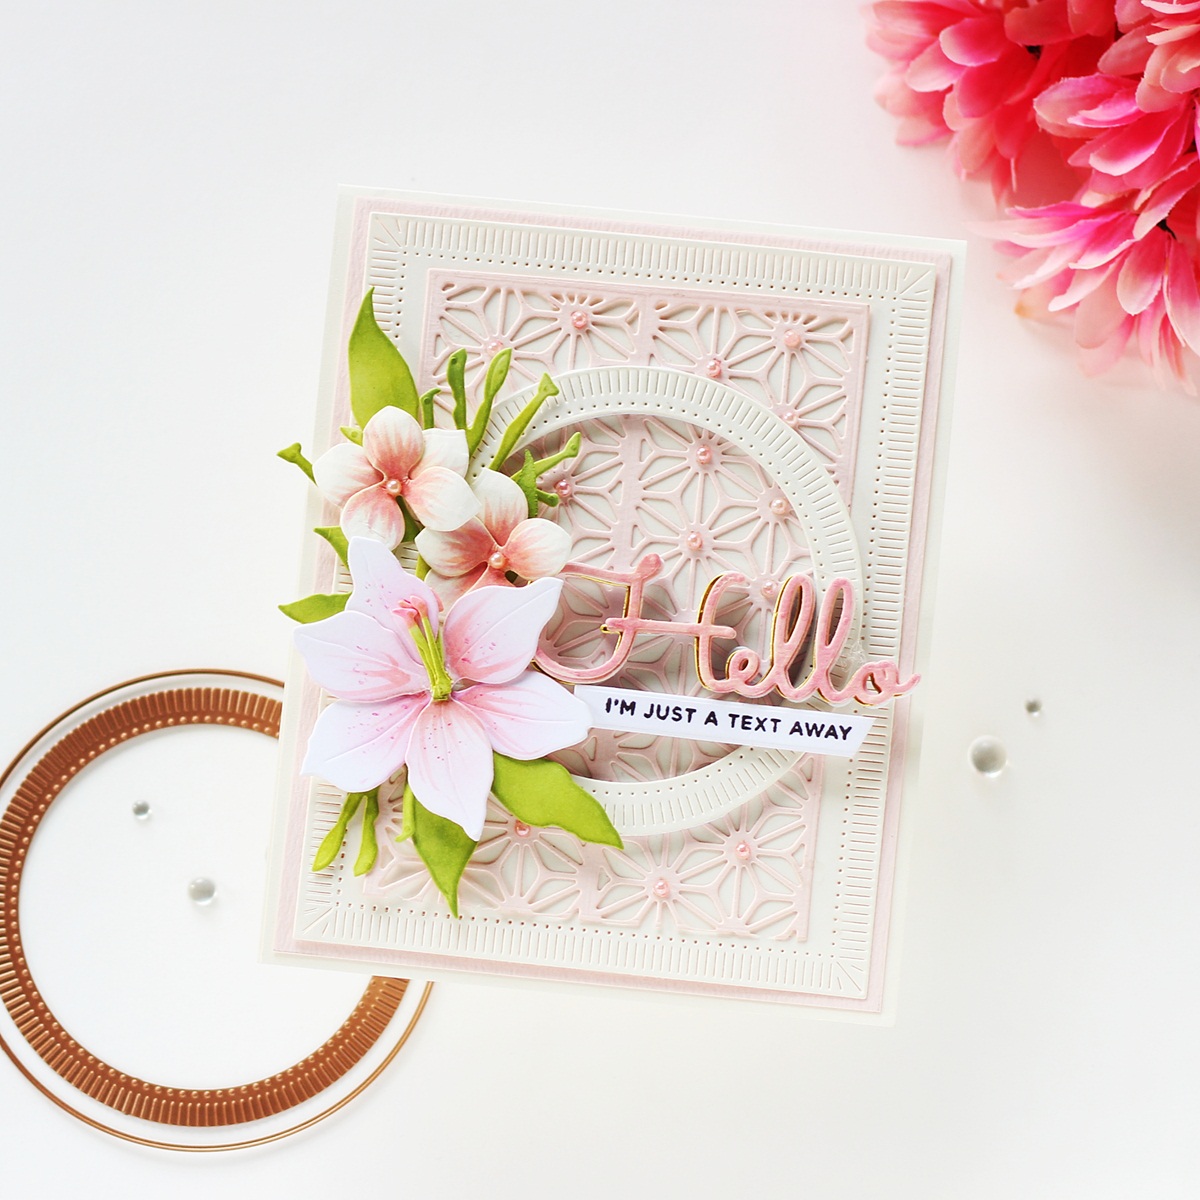
Next, I die cut Snowdrift Cardstock and Mirror Gold Cardstock using the ‘Hello’ die from the Sweet Sayings Notecard Sentiments Etched Dies. I adhered the white die-cut sentiment on top of the gold die-cut with liquid glue, offsetting them a bit to form a shadow. I then ink blended Picked Raspberry ink to the top three-quarters of the sentiment die-cut piece for more depth. Once that was done, I adhered the piece down to my panel using foam adhesive. Then, I stamped a sentiment from the I’m Here for You Sentiments Clear Stamp & Die Set on to a strip of Snowdrift Cardstock using Versafine Onyx Black ink and popped it on to my panel using foam adhesive. I arranged the flowers and leaves around the sentiment panel and adhered them down with strong Liquid Glue. To assemble the card together, I matted the card panel with Pink Sand Cardstock before adhering it to a top-folding A2-sized ivory card base. I adhered pink pearls all over the intricate background panel as a finishing touch.
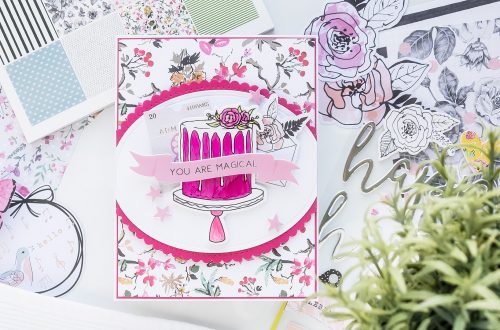
Shaped Card
I love creating Shaped Cards and the Fluted Classics Ovals Etched Die Set was just perfect for creating one. I always love when I can stretch my dies and use them to create new designs. I added a few handmade flowers for a simple congratulations card.

To create my card, I first scored and folded Waterfall Cardstock in half and placed the Large Oval Insert Die included in the Fluted Classics Ovals Die Set along the fold of the card, so the cutting edges of the die are just above the fold. I then ran it through my Spellbinders Platinum 6″ Machine. This helped me create a folded card base that matches the shape of the card. I then die cut Alabaster and Pink Sand Cardstock using the Large Oval Insert Outer Rim and Insert Dies from the same set. I adhered the ivory die-cut piece on top of the gold die-cut with liquid glue, offsetting them a bit to form a shadow.
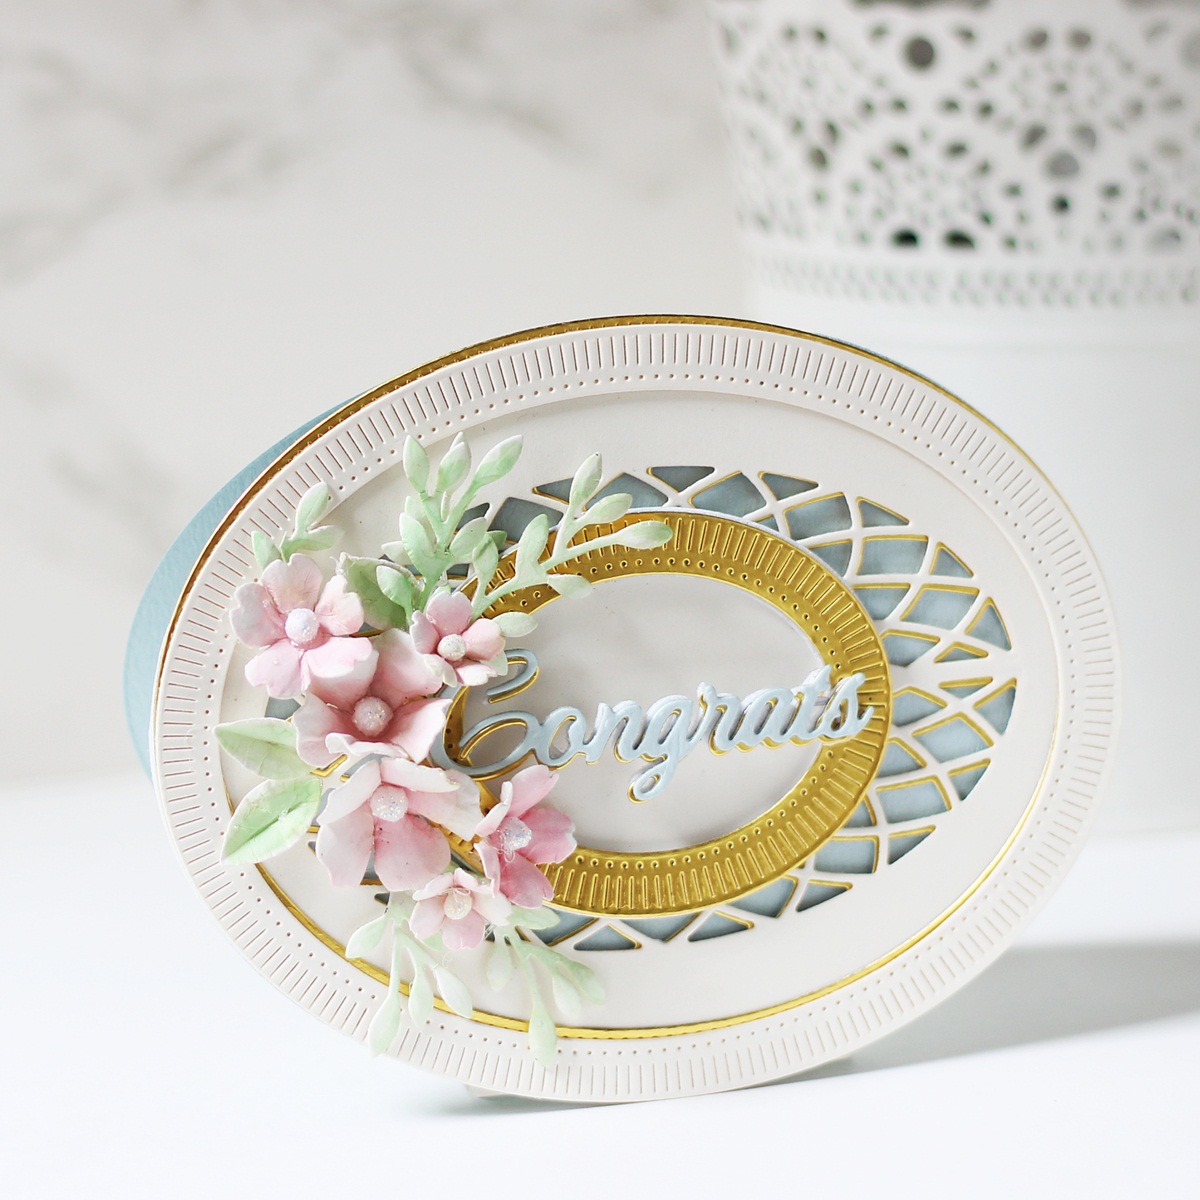
Next, I die cut Mirror Gold Cardstock using the Small Oval Outer Rim, Insert, and the Small Oval Inner Rim Dies included in the Fluted Classics Ovals Die Set. Once that was done, I adhered a solid oval cut using Snowdrift Cardstock inside the outline die cut piece with Liquid Glue. Next, I die cut Waterfall and Mirror Gold Cardstock using the sentiment die from the Elegant Infinity Die Set. I adhered the blue die-cut sentiment on top of the gold die-cut with liquid glue, offsetting them a bit to form a shadow. Next, I die cut Snowdrift Cardstock using the Plumeria Etched Dies from Susan’s Garden. I lightly coloured the pieces using Mermaid Markers and shaped the petals using the Ball Stylus and Tweezers from Susan’s Garden Ultimate Tool Kit.

Then, I die cut Snowdrift Cardstock using the leaf dies included in the Floral Potpourri Etched Dies. I coloured the individual die cut pieces using Mermaid Markers and embossed them using the Small Ball Tip and Tweezers from the Ultimate Tool Kit by Susan’s Garden. I added sparkly styrofoam buds to the centre of each of the flowers for more dimension. To finish, I assembled the different card layers together and adhered them down using a mix of Liquid Glue and foam adhesive.
Spellbinders Supplies:

Other Supplies
Neenah Solar White Cardstock, Copic Markers, Peeled Paint, Picked Raspberry, Twisted Citron Distress Inks, Versafine Onyx Black Ink, Versamark Embossing Ink, Super Fine Gold Embossing Powder, Blending Tool, Sponge Daubers, Heat Tool, MISTI Stamping Tool, Tape Runner, Foam Adhesive, Crystal Jewels, Styrofoam Buds, Microfine Glitter Powder, Rhinestones, White Fun Foam Sheets
I hope you enjoyed this set of layered floral cards featuring the Fluted Classics Collection and are inspired to give it a try. Thank you so much for stopping by today!
You can find more inspiration over at my Instagram page and Blog.

One Comment
MaryH
OMG these cards are so beautiful and sophisticated! Love the colors and those flowers have your special touch! I can tell my poor pocket book will take a hit, as I love the Fluted Classics Collection by Becca Feeken!