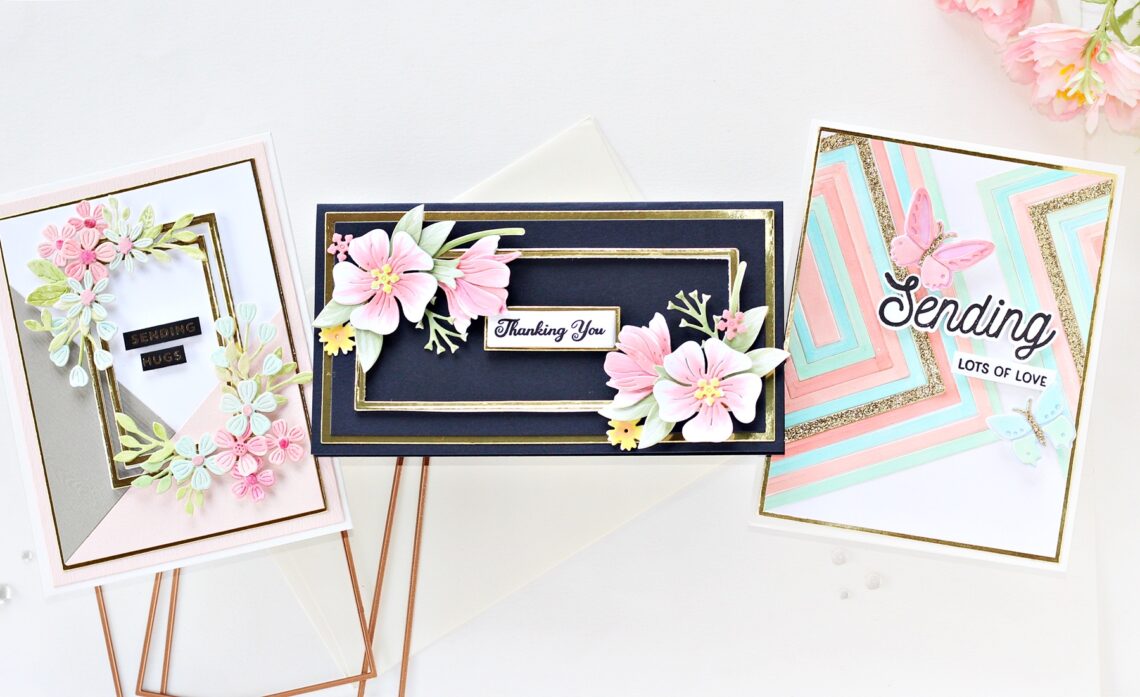
Precision Layering Basics Collection – Three Ideas From Hussena Calcuttawala
Hello, crafty friends! This is Hussena from Quill and Punch Works and I’m so honored to be guest posting today on the Spellbinders blog! using the new Precision Layering Basics Collection. Basic nesting dies are a staple in every crafter’s stash and there are so many things one can do with them. The dies in the Precision Layering Basics Collection are designed to cut perfectly spaced layers of 1/8-inch, and when combined with the B Sets, help you achieve a 1/16-inch border. This means no more measuring, as the work is done for you. I used the various dies in this collection to create three easy and fun cards for a variety of occasions.

My first card features the Precision Layering A2 A Etched Dies, Precision Layering A2 B Etched Dies, and the Precision Layering Mini Slimline A Etched Dies & Precision Layering Mini Slimline B Etched Dies. I kept this card simple to go with the modern look of the die set. I used various colors of cardstock from my stash to make the color block background and adhered bunches of pink and blue flowers around the sentiment.
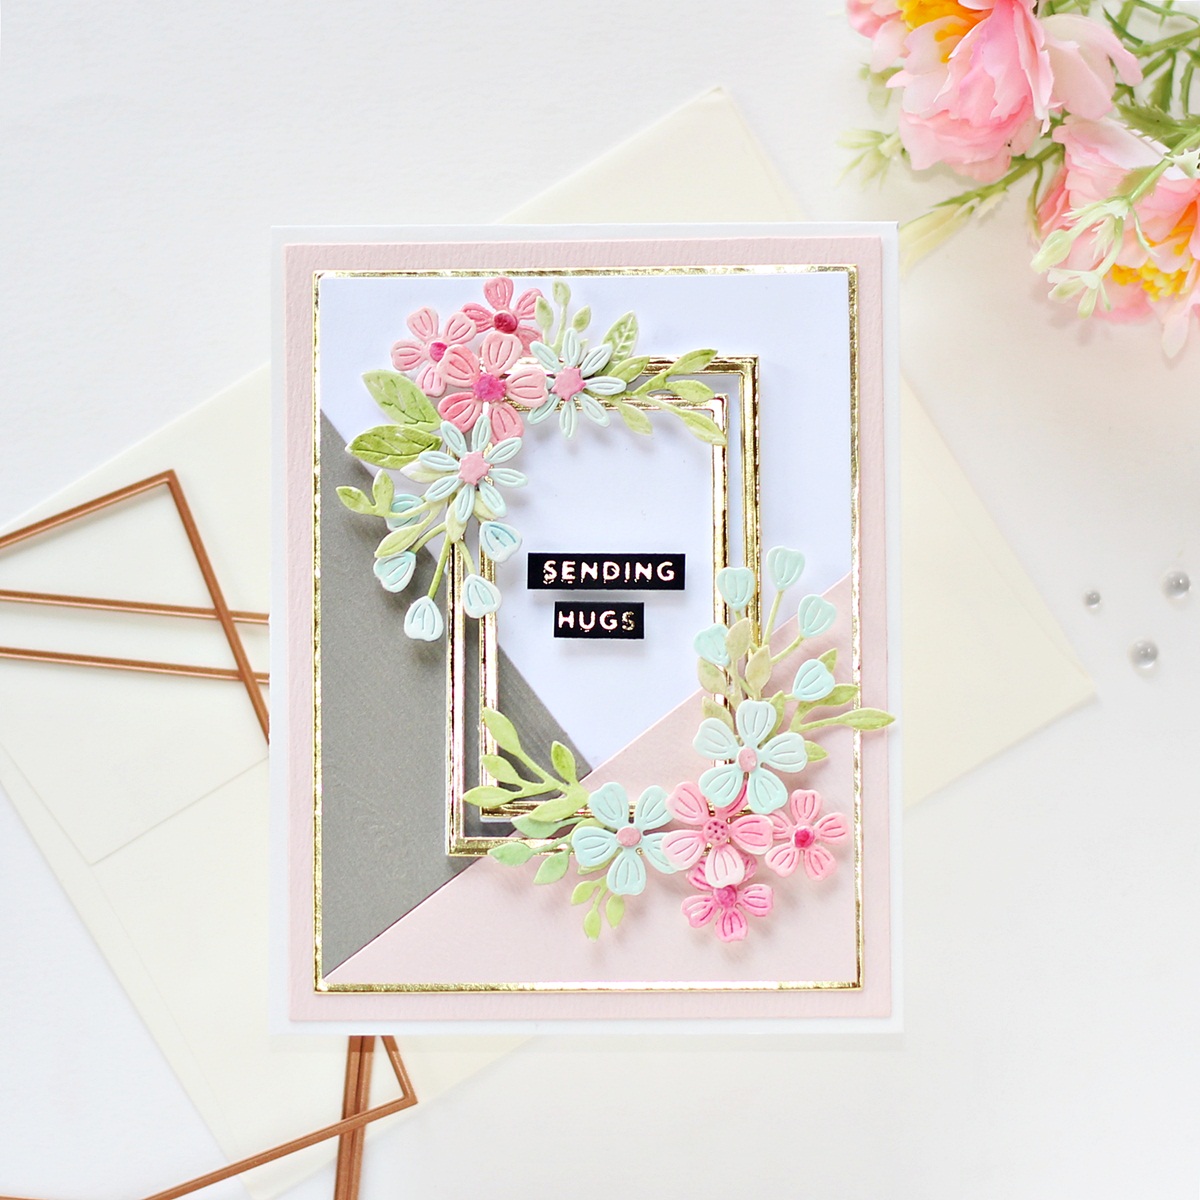
To create my card, I first cut Snowdrift, Pink Sand, and Brushed Silver Cardstock using different layering dies from the Precision Layering A2 A Etched Die Set and arranged the pieces together to create my background. This is a great technique to use existing scraps in your stash and utilize them for creating card backgrounds! Next, I die-cut Brushed Gold Cardstock using the Layer 1 Die from the Precision Layering A2 A Etched Dies and adhered it down using liquid adhesive to my background panel. I then matted the card panel with Pink Sand Cardstock and attached it to a top-folding white card base using a tape runner.
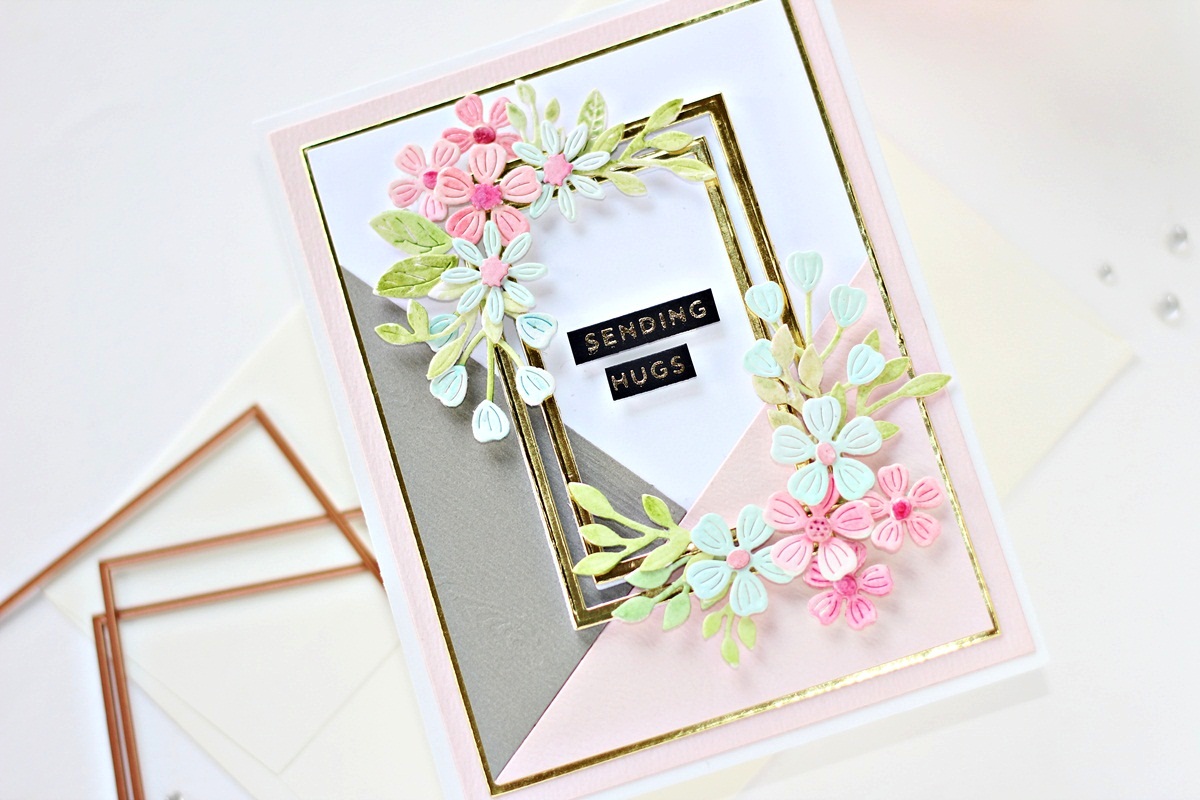
Next, I die-cut Brushed Gold Cardstock and White Fun Foam using the Layer 3 and Layer 4 Dies from the Precision Layering Mini Slimline A Etched Dies to create a die-cut frame for my card front. I used two different nesting dies to create the frame, but you can stick to one if you’d like. I adhered the pieces one on top of the other using liquid adhesive.

Next, I die-cut Snowdrift Cardstock using various flowers and foliage dies from the Mini Blooms and Sprigs Etched Dies and Layered Blooms Etched Dies. I colored the die-cut pieces using Jane Davenport’s Watercolour Brush Markers and then foam-mounted them to the panel for dimension. Once that was done, I used Gold Hot Foil to foil Onyx Cardstock using one of the sentiments from the Mini Sincere Sentiments Glimmer Hot Foil Plate and cut it out using the coordinating die. Then, to finish, I adhered the pieces onto my panel using foam tape for a raised effect.
My second card features the Precision Layering Mini Slimline A Etched Dies, Precision Layering Mini Slimline B Etched Dies, and the Primrose Heart Façade Etched Dies. I have long been a fan of Slimline cards, so I was absolutely thrilled to know that Spellbinders now offers Mini Slimline dies as well. These are such a fun alternative to standard A2-sized cards and I love working with this size. The idea for this card was to create a floral design on a dark background, surrounding a foiled sentiment frame, and the Precision Layering Mini Slimline A Etched Dies made it such a breeze to create my card design.
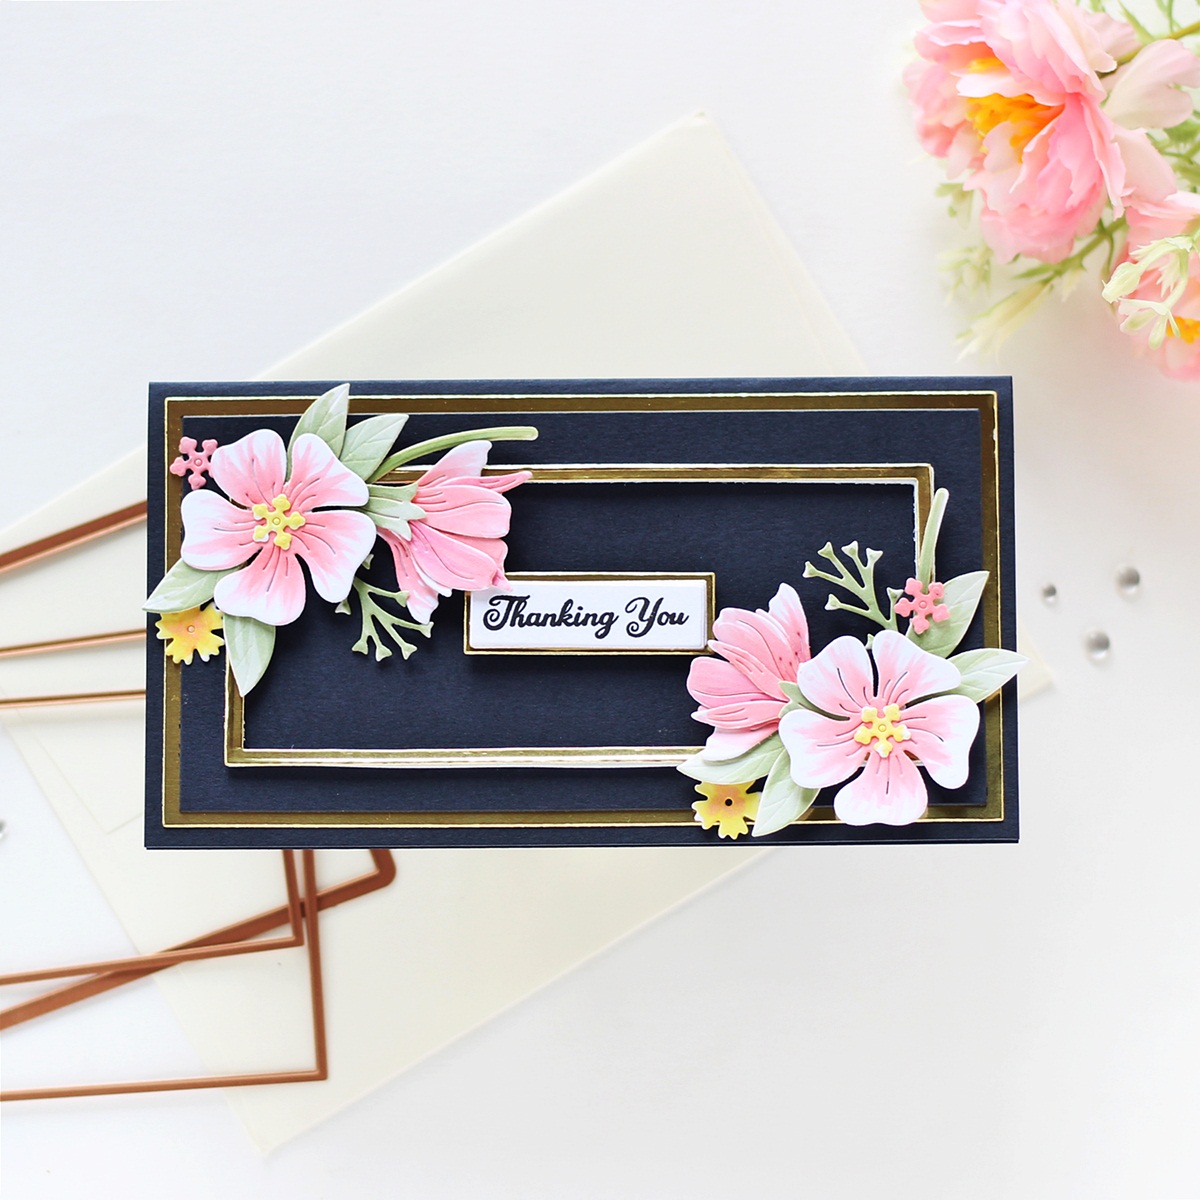
To create my card, I first die-cut Brushed Gold Cardstock using the Layer 1 Die from the Precision Layering Mini Slimline A Etched Dies to create a die-cut frame for my card front. Next, I die-cut Navy Blue Cardstock using the coordinating Layer 2 Die from the Precision Layering Mini Slimline B Etched Dies. Then, I die-cut Brushed Gold Cardstock using the Layer 4 Die from the Precision Layering Mini Slimline A Etched Dies. I adhered the layers together using liquid adhesive to create my background panel.
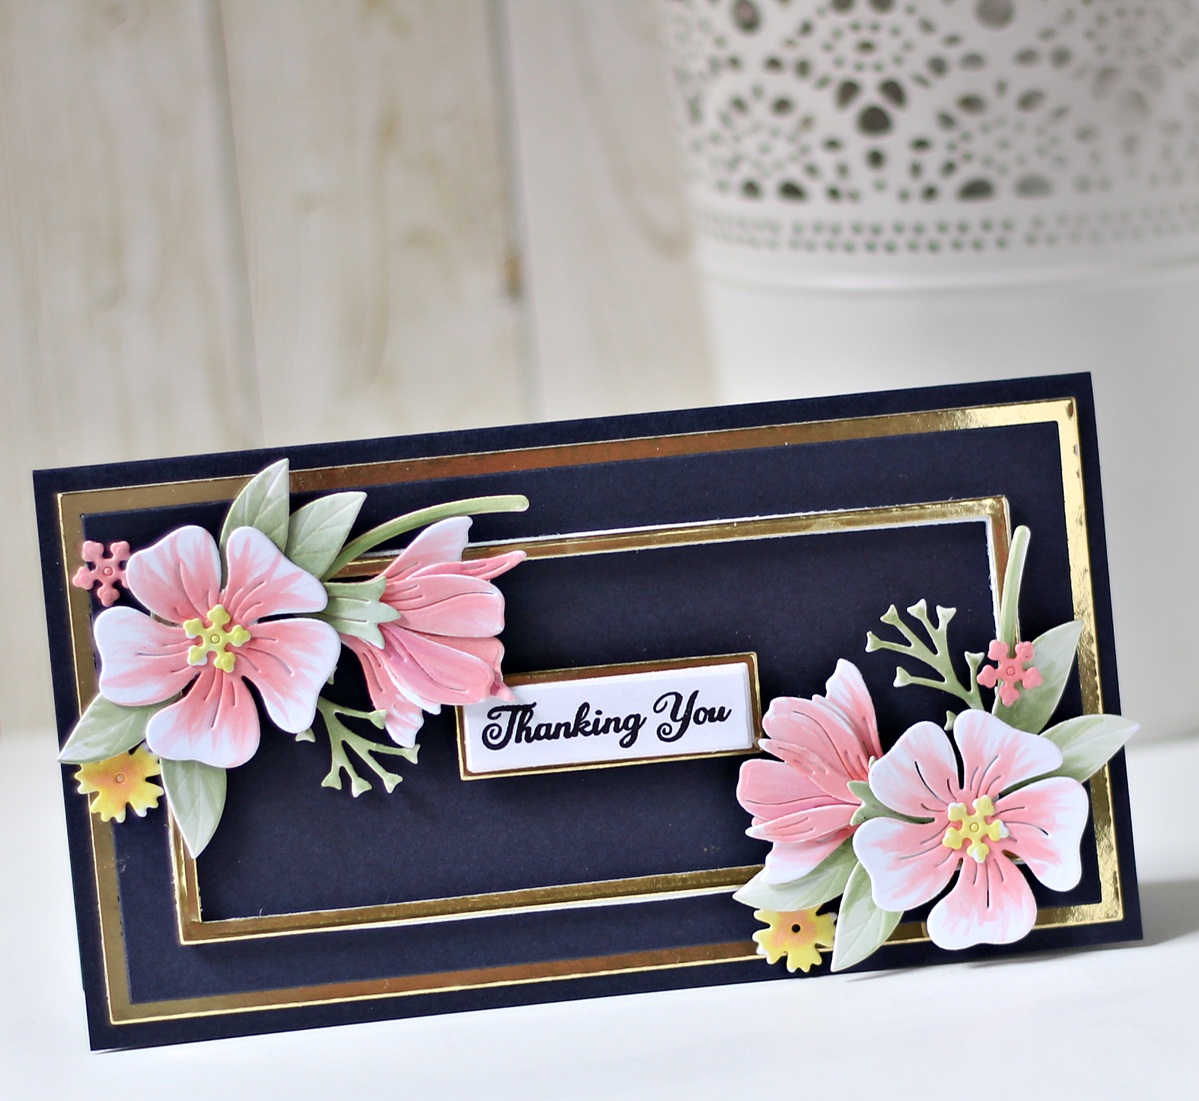
Next, I die-cut Snowdrift Cardstock using various flower and foliage dies from the Mini Blooms and Sprigs Etched Dies and Layered Blooms Etched Dies. I used a combination of Jane Davenport’s Watercolour Brush Markers and Copic Markers to color and shade the die-cut pieces, but you can also cut out the pieces from colored cardstock and assemble them together, or use any coloring medium of your choice.
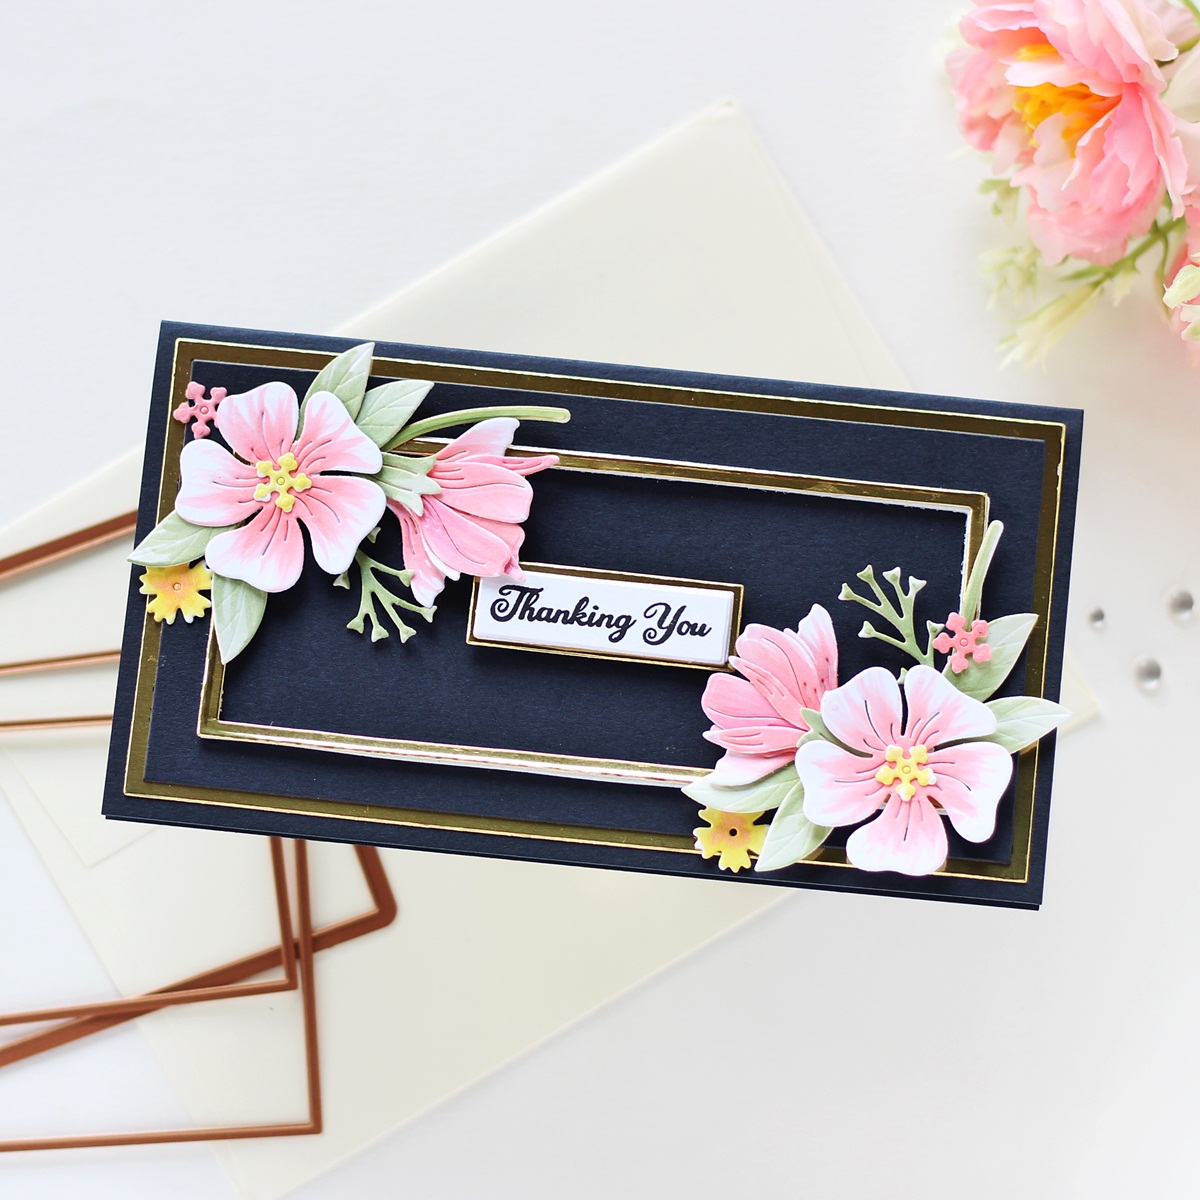
Next, I die-cut Brushed Gold and Snowdrift Cardstock using the Layer 11 Dies from the Precision Layering Mini Slimline A Etched Dies and Precision Layering Mini Slimline B Etched Dies. I stamped my sentiment from the All Occasion Sentiments Stamp and Die Set in Versafine Onyx Black ink and adhered the layers together using liquid glue and then foam-mounted them to the panel for dimension. Then, to finish, I attached my card background to a top-folding navy card base using a tape runner. I really liked working with a dark background for this card, I think it helps the pale pink and coral flowers pop.
My final card for today features the Precision Layering A2 A Etched Dies, Precision Layering A2 B Etched Dies, and the Butterfly Bliss Garden Shutters 5 x 7″ Card Base Etched Dies. I love stretching my supplies to get more out of them and the background for this card was so fun to create using just nesting dies. With a few butterflies and a big, pretty sentiment, this card came together easily.
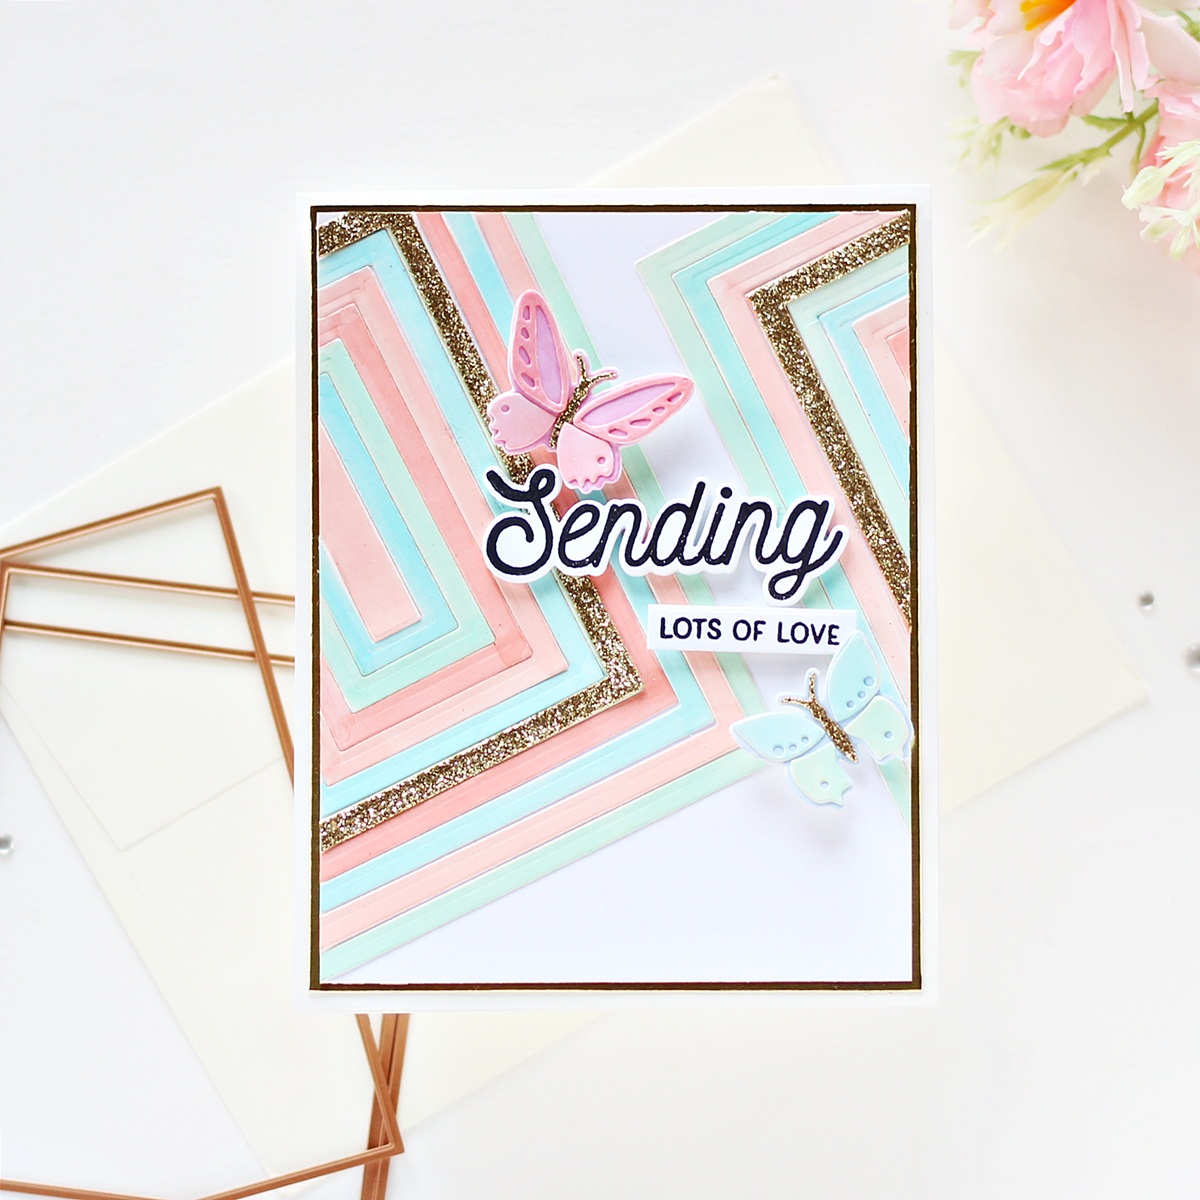
To make my card, I first die-cut a piece of Brushed Gold Cardstock using the Layer 1 Die from the Precision Layering A2 B Etched Dies and Snowdrift Cardstock using the coordinating Layer 2 Die from the Precision Layering A2 A Etched Dies. I matted the white panel with the foiled card panel using a tape runner and then attached it to a top-folding white card base made from Snowdrift Cardstock.
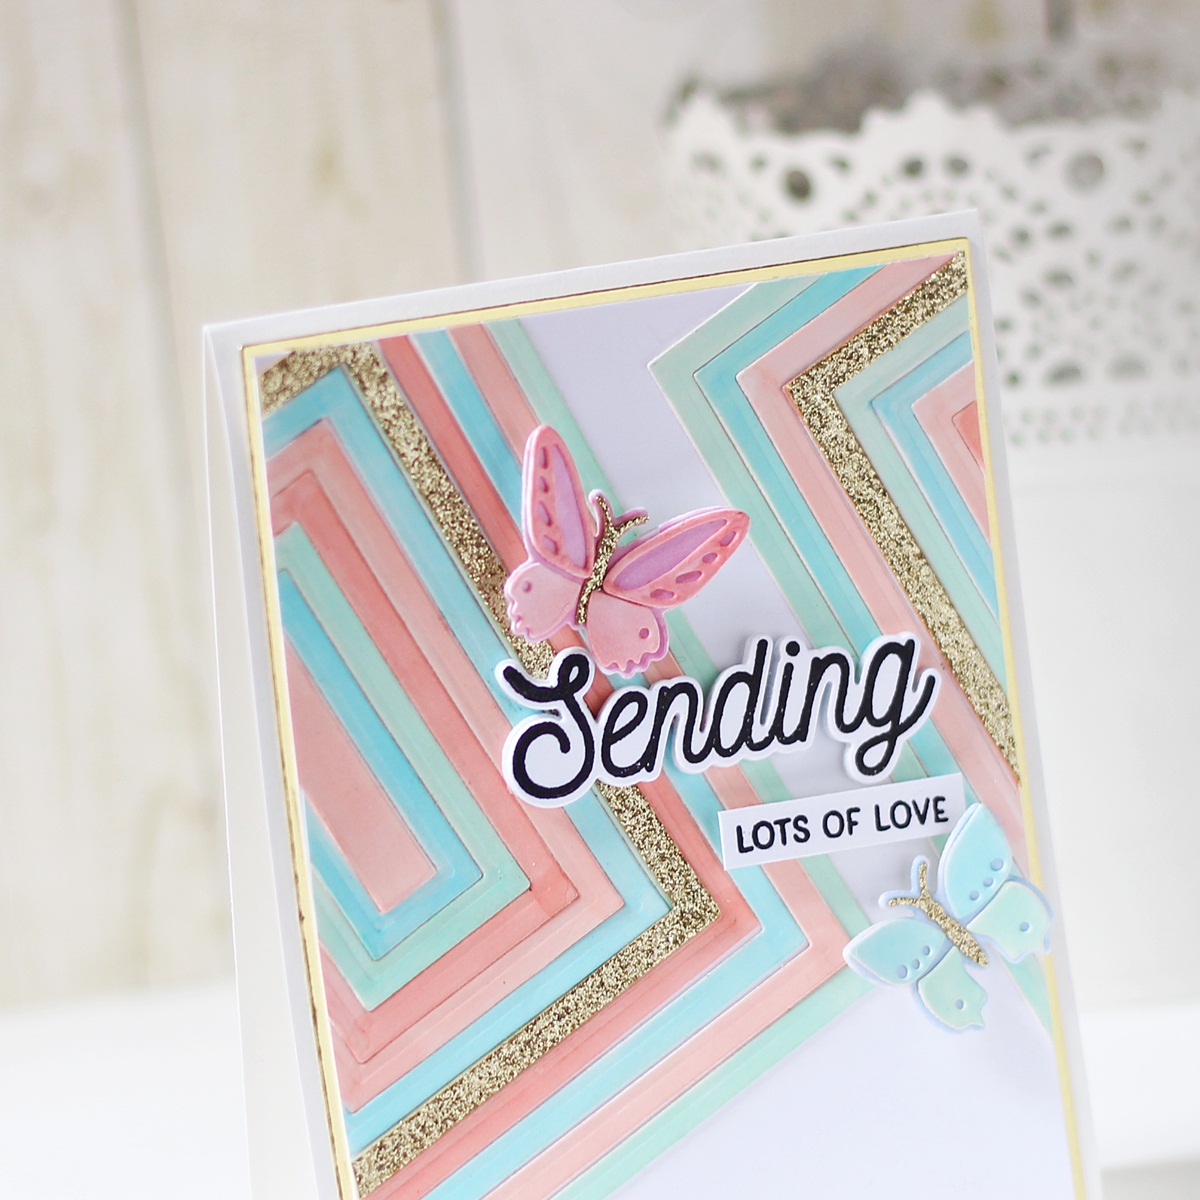
Next, I die-cut Snowdrift and Gold Glitter Cardstock using various nesting dies included in the Precision Layering A2 A Etched Dies. I colored the pieces using Copic markers, but you can use Distress Oxides or inks as well if you like. Next, I assembled the pieces down on my panel and adhered them using liquid adhesive. I trimmed the overhanging pieces using a paper trimmer and used the leftover die-cut pieces on the other side of the panel to create a continuous background design. This is a great technique to get more out of your basic shape dies. One can create a multitude of die-cut or embossed backgrounds for your cards using simple techniques like such.
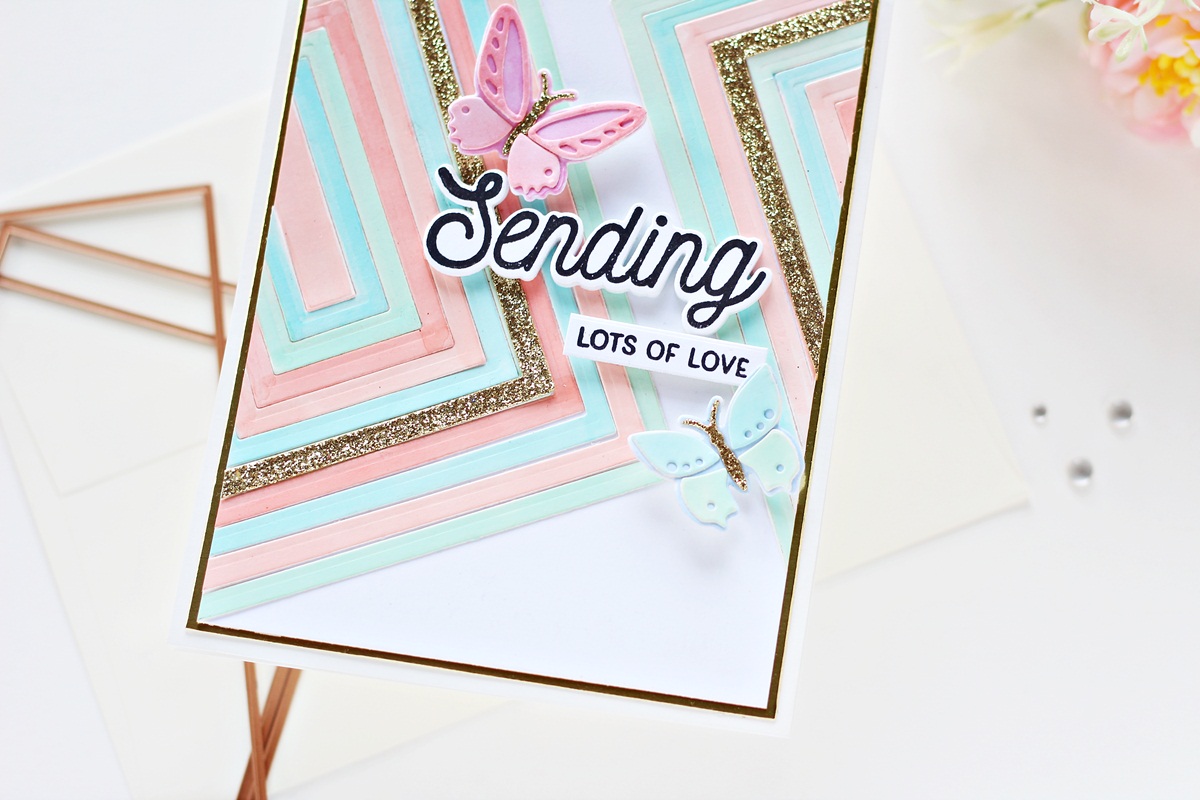
Then, to embellish my card, front I die cut Snowdrift Cardstock using the butterfly dies from the Butterfly Bliss Garden Shutters 5 x 7″ Card Base Etched Die Set. I used Copic Markers to color and shade the die-cut pieces, but you can also cut out the pieces from colored cardstock and assemble them together. I also die-cut the body of the butterflies from Gold Glitter Cardstock for interest. Next, I stamped the sentiment from Sending You stamp set in Versafine Onyx Black ink onto Snowdrift Cardstock and cut it out with one of the coordinating dies. I popped in onto my panel using foam adhesive for dimension. Once that was done, I stamped the accompanying sentiment from the same stamp set onto a strip of Snowdrift Cardstock using Versafine Onyx Black ink and popped it onto my panel using foam adhesive too. I really love how easy and fun this was to make!
Spellbinders Supplies:

Other Supplies
Neenah Solar White Cardstock, Navy Blue Cardstock, Copic Markers, Versafine Onyx Black Ink, MISTI Stamping Tool, Tape Runner, Foam Adhesive, Gold Glitter Cardstock.
I hope you enjoyed this trio of floral cards featuring the Precision Layering Basics Collection. The dies in the collection are truly versatile and would be a great addition to your craft room! Thank you so much for stopping by today! You can find more inspiration over at my Blog or Instagram page.
Hussena Calcuttawala
'Hello! My name is Hussena, and I live in Kolkata, India. I am a stay at home mum of two kids and have been crafting for over five years now. I started my creative journey with paper quilling and since then have dabbled in various paper crafting forms like punch craft, die cutting, and more recently stamping. I am an ardent floral fan and you will find me using florals on almost all my creations. I love working with dies, especially floral and intricate ones, as they offer me various possibilities. I also love to create my own handmade flowers, and this is one of the reasons why I am drawn to Spellbinders dies. You can find my work on my blog: Quill and Punch Works
One Comment
MaryH
Wonderful cards and great step-by-step tutorials. You are a wiz at flowers, layouts, and color choices! Enjoy viewing your crafting results very much. Look forward to your next tutorial!