
Susan’s Garden Favorites Collection – Card Inspiration with Annie Williams
Hi there, this is Annie Williams and I’m excited to be back on the blog today to share a couple of projects using the new Susan’s Garden Favorites Collection by Susan Tierney-Cockburn. There are so many different gorgeous blooms you can mold with this collection, but I picked a handful of my favorites to create these three colorful springtime cards for a variety of occasions.

Sunflowers and Ladybugs Card
Sunflowers are easily one of my favorite flowers and I was thrilled that Susan made a beautiful die set to help me create them out of paper. Here I added a bright basket and a pretty background for this cheery birthday card.

Step by Step Instructions:
- Die-cut Susan’s Garden Specialty Cardstock using the Sunflower Petals and Flower Center dies from the Sunflowers and Ladybugs Die Set.
- Color the pieces with yellow and orange Copic markers and shape them with tweezers and a small ball stylus.
- Add orange or yellow pollen to the tips of the flower centers.
- Die-cut Fern Cardstock several times with the Leaf Die. Blend Rustic Wilderness Distress Ink around the edges and shape them with the leaf tool and small ball stylus.
- Die-cut Timber Cardstock several times with the Seeds Die and shape them with a ball stylus.
- Assemble the flowers with liquid glue and add brown prills to the centers for more texture.
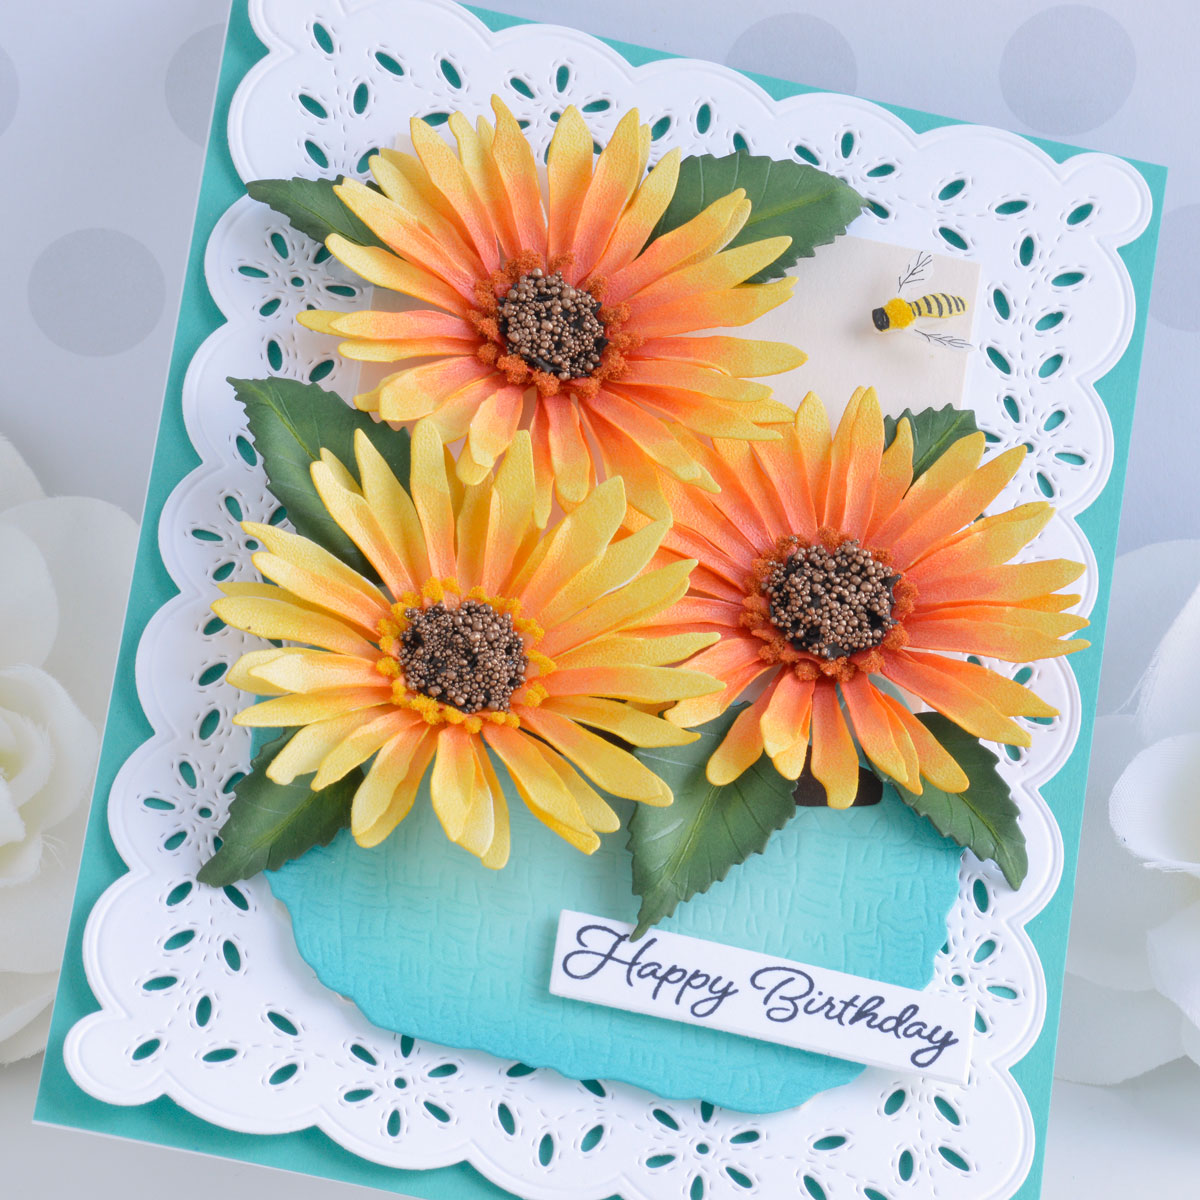
- Die-cut white cardstock with the Scallop Rim and Outer Lace Eyelet Dies and Barely Peach Cardstock with the Outer Rectangle Outline Die from the Eyelet Lace Frame Die Set.
- Trim a piece of Lagoon Cardstock to 5” x 7” and adhere it to a top-folding A7-sized white card base. Adhere the rectangular panel to the lace border with tape runner, then pop the background up on top of the card base with foam adhesive.
- Die cut Waterfall Cardstock with the Gathering Basket Die. Blend Salvaged Patina and Mermaid Lagoon Distress Inks around the edges to give it a little dimension.
- Adhere the basket to the bottom of the card front with foam adhesive.
- Arrange the flowers and leaves above the basket and add to the card front using hot glue.
- Stamp a sentiment from the Garden Favorites Sentiments Stamp Set onto white cardstock and trim out into a strip. Pop the sentiment up in the lower right corner of the card.
- Die cut Susan’s Garden Specialty Cardstock and vellum using the Honey Bee Die from the Daffodil/Narcissus with Antique Vase Die Set. Color the specialty cardstock with Copic markers, trim off the wings, and adhere on top of the vellum layer. Add yellow pollen to the bee’s back and pop it up in the upper right corner of the card.
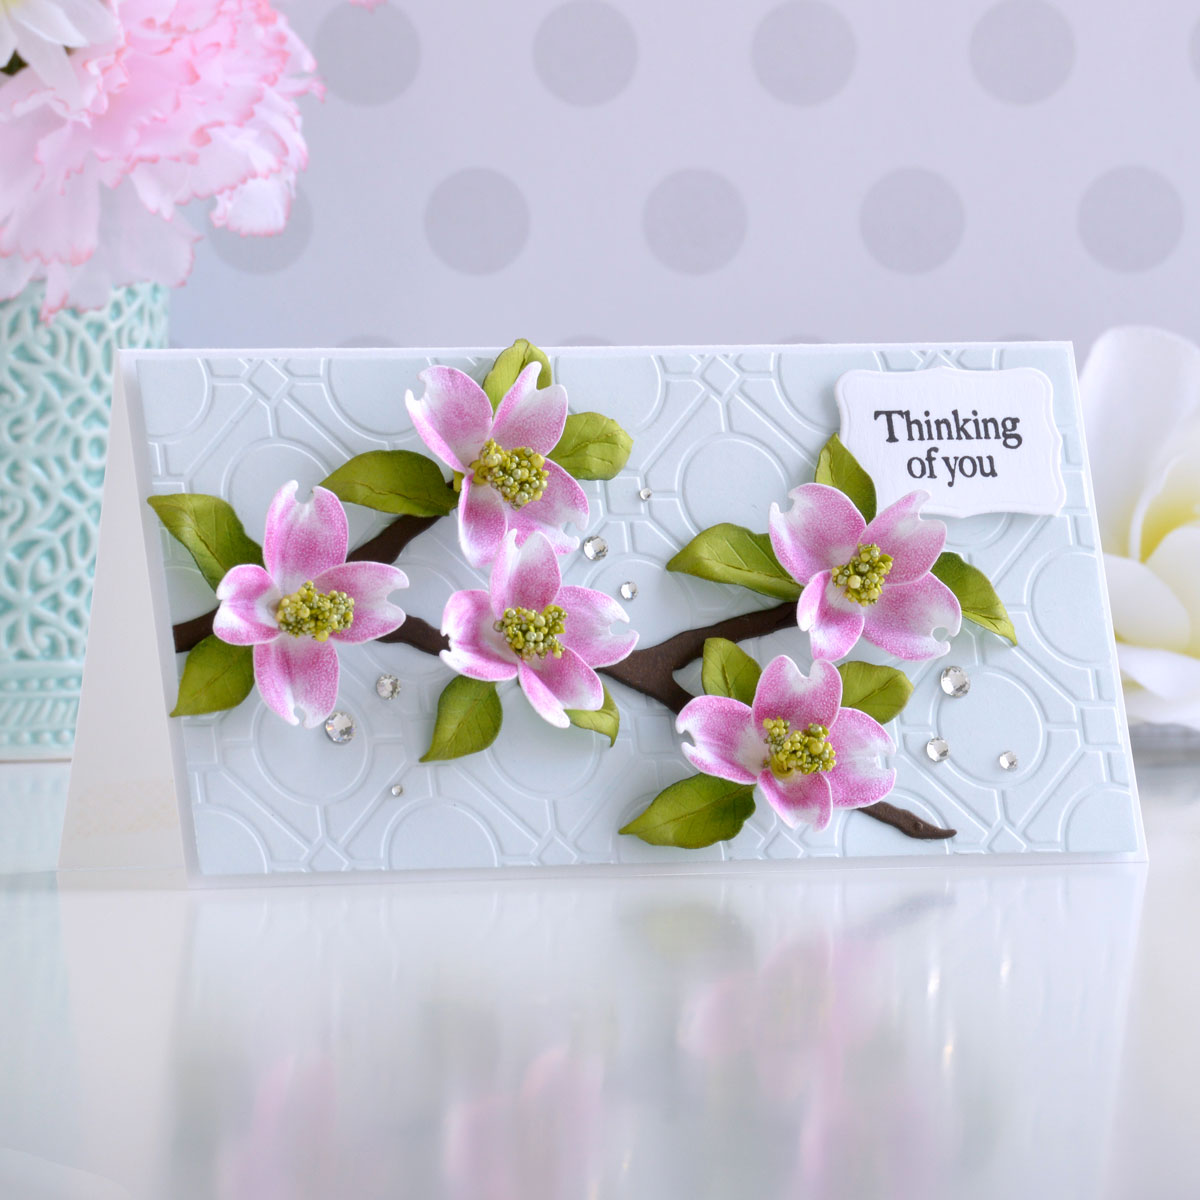
Dogwood Card
When the dogwoods bloom in my neck of the woods, it really starts to signal that spring has come. I thought a pretty pink dogwood branch was the perfect way to let someone know I’m thinking of them this time of year.
Step by Step Instructions:
- Die cut Susan’s Garden Specialty Cardstock using the Blossom Petals Dies from the Dogwood Die Set. Add a bit of pink to just the centers of each petal (avoiding the very center of the die-cut and the petal tips) with magenta PanPastel and shape them with a loop tool and tweezers.
- Die cut Timber Cardstock twice with the Branch Die. Add a bit of shading on the underside with Ground Espresso Distress Ink and glue the two die-cuts together to form a longer branch.
- Die cut Rainforest Cardstock with the Leaf and Calyx Dies and Peridot Cardstock with the Stamen Die. Shade the leaves with Mowed Lawn Distress Ink and shape with the leaf tool and ball stylus.
- Roll the stamens up with liquid glue and add green prills to the tips.
- Assemble the flowers with liquid glue.
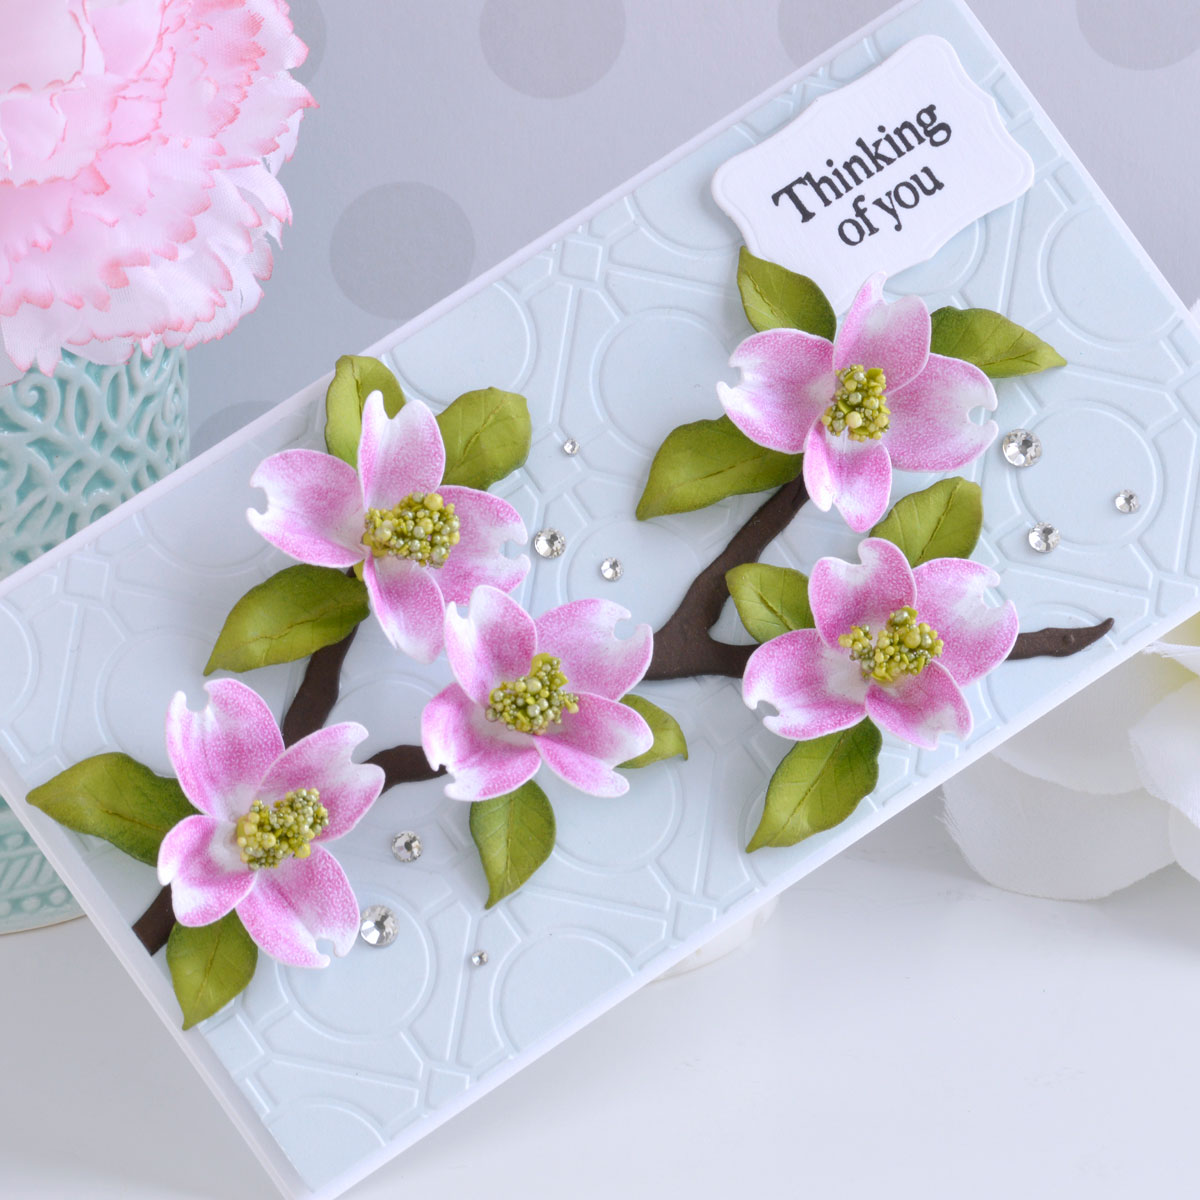
- Die cut a piece of Glacier Cardstock with the largest die from the Precision Layering Mini Slimline B Die Set.
- Emboss the panel using the Geo Screen Embossing Folder and adhere it to a top-folding mini slimline-sized white card base with foam adhesive.
- Stamp a sentiment from the Garden Favorites Sentiments Stamp Set onto white cardstock and cut it out using the smallest rim die from the Essential Label Die Set.
- Adhere the branch to the card front with liquid glue and add the calyxes to the branch where you would like your flowers to go.
- Add the flowers with more liquid glue to the calyxes and adhere several leaves around each bloom.
- Pop the sentiment up in the top right corner and add Silver Mix Gems to embellish.
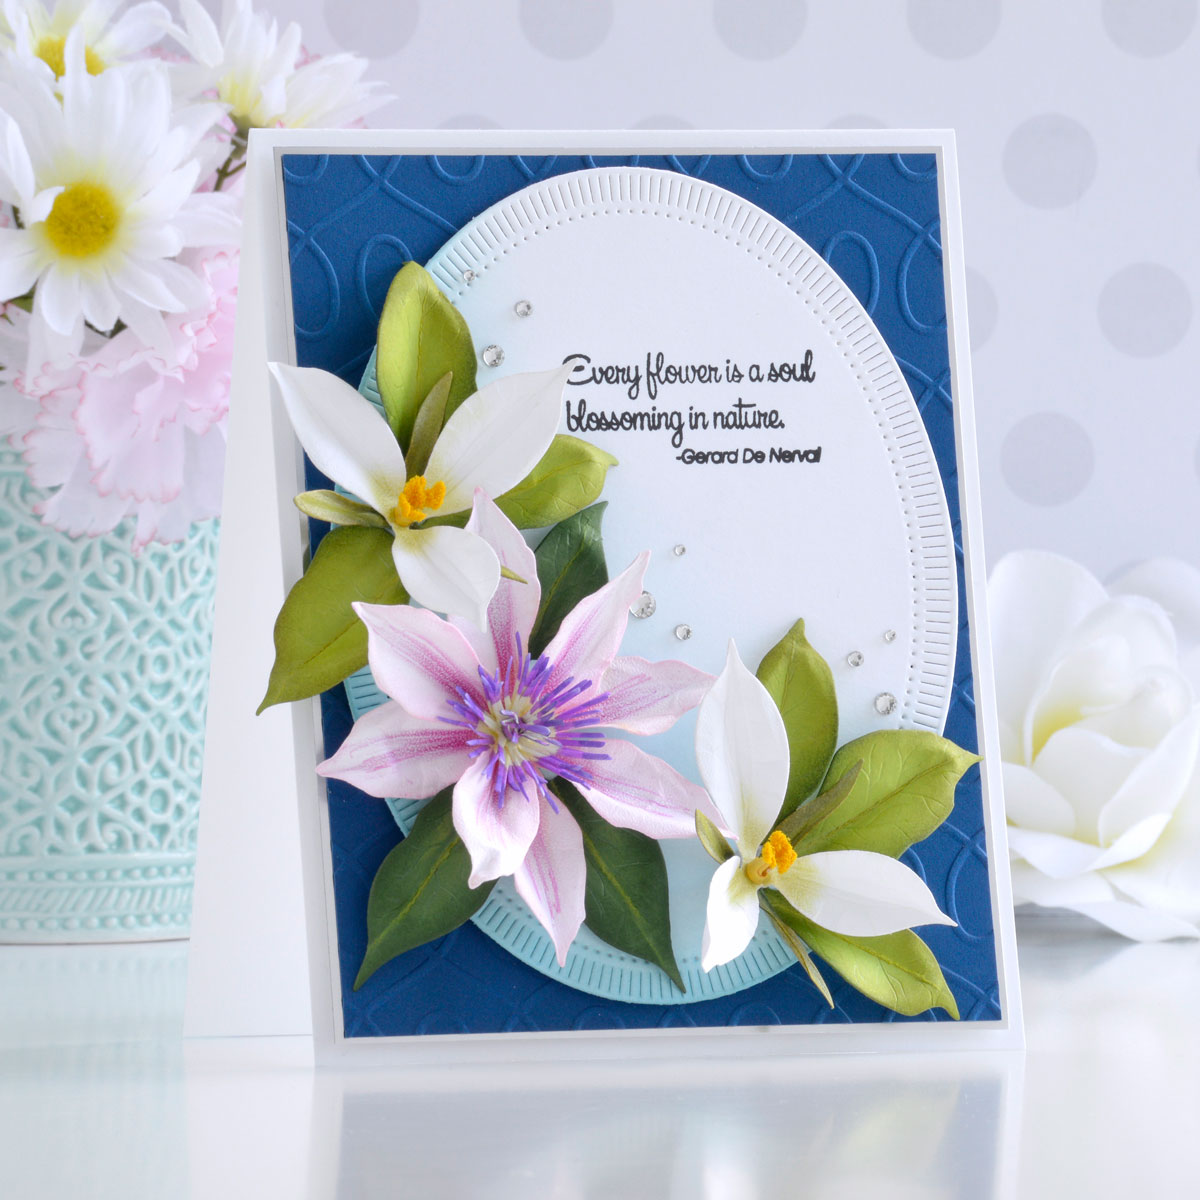
Trillium and Clematis Card
For this last card, I wanted to create a small mixed bouquet with some of the other blooms in the collection. I chose the Trillium and Clematis die sets and opted for a simple background for this colorful springtime card perfect for a friend.
Step by Step Instructions:
- Die-cut Susan’s Garden Specialty Cardstock with the Petals and Sepal Dies from the Trillium Die Set and the Petals, Corona Filament, and Stamen Dies from the Clematis Die Set.
- Shade the center of the trillium petals with a light green PanPastel and shape with a loop tool and tweezers. Color the sepal with Copic markers and shape with tweezers.
- Die-cut Beeswax Cardstock with the Stamen die from the Trillium Die Set. Roll the stamen using liquid glue and add yellow pollen to the tips. Assemble the Trillium bloom with liquid glue.
- Blend Kitsch Flamingo Distress Ink around the edges of the Clematis Petals and add a touch of Magenta PanPastel to the center of each petal. Shape with a loop tool and tweezers. Color the Corona Filament and Stamen with Copic markers, shape, and assemble the Clematis bloom with liquid glue.
- Die-cut Fern Cardstock with the leaf die from the Clematis Die Set and Rainforest Cardstock with the leaf die from the Trillium Die Set. Blend a little Mowed Lawn Distress Ink on the edges and shape the leaves with a leaf tool and small ball stylus.
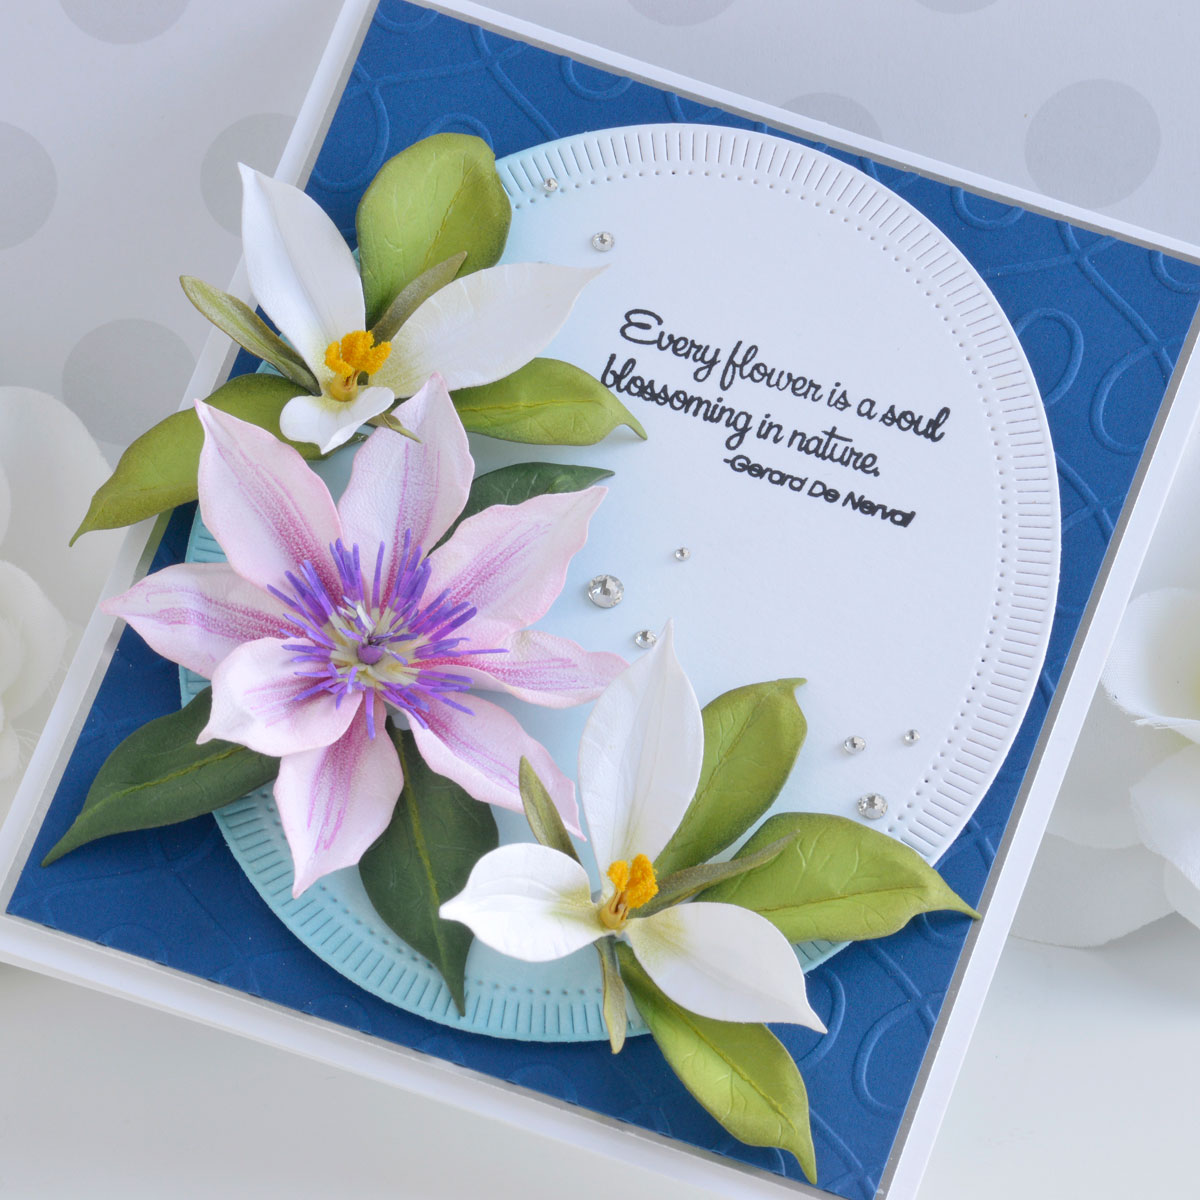
- Trim a piece of Cosmic Sky Cardstock to 4.5” x 5.75” and emboss it using the Loops Embossing Folder.
- Mat the panel with Mirror Silver Cardstock and adhere it to a top-folding white card base measuring 5” x 6.25” with foam adhesive.
- Stamp a sentiment from the Garden Favorites Sentiments Stamp Set onto white cardstock and cut it out using the largest die from the Fluted Classic Ovals Die Set so that it is positioned in the top right of the panel.
- Blend a little Tumbled Glass Distress Ink in the lower-left corner of the sentiment panel and then pop it up on top of the card front with foam adhesive.
- Arrange the flowers and leaves in the lower-left corner of the card and adhere them down with hot glue.
- Add Silver Mix Gems to embellish.
Spellbinders Supplies:

Other supplies
White heavyweight cardstock, vellum, Versafine Clair Nocturne Ink, Light Green, and Magenta PanPastel, Copic markers, Kitsch Flamingo, Salvaged Patina, Rustic Wilderness, Mermaid Lagoon, Tumbled Glass, Ground Espresso, and Mowed Lawn Distress Ink, blending brush, hot glue, tape runner, foam adhesive

I hope you enjoyed this trio of bright springtime cards and thanks so much for stopping by today. You can find more inspiration over at my blog AnnieBWills.com.
One Comment
Jani Howe
re: Annie Williams cards today. The ‘cards’ are very beautiful, but I do get annoyed thinking how the heck would you put such a thing in an envelope and expect it to arrive the other end looking the same? Does ANYBODY out there put their cards in BOXES to mail to friends? With today’s postage???? Sigh.