Color Block Backgrounds 3 Ways with Annie Williams
Hi there, this is Annie Williams and I’m thrilled to be back on the blog today to share a couple of projects using the new Color Block Backgrounds Collection from Spellbinders. The bold and versatile dies in this collection inspired me to create three cards with fun backgrounds for a variety of occasions.
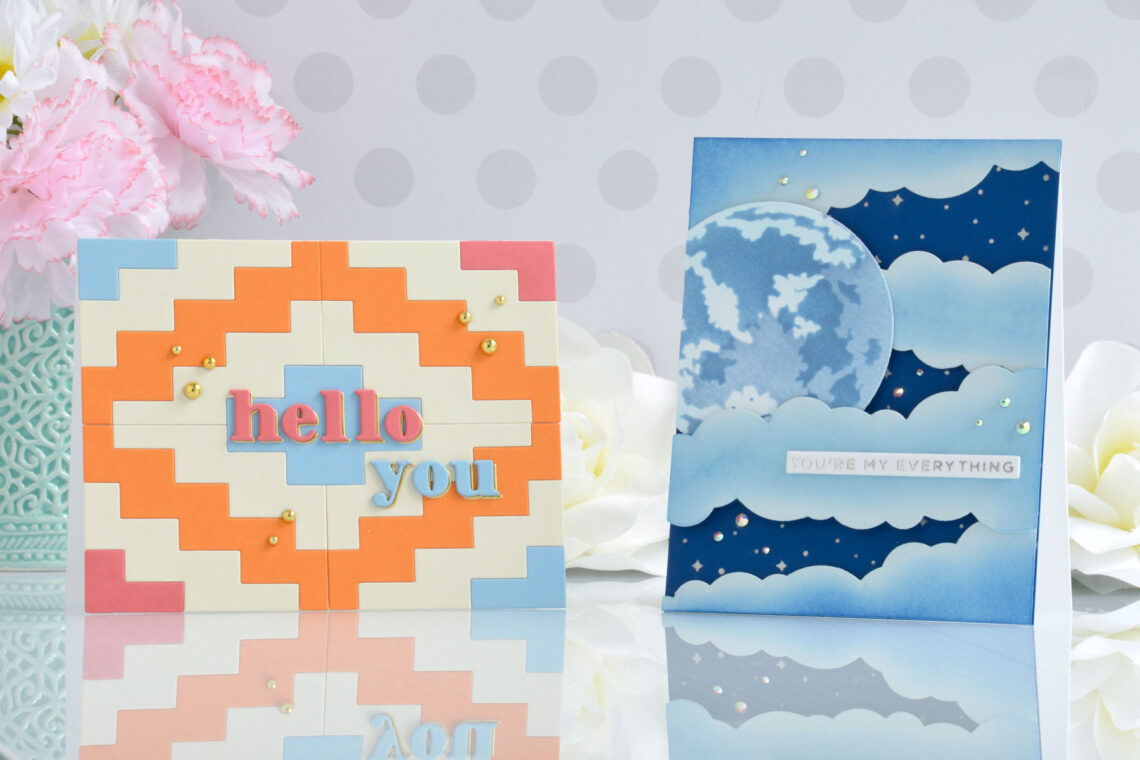
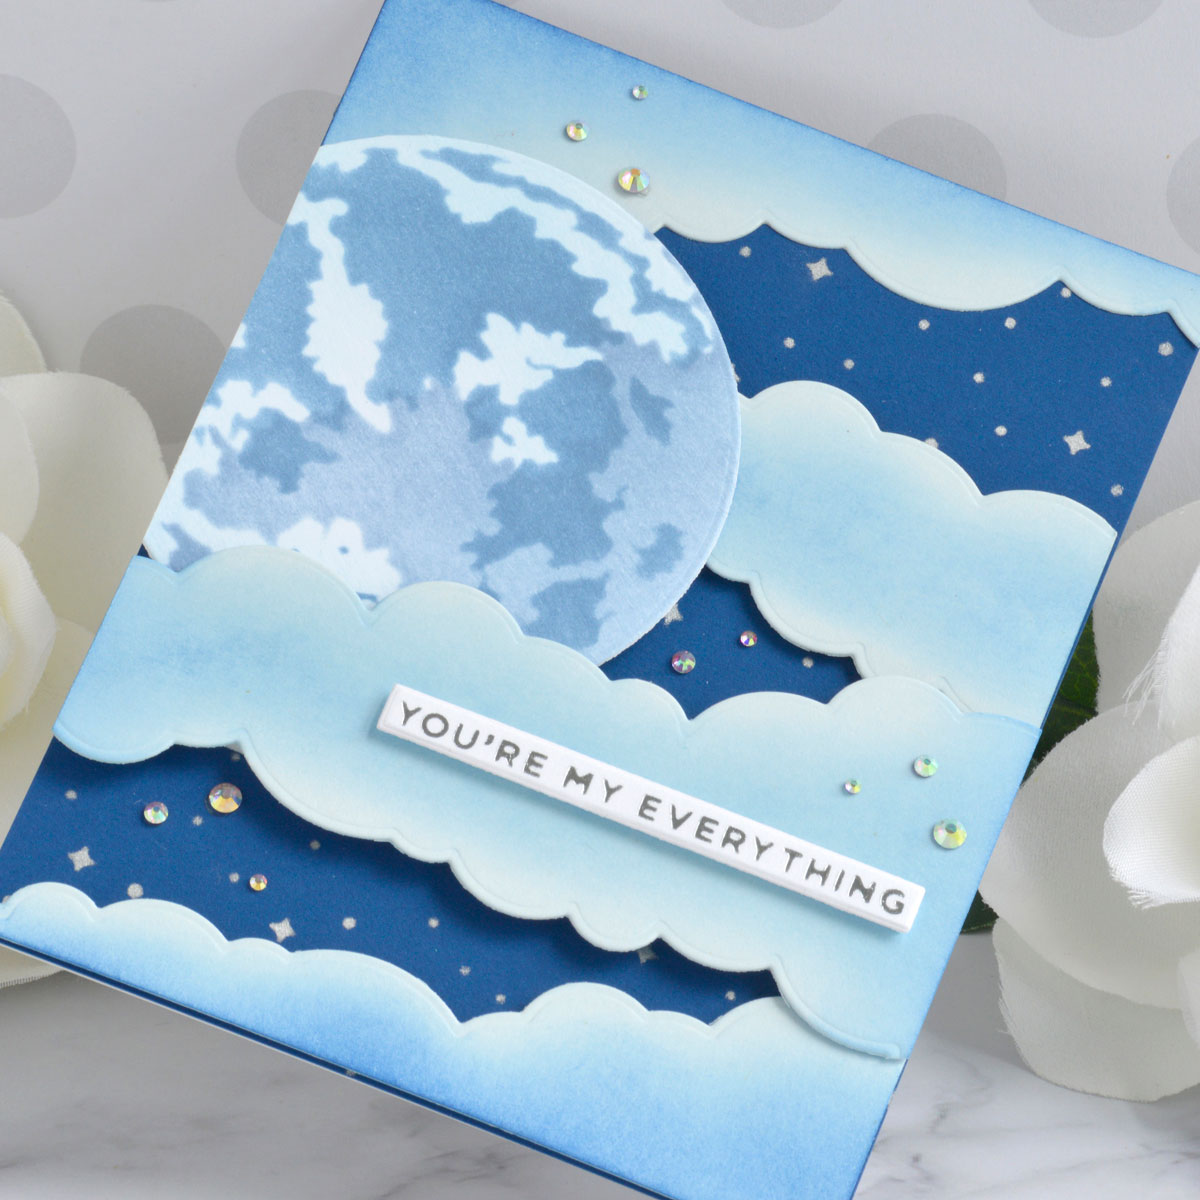
Color Blog Cloudscape
All of the different cloud formations in the Color Block Cloudscape Die Set had me imagining a dreamy night sky. I added layers of wispy clouds to a blue moon and sparkly sky for this pretty and fun love card.

- Trim a piece of Cosmic Sky Cardstock to 4.25” x 5.5”. Apply silver metallic ink through the All The Stars Stencil onto the panel and set aside to dry.
- Using the Layered Full Moon Stencil Set, apply Tumbled Glass, Stormy Sky, and Faded Jeans Distress Ink onto white cardstock with a blending brush. Cut the moon out using the second largest die from the Essential Circles Die Set.
- Trim a piece of Glacier Cardstock to 4.25” x 5.5” and then die cut several cloud strips from the panel using the Color Block Cloudscape Die Set.
- Blend a bit of Prize Ribbon Distress Ink onto the cloud die-cuts with a blending brush, leaving the edges unlinked.
- Apply Silver Hot Foil to white cardstock using one of the sentiments from the Mini Everyday Greetings Foil Plate Set and the Glimmer Hot Foil Machine. Cut it out with the coordinating die.
- Add the stenciled background to a top-folding A2-sized white card base with a tape runner.
- Arrange the moon and clouds on the card front and adhere down with foam adhesive and liquid glue for lots of dimension.
- Pop the sentiment up on top of the card with more foam adhesive.
- Embellish with Crystal Mix Gems.
Spellbinders Supplies:

Other Supplies
Heavyweight white cardstock, silver metallic ink, Tumbled Glass, Stormy Sky, Faded Jeans, and Prize Ribbon Distress Inks, blending brushes, tape runner, foam adhesive
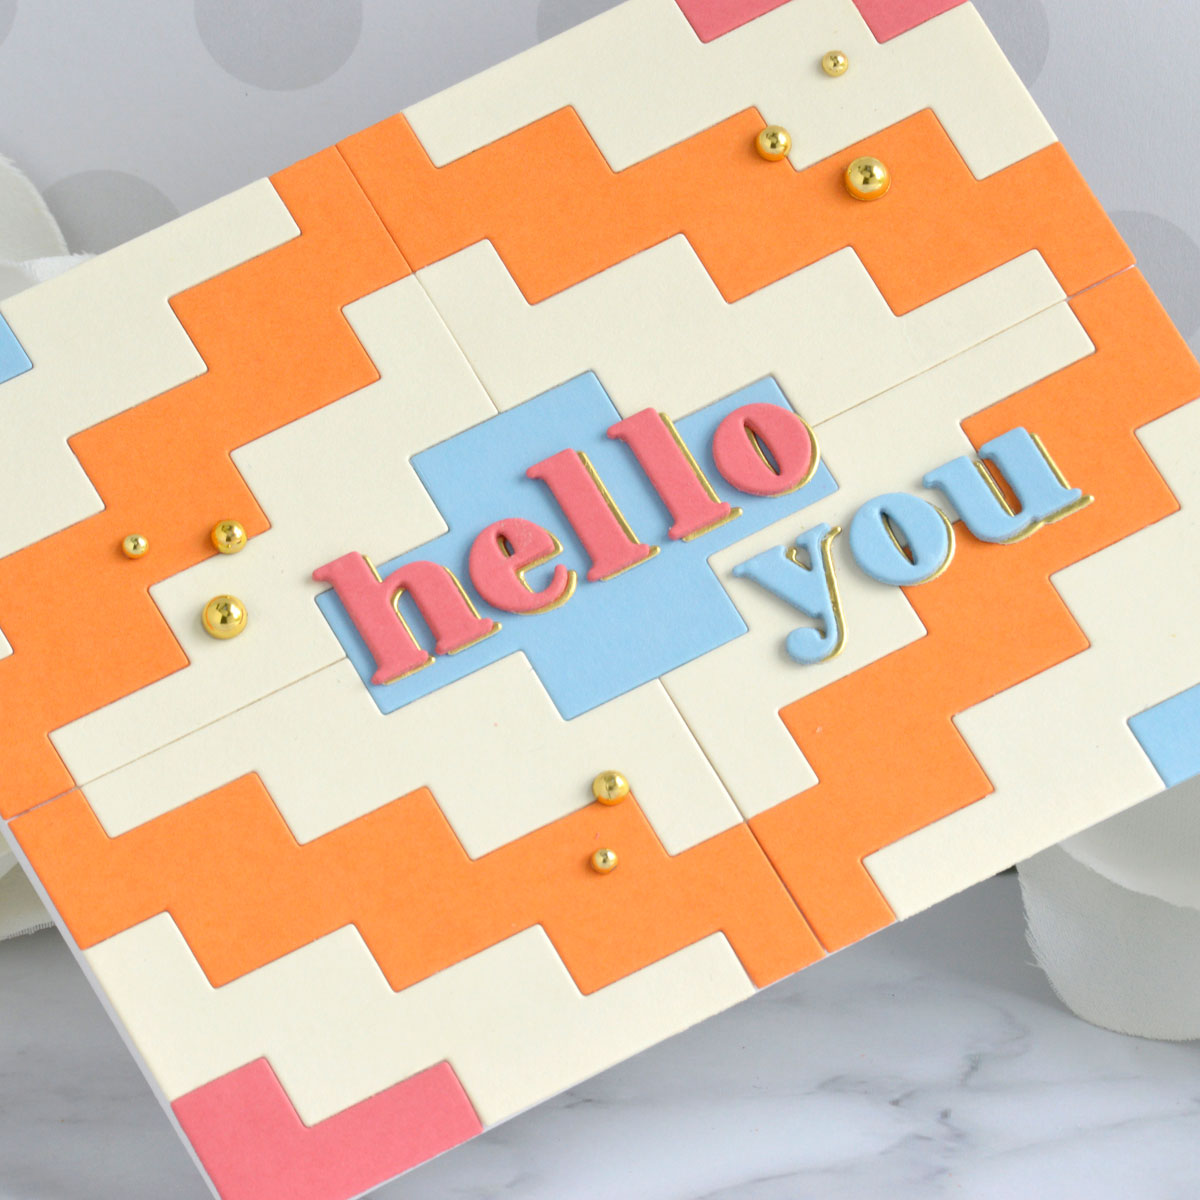
Color Block Southwest
The Color Block Southwest Die makes it so easy to create eye-catching cards fast. Here I’ve used some bright colors along with a simple greeting for this quick hello card.

- Die-cut Persimmon, Alabaster, Raindrop, and Dahlia Cardstock using the Color Block Southwest Die.
- Add adhesive all over the front of a top-folding A2-sized white card base (I like to cover the cardstock with a wide double-sided adhesive) and piece the background back together, alternating colors.
- Die-cut Dahlia and Raindrop Cardstock three times using the Be Bold Lowercase Alphabet Die Set and once using Mirror Gold Cardstock to spell the greeting.
- Adhere the three colored layers together with liquid glue, then add the gold layer to the back so that it peeks out a bit as a shadow.
- Add the sentiment to the center of the card front with liquid glue.
- Embellish with Fashion Gold Embellishments.
Spellbinders Supplies:
Other supplies
White heavyweight cardstock, double-sided adhesive
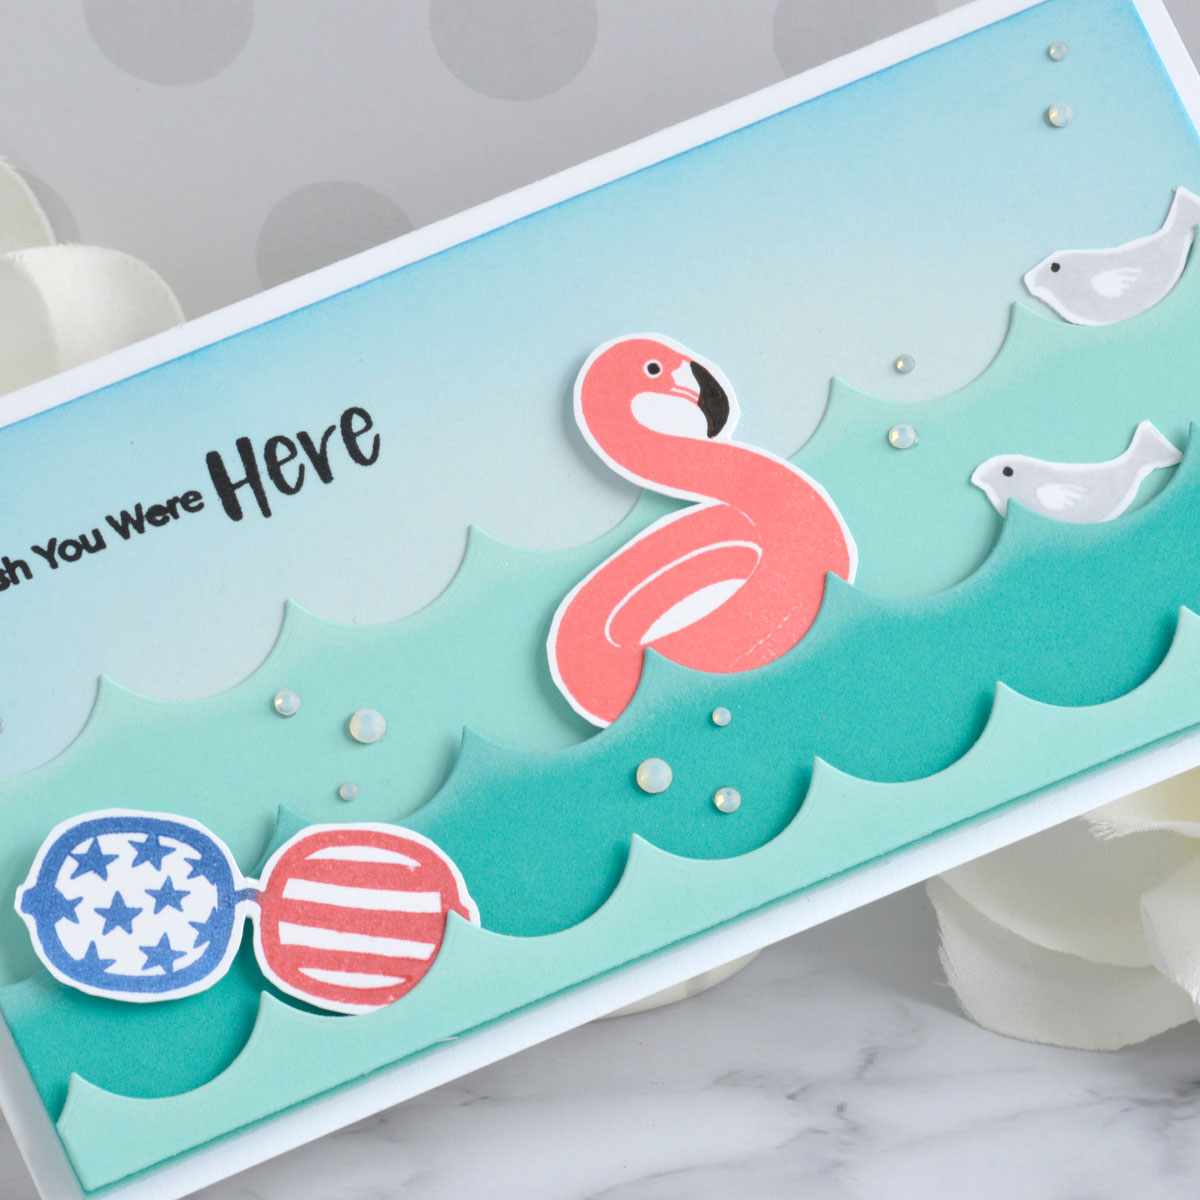
Color Block Slimline Edges
The Color Block Slimline Edges Die Set creates some beautiful scalloped and zigzag designs, but I thought it would work great for waves as well. Here I added some fun stamped images to my ocean scene for this fun summertime mini slimline card.
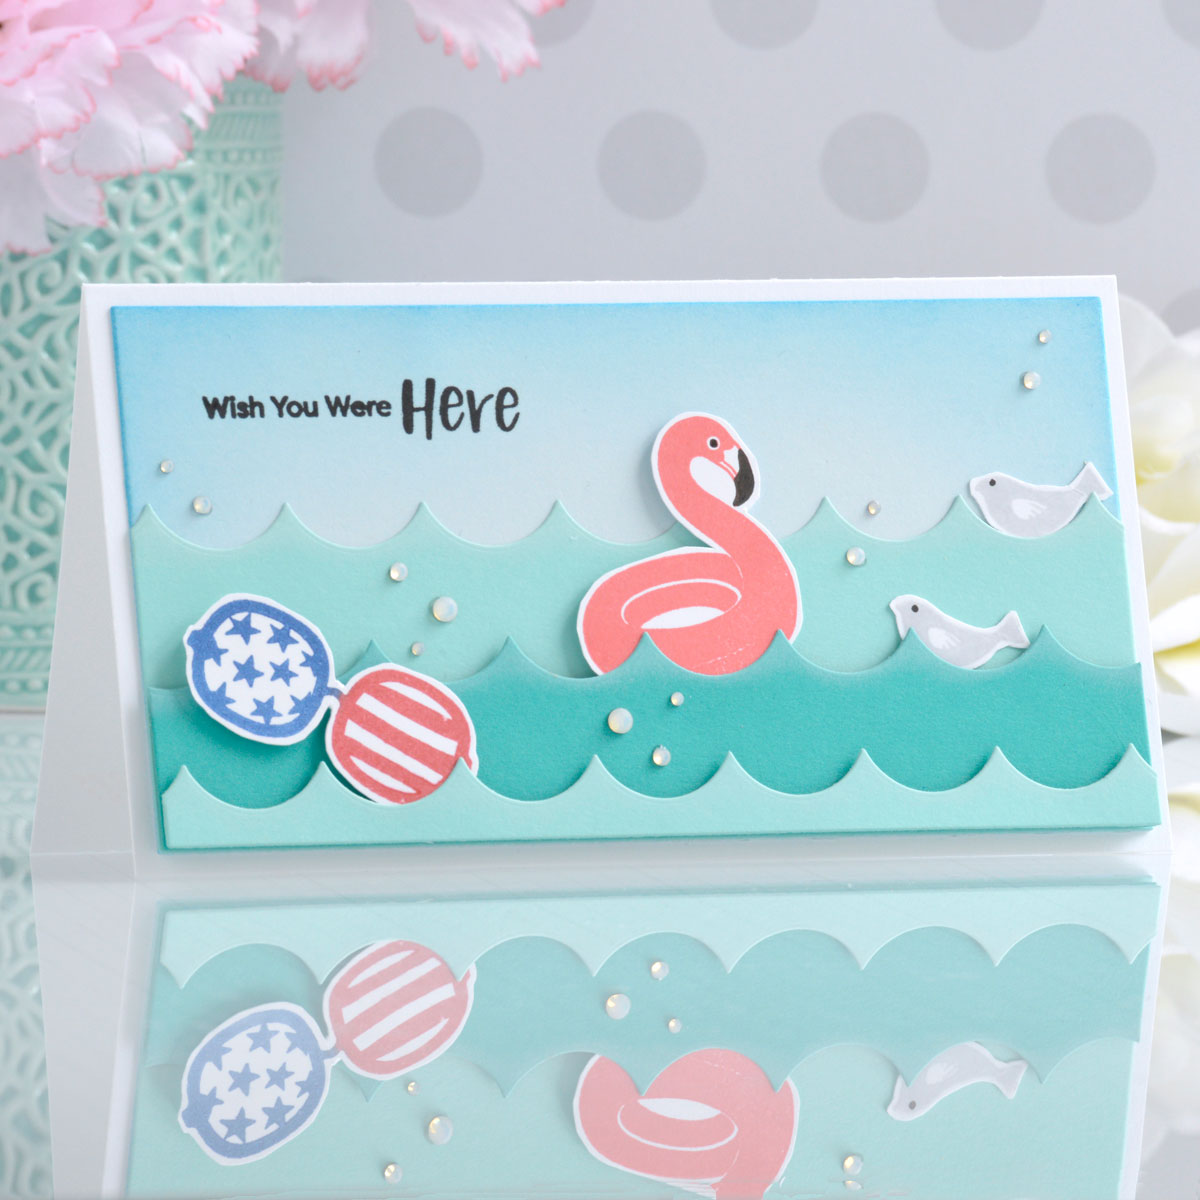
- Die-cut a piece of Glacier Cardstock using the largest die from the Precision Layering Mini Slimline A Die Set.
- Stamp a greeting from the Many Greetings Stamp Set in the upper left corner using black ink.
- Blend Salty Ocean Distress Ink around the edges with a blending brush for a little depth.
- Die-cut Waterfall and Teal Topaz Cardstock with the largest die from the Precision Layering Mini Slimline A Die Set.
- Die-cut each panel once more using the scalloped edge die from the Color Block Slimline Edges Die Set to create three-wave borders of different heights.
- Apply white pigment ink to the tips of the waves to look like sea foam.
- Stamp the flamingo, sunglasses, and bird images from the Many Greetings Stamp Set onto white cardstock using various colored inks and fussy cut them out with scissors.
- Add black details to the stamped images with a Copic multiliner pen.
- Adhere the background panel to a top-folding white card base measuring 3.5” x 6.5” with a tape runner.
- Pop the wave layers up on top of the card front with foam adhesive and add the stamped images behind each layer.
- Embellish with Crystal Mix Gems.
Spellbinders Supplies:
Other supplies
White heavyweight cardstock, Versafine Clair Nocturne Ink, white pigment ink, Salty Ocean Distress Ink, LDRS Creative Tickled Pink, Dark Wash Jeans, Kiss Me Red, and Alloy Hybrid Inks, black Copic Multiliner pen, tape runner, foam adhesive
Annie-Williams-2022-Color-Block-Background-Collection-11
I hope you enjoyed these easy and fun cards and thanks so much for stopping by today. You can find more inspiration over at my blog AnnieBWills.com.
Wings of Love Inspiration | Mom Card with Joni
January 2019 Large Die of the Month is Here – Cherish!